background image

7

Montage

Mechanical installation

Einbau der Mitteltöner

Bietet Ihr Fahrzeug serienmäßig keine Einbau-

plätze für Mitteltöner, können Sie diese z.B. 

flach in Ihr Armaturenbrett verbauen. Dies erfor-

dert, dass Sie eine Montageöffnung im Einbau-

durchmesser des Mitteltöners, in das Armatu-

renbrett einbringen. Kontrollieren Sie vorher ob 

genügend Einbautiefe vorhanden ist und sich 

keine wichtigen Baugruppen darunter befinden. 

Wählen Sie einen Platz maximal links bzw. ma-

ximal rechts in den Ecken für die bestmögliche 

Stereoabbildung. 

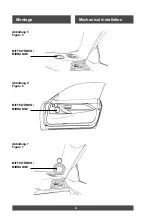
Siehe Abbildung 5

Eine weitere Möglichkeit ist der Einbau im obe-

ren Bereich der Türverkleidung. Achten Sie 

auch hier auf ausreichende Einbautiefe und 

kontrollieren Sie vor dem Einbringen der Monta-

geöffnung, ob sich keine elektro-mechanischen 

Bauteile in der Nähe des Einbauplatzes befin-

den. 

Siehe Abbildung 6

Ebenfalls sehr beliebt ist es, den Mitteltöner di-

rekt ausgerichtet, in die A-Säule oder das Spie-

geldreieck zu intergrieren. Unter Zuhilfenahme 

von Glasfaserspachtel und Metalladaptern 

(nicht im Lieferumfang enthalten), können Sie 

den Mitteltöner, optisch und akustisch integrie-

ren. Volumina ab 0,5 l sind anzustreben. 

Siehe Abbildung 7


Installation midrange driver

If your vehicle does not offer any standard in-

stallation spaces for midrange drivers, you can 

install them flat in your dashboard, for example. 

This requires that you insert a mounting hole in 

the mounting diameter of the midrange driver 

into the dashboard. Check beforehand whether 

sufficient  installation  depth  is  available  and 

whether there are no important components un-

derneath. Select a maximum left or maximum 

right seat in the corners for the best possible 

stereo imaging. 

See figure 5

Another possibility is the installation in the upper 

part of the door panel. Here, too, ensure suffi-

cient installation depth and check that there are 

no electro-mechanical components in the vici-

nity of the installation site before inserting the 

installation opening. 

See figure 6

It is also very popular to integrate the midran-

ge driver directly into the A-pillar or the mirror 

triangle. You can integrate the midrange driver 

optically and acoustically with the aid of a glass 

fibre spatula and metal adapters (not included). 

Volumes from 0.5 l should be aimed for. 

See figure 7

ACHTUNG!  Bei  A-Säulen  integrierten 

Airbag-Systemen, darf in A-Säulen kei-

ne Lautsprecher integriert oder mon-

tiert werden! 

ATTENTION: With A-pillar integrated 

airbag systems, no loudspeakers may 

be integrated or mounted in A-pillars! 

Summary of Contents for PRS 165.2

Page 1: ...INSTRUCTION MANUAL EINBAU ANLEITUNG V 22 686 2 WEGE SYSTEM 2 WAY SYSTEM PRS 165 2 PRS 165 2 3 WEGE SYSTEM 3 WAY SYSTEM PRS 165 3 PRS 165 3 ...

Page 2: ...utsprecher 3 Elektrischer Anschluss 9 Anschlussdiagramm 12 Technische Daten 14 Introduction 1 Safety instructions 2 Mechanical installation 3 Electrical installation 9 Wiring diagram 12 Technical data 14 ETON expressly thanks you for deciding to purchase this system and congratulates you on the selection of this excellent product The ETON loudspeakers are a guarantee for outstanding performance Th...

Page 3: ...er Fahrt Gefahren auslösen ETON übernimmt keine Verantwortung für Gehörschäden körperliche Schäden oder Sachschäden die aus dem Gebrauch oder Missbrauch seiner Produkte entstehen Attention Please read all warnings found in this manual This information is highlighted and included to inform you of the potential danger of personal injury or damage to property Hearing Damage CONTINOUS EXPOSURE TO SOUN...

Page 4: ...Vermei den Sie Plätze hinter dicken Stoffen Dies kann besonders bei Hochtönern den Klang und die Lautstärke beeinträchtigen Zu nahe Montage der Hochtöner an reflektie renden Flächen kann den Stereoeffekt beein trächtigen Jedes Mittel Tieftöner Paar sowie Hochtöner Paar sollte nicht weiter als 60 cm auseinander liegen Wenn Sie zuerst die Mittel und Tieftöner montieren und dieAnschlusskabel verlegen...

Page 5: ...arts window window regulator handle are restricted in their functionality Einbau der Mittel Tieftöner Können Sie den Lautsprecher nicht am Ori ginal Einbauplatz montieren ist der allgemein meistgenutzte Ort die Türverkleidung Installation of mid woofer If is not possible to install the loudspeaker in the original factory speaker location the most used position is in the door panel Vorsicht beim En...

Page 6: ...oben entnehmen Aufbau Bohren Sie unter Zuhilfenahme des Aufbaugehäuses zwei Löcher für die Befesti gungsschrauben und ein Loch für das zufüh rende Anschlusskabel Beachten Sie dabei die von Ihnen gewünschte Neigung des Auf baugehäuses Montieren Sie die Teile wie in Abbildung 4 gezeigt Surface mounting Drill two holes for the fastening screws and one hole for the leading connector cable using the mo...

Page 7: ...tteltongehäusen oder dem Armaturenbrett Achten Sie bei der Monta ge des Dämmmaterials darauf dass die Funk tion von Airbagsystemen nicht beeinflusst wird TIP For an optimal acoustic result all loudspea kers must be firmly screwed together The cladding parts in the loudspeaker assembly area should also be damped e g by using ETON Noisekill insulation material This ap plies equally to door panels an...

Page 8: ...eben Siehe Abbildung 7 Installation midrange driver If your vehicle does not offer any standard in stallation spaces for midrange drivers you can install them flat in your dashboard for example This requires that you insert a mounting hole in the mounting diameter of the midrange driver into the dashboard Check beforehand whether sufficient installation depth is available and whether there are no ...

Page 9: ...8 Montage Mechanical installation Abbildung 7 Figure 7 Abbildung 6 Figure 6 Abbildung 5 Figure 5 MITTELTÖNER MIDRANGE MITTELTÖNER MIDRANGE MITTELTÖNER MIDRANGE ...

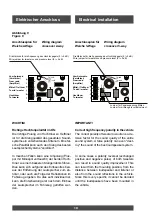
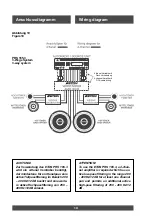
Page 10: ...Fahrzeug Batterie wieder anklemmen und das Lautsprecher System testen Replace the automobile battery connector and test the loudspeaker system The tweeters should only be installed through a crossover You can adjust tweeter level via wire jumper which is located in the crossover housing Follow the wiring diagrams figures 8 and 9 to connect the loudspeaker system to your auto mobile radio and possi...

Page 11: ...roy the sound of the best loudspeaker system In some cases a polarity reversal exchanged positive and negative poles of both tweeters can result in sound quality improvement This can result from the mounting position from the distance between loudspeaker and listener or also from the sound reflections in the vehicle Since this is very specific it cannot be decided until the loudspeakers have been ...

Page 12: ...den Tipps Bei Dunkelheit oder mit geschlossenen Au gen lassen sich Hörunterschiede meist besser erkennen Wählen Sie eine komplexe instrumentale Mu sik mit mehreren akustischen Instrumenten für die Bewertung Evaluation of the correct high frequency polarity After the loudspeakers have been mounted in the vehicle they are connected with the inclu ded crossovers At first the crossover should be place...

Page 13: ...erstärker benötigt der mindestens für ein Kanalpaar eine aktive Tiefpassfilterung im Bereich 200 400 Hz 12 dB besitzt und eine weite re aktive Hochpassfilterung von 250 400 Hz 12 dB zulässt ATTENTION To use the ETON PRS 165 3 a 4 chan nel amplifier is required which has ac tive low pass filtering in the range 200 400 Hz 12 dB for at least one channel pair and permits an additional active high pass...

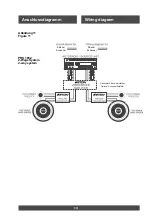
Page 14: ...13 Anschlussdiagramm Wiring diagram Abbildung 11 Figure 11 PRS 165 2 2 Wege System 2 way system Optionaler 2 Kanal Verstärker Optional 2 channel Amplifier 2 Kanal 2 channel 2 Kanal 2 channel ...

Page 15: ...ner 38 9 mm Einbaudurchmesser Mitteltöner 74 mm Außendurchmesser Mitteltöner 95 mm Model PRS 165 2 PRS 165 3 Nominal power 60 W Music power 90 W Cone material bass driver Glass fibre Cone material midrange driver Paper hand coated Tweeter material Silk dome Impedance 4 Ohm SPL 92 dB Tweeter outer diameter 34 mm Installation depth bass driver 65 mm Installation diameter bass driver 142 mm Outer dia...

Page 16: ...n Alle Rechte sind vorbehalten Die auch teilweise Vervielfältigung des vorliegenden Handbuchs ist untersagt ETON reserves the rigth to make modifications or improvements to the products illustrated without notice thereof All rights belong to the respective owners Total or partial reproduction of this User s Guide is prohibited ...

Reviews: