background image

ETAS

ES400 Product Family

ES441.1 - User Guide

14

3

ES400 Product Family 

This chapter contains information on the following topics:

• “Wiring Concepts in Test Vehicles” on page 14
• “Features of the ES400 Line” on page 15
• “Housing” on page 16
• “Ports” on page 17
• “LED” on page 18

3.1

Wiring Concepts in Test Vehicles

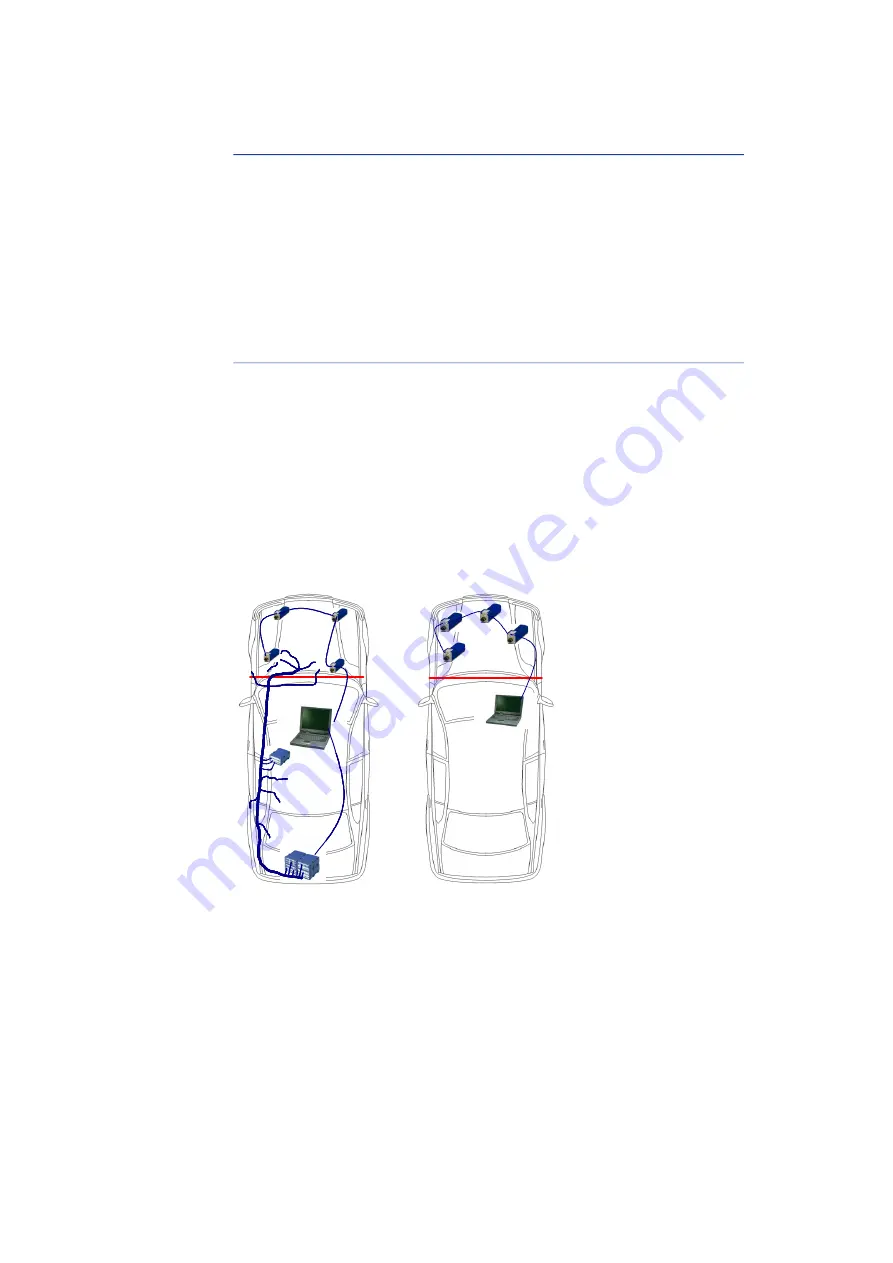
For the test phase, several hundred sensors must be installed in a test vehicle 
in various areas, e.g. in the engine compartment and in the floor area. The sen

-

sors, which are positioned all over the vehicle, then have to be connected to the 
measuring instruments of the test setup.
Today’s standard solutions with their central setup of measuring instruments 
inside the vehicle require complex cabling to connect the widely distributed 
sensors with the measuring instruments. Numerous, usually long connection 
cables between the sensors and the measuring instruments, bundled together 
to form several fat wiring harnesses, require a highly modified splash wall of 
the test vehicle. This involves long setting-up times as well as high costs. 

Fig. 3

-

1

Central and Decentral Sensor Cabling

With the ES400 modules, ETAS provides a decentral solution which consider

-

ably simplifies the test setup of the sensors. 
The basic idea of this concept is to install the modules of the ES400 family as 
close as possible to the sensors, to concatenate the modules with each other 
and to connect just the first module of this chain with the laptop in the vehicle.

Sensor 1

Sensor 2

Sensor 3

Sensor n

Sensor 1

Sensor 2

Sensor 3

Sensor n

Sensor 1

Sensor 2

Sensor 3

Sensor n

Sensor 1

Sensor 2

Sensor 3

Sensor n

Sensor 1

Sensor 2

Sensor 3

Sensor n

Summary of Contents for ES441.1

Page 1: ...ETAS ES441 1 Counter and Frequency Module with Sen sor Supply User Guide...

Page 2: ...single license Using and copying is only allowed in concurrence with the specifications stipu lated in the contract Under no circumstances may any part of this document be copied reproduced transmitte...

Page 3: ...oncept 15 3 2 2 Further Features 15 3 3 Housing 16 3 4 Ports 17 3 4 1 Sensor Port 17 3 4 2 Daisy Chain Ports IN OUT 17 3 5 LED 18 3 5 1 Operational State 18 3 5 2 Service State 18 3 5 3 Functional Sta...

Page 4: ...Signal 48 5 8 3 Measurement Modes with a Qualifying Signal 50 5 9 Frequency Measurement 51 5 9 1 Measurement Modes 51 5 9 2 Measurement Modes without a Qualifying Signal 52 5 9 3 Measurement Modes wi...

Page 5: ...ng 81 6 6 1 Sensor Port 81 6 6 2 Daisy Chain Ports IN OUT 81 7 Troubleshooting Problems 83 7 1 LED Displays 83 7 2 Troubleshooting ES441 1 Problems 83 7 3 Problems and Solutions 86 7 3 1 Network Adapt...

Page 6: ...305 1 Cable 111 9 2 Ethernet Cable 112 9 2 1 CBE400 2 Cable 112 9 2 2 CBE401 1 Cable 112 9 2 3 CBE430 1 Cable 113 9 2 4 CBE431 1 Cable 113 9 2 5 CBEX400 1 Cable 113 9 2 6 ES4xx_BRIDGE 114 9 3 Cable fo...

Page 7: ...steps for his are in a step by step guide Target definition 1 Step 1 2 Step 2 3 Step 3 Result DANGER indicates a hazardous situation with a high risk of death or serious injury if not avoided WARNING...

Page 8: ...ional cables and adapters can be obtained separately from ETAS A list of available accessories and their order designation is located in chapter Acces sories on page 120 of this manual or in the ETAS...

Page 9: ...he safety of systems that are using the product is the responsibility of the system integrator General safety at work The existing regulations for safety at work and accident prevention must be follow...

Page 10: ...apter Technical Data Do not apply any voltages to the connections of the module that do not correspond to the specifications of the respective connection Power supply The power supply for the product...

Page 11: ...Approved cables Use exclusively ETAS cables at the connections of the module Adhere to the maximum permissible cable lengths Do not use any damaged cables Cables may be repaired only by ETAS DANGER D...

Page 12: ...ssible via the shield of the connecting cables of the modules Install the modules only at locations with the same electrical potential or iso late the modules from the installation location CAUTION Da...

Page 13: ...product is maintenance free Repair If a repair of an ETAS hardware product should become necessary send the product to ETAS Cleaning the module housing Use a dry or lightly moistened soft lint free c...

Page 14: ...the widely distributed sensors with the measuring instruments Numerous usually long connection cables between the sensors and the measuring instruments bundled together to form several fat wiring har...

Page 15: ...of the ES400 line in addition to decentral cabling The ES400 modules have a very compact design Each module has an LED for localizing the module The Counter and Frequency Module with Sensor Supplys of...

Page 16: ...urdy metal housing is used for the ES441 1 it has ports on the front of the device so it can fit into tight spaces The ES441 1 is specifically designed to be installed in engine compartment but also i...

Page 17: ...rt is available for each sensor The use of a cable tail or whip solution with just one connector makes it possible to change the modules quickly within complex test setups 3 4 2 Daisy Chain Ports IN O...

Page 18: ...chain not initialized yet green illuminated semi bright Normal yellow illuminated semi bright At least one sensor supply voltage is activated green flashing 0 1 s on 1 9 s off Standby No Ethernet conn...

Page 19: ...ge 28 Configuration on page 31 Tool Integration on page 31 Firmware Update on page 31 Calibration on page 31 4 1 Features of the ES441 1 Fig 4 1 ES441 1 Housing The ES441 1 Counter and Frequency Modul...

Page 20: ...mum pulse width is limited to 120 ns This limitation avoids the acqui sition of interfering pulses on the measurement channels The input imped ance is greater than 2 M 4 3 1 Input Stage with Signal Ac...

Page 21: ...y Galvanic Isolation The measurement channels are galvanically isolated from each other and from the power supply Interfering Voltage Filter In the input stage an interfering voltage filter frees the...

Page 22: ...r supply voltage can be modified in steps The user can switch off the sensor supply voltage of each sensor channel in the application software select one of the defined values between 5 V and 15 V or...

Page 23: ...ictable time pattern The communication protocol used for the modules avoids repeated transfer of protocol data which takes place for example in handshake based systems This makes a high bandwidth avai...

Page 24: ...P header The Ethernet frames are transferred from module to module within the chain Each module in the chain receives bandwidth to transfer its measure data in freely selectable time slices assigned w...

Page 25: ...of the measure data of the ES4xx ES63x ES93x and ES600 modules used resulting from this makes precise analysis of the correlations of measure sig nals possible Synchronizing the Modules and INCA Signa...

Page 26: ...lly generates 216 65536 time slices each 100 microseconds long Modules 1 2 and 3 acquire measure ments with the same rate of 10 kHz each Module 1 Module 2 and Module 3 link their measurements to each...

Page 27: ...Ethernet frames each 100 microseconds long The ES400 mod ules 1 2 and 3 acquire measurements at a rate of 10 kHz 2 kHz and 5 kHz Module 1 links its measurements to each Ethernet frame module 2 to eve...

Page 28: ...les sufficient supply voltage in lon ger module chains In this application case you have to split the module chain Swap the existing connection cable between the two modules for a Y boost cable for ad...

Page 29: ...e module chain is longer than 8 modules without sensor feeding or is longer than 5modules with sensor feeding Example 4 With a minimum voltage of 7 7 V no additional feeding is necessary with a Y cabl...

Page 30: ...um voltage of 9 V no additional feeding is necessary with a Y cable if the module chain consists of the following modules five ES420 1 or ES421 1 and two ES415 1 with sensor feeding and one ES441 1 NO...

Page 31: ...nterface converters are necessary 4 8 Firmware Update The firmware of the module can be updated by the user so that future versions of the module can also be used The firmware update is done with the...

Page 32: ...variables such as temperature torque force pressure fluid level course distance and flow often need to be mea sured These non electrical physical variables are converted to electric signals using tran...

Page 33: ...Linearization of measure curves or all measure results Correction of measure errors Compensation of the non linearity of sensors Example flow sensor axle speed is not in proportion to the flow rate T...

Page 34: ...es follow one another The pulse of an input signal is either active or inactive An active pulse starts with an inactive active edge an inactive pulse starts with an active inactive edge Fig 5 2 Active...

Page 35: ...ycle Starting with an Active Inactive Edge and n 3 5 3 Signal Sampling 5 3 1 Sampling and Rates The sampling rate can be selected independently for every channel of the ES441 1 in fixed steps in the c...

Page 36: ...is used again 5 4 Overview of the Measuring Capabilities of the ES441 1 The ES441 1 module can acquire digital signals at the four input channels and evaluate these using various measuring capabiliti...

Page 37: ...active state by the value 0 or LOW Fig 5 8 Measuring the Active and Inactive State Fixed Measure Rate Which input channels of the ES441 1 state should be measured on can be specified in the calibratio...

Page 38: ...hannel is counted regardless of signals at other measurement channels see section 5 7 2 on page 39 All counter parameters can be configured freely in the calibration software Standard with Qualifying...

Page 39: ...odes in accordance with the configuration in the calibration software Counting the edges when the input signal changes from inactive to active state Counting the edges when the input signal changes fr...

Page 40: ...g point Counting Cycles Fig 5 12 Counting Cycles The counter is reset at every sampling point 5 7 3 Standard with Qualifying Signal Counter Mode Every measurement channel can be assigned any other mea...

Page 41: ...owing figures show examples of the Standard with qualifying signal counter mode Counting with Resetting in acc with the Qualifying Signal In this counter mode the ES441 1 is configured as an up counte...

Page 42: ...e1 The edges at the measurement channel are only counted when the qualifying channel is active or Gate2 The edges at the measurement channel are only counted when the qualifying channel is inactive In...

Page 43: ...nted when the states are identical and decremented when the states of the measurement channel and qualifying channel differ In the counter modes Up Down3 and Up Down4 the counter is incremented or dec...

Page 44: ...s of the signals at both measure ment channels are analyzed and the counter incremented or decremented The counter is incremented with inactive active edges at the measure ment channel and decremented...

Page 45: ...e X4 When to use the counter modes X1 X2 and X4 Coding encoding digital signals Use in digital control circuits with movement control and digital data input systems Quadrature functions Linear or rota...

Page 46: ...edges at the measurement channel and the states of the mea surement channel and qualifying channel differ and decremented when there are inactive active and active inactive edges at the measurement c...

Page 47: ...es for evaluating signal edges at the qualifying channel The counter is incremented when the signal edges at the qualifying channel and the signal at the measurement channel have an identical state an...

Page 48: ...signal or Evaluation of the signal at the measurement channel depending on any other measurement channel of the module assigned to the measure ment channel as a qualifying channel trigger channel 5 8...

Page 49: ...counted or after 232 20 ns 85 9 s The following figures show examples of determining various time sections totaled from the start of measurement to the current sampling point without a qualifying sign...

Page 50: ...ith a Qualifying Signal Any measurement channel can be assigned any other measurement channel of the module as a qualifying channel Depending on the configuration in the calibration software the input...

Page 51: ...lculation error coupled to the resolution of the ES441 1 see section 5 9 5 on page 54 5 9 1 Measurement Modes In the calibration software parameters and measurement modes can be selected for frequency...

Page 52: ...1 1 can calculate the number of revolutions per minute RPM see example in section 5 11 on page 57 The following figures show examples of determining frequencies within differ ent time sections without...

Page 53: ...the states of the signal at the mea surement channel and the signal at the qualifying channel are identi cal Assignment of the sign when the states of the signal at the mea surement channel and the si...

Page 54: ...cy value is set to when the sig nals at the measurement channel and the qualifying channel are identical 5 9 4 Measuring the Duty Cycle The duty cycle specifies the ratio of the length of the active s...

Page 55: ...e division by zero in the calibration software must be con sidered The Timeout function is not available for the frequency Increasing Measurement Accuracy with High Frequencies When determining high f...

Page 56: ...g takes place These values are determined according to the measur ing capability Fig 5 31 Timeout If the timeout of the ES441 1 has expired the measured frequency revolutions min velocity flow is set...

Page 57: ...r ence mark for the position of the crankshaft One revolution of the wheel is thus a cycle which consists of 60 2 58 periods Simplified Example The configuration principle is demonstrated by the follo...

Page 58: ...wheel suspensions or directly on the engine and the temperature resistance of the modules for example do not assem ble modules on the engine turbocharger exhaust manifold or within their vicinity 6 1...

Page 59: ...2 1 How to Connect and Attach ES400 Modules Fig 6 2 How to Attach ES400 Modules Integrated Assembly Elements Every ES400 module has two integrated assembly elements to enable different assembly possi...

Page 60: ...odules to other components using cable fasteners Examples for mounting Examples for mounting using the different possibilities to connect and attach ES400 modules are Connect ES400 modules with the in...

Page 61: ...dules To position the modules 1 Position the modules to be connected in the required order 2 Position the modules so that their fronts are in a line 3 Hold the two modules together firmly on their out...

Page 62: ...gon socket of the right hand module 4 Screw the two modules by turning the Allen key clockwise as far as it will go within the module Both modules are now completely connected mechanically Connecting...

Page 63: ...the Integrated Assembly Elements Rules on Attaching the Modules to Other Components Observe the following rules when connecting the modules as required to other components Preparing the Component To...

Page 64: ...ise as far as it will go within the module Both parts are now connected mechanically on one side 5 Insert the Allen key into the other hexagon socket of the mod ule 6 Screw the two parts together by t...

Page 65: ...ules with each other but also with DIN rails For this fastening variant you connect the ES400 module with the DIN rail using an ES4xx angle bracket left The screw connection follows the principle of c...

Page 66: ...on head on the right side of the module 4 Screw the parts together by turning the hex key clockwise to the stop within the module Both parts are now mechanically connected on one side 5 Insert the hex...

Page 67: ...hooks of the ES4xx angle bracket into the upper part of the DIN rail 3 Engage the ES4xx angle bracket in the DIN rail by pressing on the ES4xx angle bracket or the module The module connected with the...

Page 68: ...module to the openings in the component 3 Insert one screw into a hole in the component 4 Screw the screw from the right hand side of the component into the module Both parts are now connected mechan...

Page 69: ...the ES400 modules you can not only connect the modules with each other but also with DIN rails For this fastening variant you connect the ES400 module with the DIN rail using an ES4xx angle bracket ri...

Page 70: ...the ES4xx angle bracket right 4 Fasten the screw with the module from the right side of the ES4xx angle bracket Both parts are now mechanically connected on one side 5 Insert the other screw through...

Page 71: ...the ES4xx angle bracket into the upper part of the DIN rail 3 Engage the ES4xx angle bracket in the DIN rail by pressing on the ES4xx angle bracket or the module The module connected with the ES4xx a...

Page 72: ...con nected with an ES4xx angle bracket right or with an ES4xx angle bracket left using additional cable fasteners inserted through the breakouts of the module The integrated assembly elements of the...

Page 73: ...ETAS Getting Started ES441 1 User Guide 73 6 3 Drilling Template Fig 6 13 Drilling Template...

Page 74: ...d easily be compared with INCA reference measurements The drive recorder ES720 1 can automatically transfer the recorded measure data encrypted and compressed via LAN WLAN or wireless radio to custome...

Page 75: ...ls are processed directly in the Rapid Prototyping model The ES910 3 or RTPRO PC can access all customary ECU interfaces ETK XETK CAN LIN FlexRay and calculate the new control functions in the bypass...

Page 76: ...Cable in Fig 6 16 Function Order name 1 Power supply cable CBP120 CBP1205 2 Host connection cable CBE100 3 Power supply and Ethernet cable Daisy Chain modules CBEP430 CBEP4305 4 ETK connection cable...

Page 77: ...6 17 Function Order name 1 ES520 ES59x ES6xx ES1120 or ES1135 Ethernet cable CBE130 CBE140 2 Power supply and Ethernet cable Daisy Chain modules CBEP430 CBEP4305 ECU ECU Ambient Exhaust Pressure Lamb...

Page 78: ...nection cable CBE200 3 Power supply and Ethernet cable Daisy Chain modules CBEP430 CBEP4305 4 ETK connection cable CBM150 5 6 CAN LIN FLX connection cable CAN LIN FLX combined at ES910 3 at ES921 1 CB...

Page 79: ...330 con nected to cable 2 2 Ethernet connection cable 1 Gbit s CBE230 con nected to cable 1 3 Power supply and Ethernet cable Daisy Chain modules CBEP430 CBEP4305 ECU ECU Ambient Exhaust Pressure Lamb...

Page 80: ...O PC Rapid Prototyping Cable in Fig 6 20 Function Order name 1 Power supply and Ethernet cable PC and Daisy Chain modules CBEP410 CBEP4105 CBEP415 CBEP4155 2 CAN and FlexRay Y interface cable CBCF100...

Page 81: ...open connection of cable CBAV411 1 and adapt it to the specific plug connector system of your measuring setup Cable CBAV412 1 Cable CBAV417 1 To wire the ES441 1 with the sensors 1 If there is a prote...

Page 82: ...dditional current feeding 1 End the module chain after the last module whose power sup ply is still guaranteed in the entire operational range 2 Connect the combined Ethernet and power supply cable to...

Page 83: ...dules LEDs flash ing green Check that the function for automatic change to energy saving mode on your PC Card has been disabled1 Disable this function Did you configure the net work card correctly INC...

Page 84: ...t assigned the same IP address to two module chains Is the module supplying usable data Check that the sensor is connected cor rectly Data is lost during data transfer Are you using WLAN in your test...

Page 85: ...again Load the measuring configuration again If the LED continues to show red send the module to ETAS for repair The firmware of one or more mod ules cannot be updated Is the module to be updated in...

Page 86: ...symbol 1 2 Enter regedit in the entry field 1 3 Push ENTER Windows 10 1 1 Rightclick on the Windows symbol 1 2 Click on Search 1 3 Enter regedit in the entry field 1 4 Push ENTER The registry editor i...

Page 87: ...ch the hardware off then switch it on again to re initialize it Cause Network Adapter temporarily has no IP Address Whenever you switch from a DHCP company LAN to the ETAS hardware net work it takes a...

Page 88: ...field 1 3 Push ENTER 2 Click on Device Manager 3 In the Device Manager open the tree structure of the entry Network Adapter 4 Right click on the used network adapter 5 Select Properties in the contex...

Page 89: ...owing permissions Outgoing limited IP broadcasts via UDP destination IP 255 255 255 255 for the destination port 17099 or 18001 Incoming limited IP broadcasts via UDP destination IP 255 255 255 255 or...

Page 90: ...to configure the Windows firewall if the hardware access is being blocked Solution for Windows Firewall user with administrator rights Enabling ETAS products in the firewall control 1 Open the Control...

Page 91: ...inistrator rights This chapter is directed at users with restricted rights e g no changes to the system restricted write permissions local login Working with an ETAS product requires the rights Write...

Page 92: ...a 8 1 1 Product labeling The following symbols are used for product labeling Symbol Description Prior to operating the product be sure to read the user s guide Labeling of the daisy chain port IN inpu...

Page 93: ...2 14 Nb Temperature change Temperature Tu 40 C To 120 C Number of cycles 10 Unit under test active DIN EN 60068 2 56 Humidity storage DIN EN 60068 30 Variant 1 Climate change DIN EN 60068 2 64 ISO 167...

Page 94: ...duration 16 d Units under test passive ISO 16750 5 Chemical resistance Identification A W Pr flinge passiv DIN 5596 1 Stone impact IPX7 Protection class test Protection class IP67 with cables connect...

Page 95: ...With the CE mark attached to the product or its packaging ETAS confirms that the product corresponds to the product specific applicable directives of the European Union The CE Declaration of Conformit...

Page 96: ...ces but not to external cables or batteries Additional information about the recycling program of ETAS GmbH is available from the ETAS sales and service locations see chapter Contact Information on pa...

Page 97: ...f this device to save power option in the Power Management register Confirm your configuration The manufacturers of network adapter have different names for this function Example Link down Power savin...

Page 98: ...gher or ES4xx driver LabVIEW Integration V1 0 0 and higher from ES4xx _DRV_SW or Integration into software not based on XCP on Ethernet via a C based library 8 10 Electrical Data This chapter contains...

Page 99: ...k card of your PC observe chap ter 8 9 1 on page 97 Operating voltage Temperature range 40 C to 85 C 5 V to 50 V DC Temperature range 40 C to 120 C 6 V to 50 V DC Power consumption operation sen sors...

Page 100: ...f against ground and up to 26 V over voltage Ground connected to operating volt age ground and protected by a fuse Diagnostics Short circuit detection per channel overload conditions reduce the output...

Page 101: ...0 MHz Accuracy time resolution 100 ppm Counter length 32 bit Measuring capabilities Event counting measurement of frequency duty cycle active duration inactive dura tion period duration state combinat...

Page 102: ...N Connector The following plug is mounted on IN connector LEMO 1B 8 pin L coding connection identified in green NOTE All connectors are shown with a view of the front of the ES441 1 All shields are at...

Page 103: ...cket is mounted on OUT connector LEMO 1B 8 pin A coding connection identified in yellow Pin Signal Meaning 1 UBatt Operating voltage 2 UBatt Operating voltage 3 Ground Ground 4 RX Received data plus 5...

Page 104: ...l 4 input minus 10 CH4 S Sensor channel 4 Sensor supply voltage plus 11 CH4 SGND Sensor channel 4 Sensor supply voltage GND 12 CH1 S Sensor channel 1 Sensor supply voltage plus 13 CH1 SGND Sensor chan...

Page 105: ...ation on the following topics Combined Ethernet and Power Supply Cable on page 106 Ethernet Cable on page 112 Cable for the Connection Sensor on page 115 Protective Caps on page 118 Angle Brackets on...

Page 106: ...can use combined ethernet and power supply cables with standard banana plugs or with safety banana plugs DANGER Dangerous electrical voltage Connect the power cable only with a suitable vehicle batte...

Page 107: ...IP67 Temperature rated for 40 C to 125 C 40 F to 257 F 9 1 3 CBEP4105 1 Cable Fig 9 2 CBEP4105 1 Cable Connection of an ES4xx ES63x ES93x module to PC and power supply stand alone operation Supply bat...

Page 108: ...IP67 Temperature rated for 40 C to 125 C 40 F to 257 F 9 1 5 CBEP4155 1 Cable Fig 9 4 CBEP4155 1 Cable Connection of an ES4xx ES63x ES93x module to PC and power supply stand alone operation Supply bat...

Page 109: ...IP67 Temperature rated for 40 C to 125 C 40 F to 257 F 9 1 7 CBEP4205 1 Cable Fig 9 6 CBEP4205 1 Cable Ethernet and voltage supply connection of an ES4xx ES63x ES93x measure ment module with an ES600...

Page 110: ...IP67 Temperature rated for 40 C to 125 C 40 F to 257 F 9 1 9 CBEP4255 1 Cable Fig 9 8 CBEP4255 1 Cable Ethernet and voltage supply connection of an ES4xx ES63x ES93x measure ment module with an ES600...

Page 111: ...Temperature rated for 40 C to 125 C 40 F to 257 F 9 1 11 CBEP4305 1 Cable Fig 9 10 CBEP4305 1 Cable To chain ES4xx ES63x ES93x modules and connect an ES4xx ES63x ES93x chain to an ES910 3 Rapid Protot...

Page 112: ...replaceable stan dard fuse MINI flat automotive fuse quick response 3 A 58 V Robust waterproof and dust proof IP67 Temperature rated for 40 C to 125 C 40 F to 257 F 9 2 2 CBE401 1 Cable Fig 9 12 CBE4...

Page 113: ...les use CBE130 or CBE140 cable Robust waterproof and dust proof IP67 Temperature rated for 40 C to 125 C 40 F to 257 F 9 2 5 CBEX400 1 Cable Fig 9 15 CBEX400 1 Cable Ethernet extension cable to increa...

Page 114: ...User Guide 114 9 2 6 ES4xx_BRIDGE Fig 9 16 ES4xx Bridge Ethernet bridge connecting blocked ES400 modules Facilitates very compact measurement setups IP67 compliant Product Order number ES4xx_BRIDGE F...

Page 115: ...f a cable section to the signals of a measurement channel n is shown in the table Notes about the Application If you replaced modules with BNC cabling with ES4xx modules in your measur ing setup the u...

Page 116: ...niversal cable CBAV411 1 sensors or measuring transducers can be connected to the ES4xx module You can customize the open connection of sensor cable CBAV411 1 and adapt it to the specific plug connect...

Page 117: ...e Section The assignment of the connections of the LEMO connector of a cable strand to the signals of a measurement channel n is represented in the table Notes about the Application Temperature rated...

Page 118: ...p CAP_LEMO_1B protects the connection IN or OUT against dirt according to IP67 9 4 3 Cap CAP_LEMO_1B_LC Fig 9 23 Cap CAP_LEMO_1B_LC The cap CAP_LEMO_1B_LC protects the connection IN or OUT in an inexp...

Page 119: ...35 Stainless steel V2A For mounting on left side of an ES4xx module 9 5 2 Angle Bracket Right Fig 9 26 Angle Bracket Right Angle Bracket for mounting ES4xx modules to a DIN rail 35 x 7 5 EN 60715 TH35...

Page 120: ...e ES4xx Safety Advice China RoHS leaflet_Compact_green_cn Calibra tion Certification NOTE Cables are not part of the scope of supplies of the module and must be ordered separately see chapter 10 2 1 o...

Page 121: ...105 680 Ethernet PC Connection and Power Sup ply Cable Power Feeder close to PC Lemo 1B FGL RJ45 Safety Banana 8fc 8mc 2mc 5 m CBEP4155 1 5 F 00K 110 027 Ethernet Connection and Power Supply Cable Lem...

Page 122: ...g Input Splitter Cable Souriau 8ST12 35 open wires 22mc 4c 2 m CBAV411 1 2 F 00K 104 918 Analog Input Splitter Cable Souriau 8ST12 35 Lemo 0B PHG 22mc 4x6fc 0m3 CBAV412 1 0m3 F 00K 104 919 Analog Inpu...

Page 123: ...17025 Verification of measurement accuracy by accredited calibration labora tory1 Adjustment of the measuring accuracy to the smallest possible devia tion Issue of internationally recognized ISO IEC 1...

Page 124: ...ils of your local sales office as well as your local technical support team and product hotlines take a look at the ETAS website Borsigstra e 24 Phone 49 711 3423 0 70469 Stuttgart Fax 49 711 3423 210...

Page 125: ...and n 3 35 Fig 5 5 Cycle Starting with an Active Inactive Edge and n 3 35 Fig 5 6 Sampling Data 35 Fig 5 7 Oversampling 36 Fig 5 8 Measuring the Active and Inactive State Fixed Measure Rate 37 Fig 5 9...

Page 126: ...es Using the Integrated Assembly Elements 61 Fig 6 6 Connected ES400 Modules 62 Fig 6 7 Attaching a Module to Other Components with the Integrated Assembly Ele ments 63 Fig 6 8 Connecting to Other Mod...

Page 127: ...11 Fig 9 10 CBEP4305 1 Cable 111 Fig 9 11 CBE400 2 Cable 112 Fig 9 12 CBE401 1 Cable 112 Fig 9 13 CBE430 1 Cable 113 Fig 9 14 CBE431 1 Cable 113 Fig 9 15 CBEX400 1 Cable 113 Fig 9 16 ES4xx Bridge 114...

Page 128: ...protocols 23 Configurable hysteresis 21 Configuration 31 32 Conversion 32 Counter 38 Cycle 35 D Daisy chain ports 17 81 Daisy chain topology 15 DAkkS 123 Data electrical 98 mechanical 95 Data transfer...

Page 129: ...lse width 20 Q Qualification required 9 R Rates 35 REACH regulation EU 96 Recycling 96 Resolution 21 Reverse feeding 28 RoHS conformity China 95 European Union 95 S Safety at work 9 10 Safety notices...

Reviews: