background image

Description of the configuration wizard

5

2

Description of the configuration wizard

Configuration with the wizard

Configuration  with  the  wizard  takes  place  in  several
steps. These are described below:
1) Add  the  function blocks required  for the  installed

heating system components. Choose your settings
and options individually in each function block.

2) When you have added all the necessary function

blocks,  set  the  individual  connections  between
"producers" and "consumers". 
"Producers" are components that provide heat or
fuel. "Consumers" consume this heat or fuel.

3) Next,  the  terminal  assignments  of  each  function

block  is  displayed  on  the  corresponding  circuit
board.  In  this  step,  the  heating  system
components  are  electrically  connected.  You  may
also  adjust  the  terminal  assignments  during  this
step.

4) Finally,  the  configuration  is  installed,  and  the

software rebooted. 

After  this,  you  can  make  customer-specific
adjustments  to  the  heating  system,  such  as:  buffer
charging  times,  room  temperatures  for  the  heating
circuit, hot water temperatures, etc.

When you have completed these customer adap-
tations, save this configuration. It is saved in the

ETAtouch control system. You can additionally save it
on a USB stick.

The description below explains the general way
in  which  the  configuration  wizard  works.  Your

heating system's individual configuration depends on
the installed components, and can vary.

Starting the configuration assistant

In the system configuration 

, increase the authori-

sation to [Service] and open the system configuration
menu with the [Systems configuration] button.

Fig. 2-1: System configuration menu

Start the configuration assistant with the 

 [Starting

the assistant] button.

Function block overview

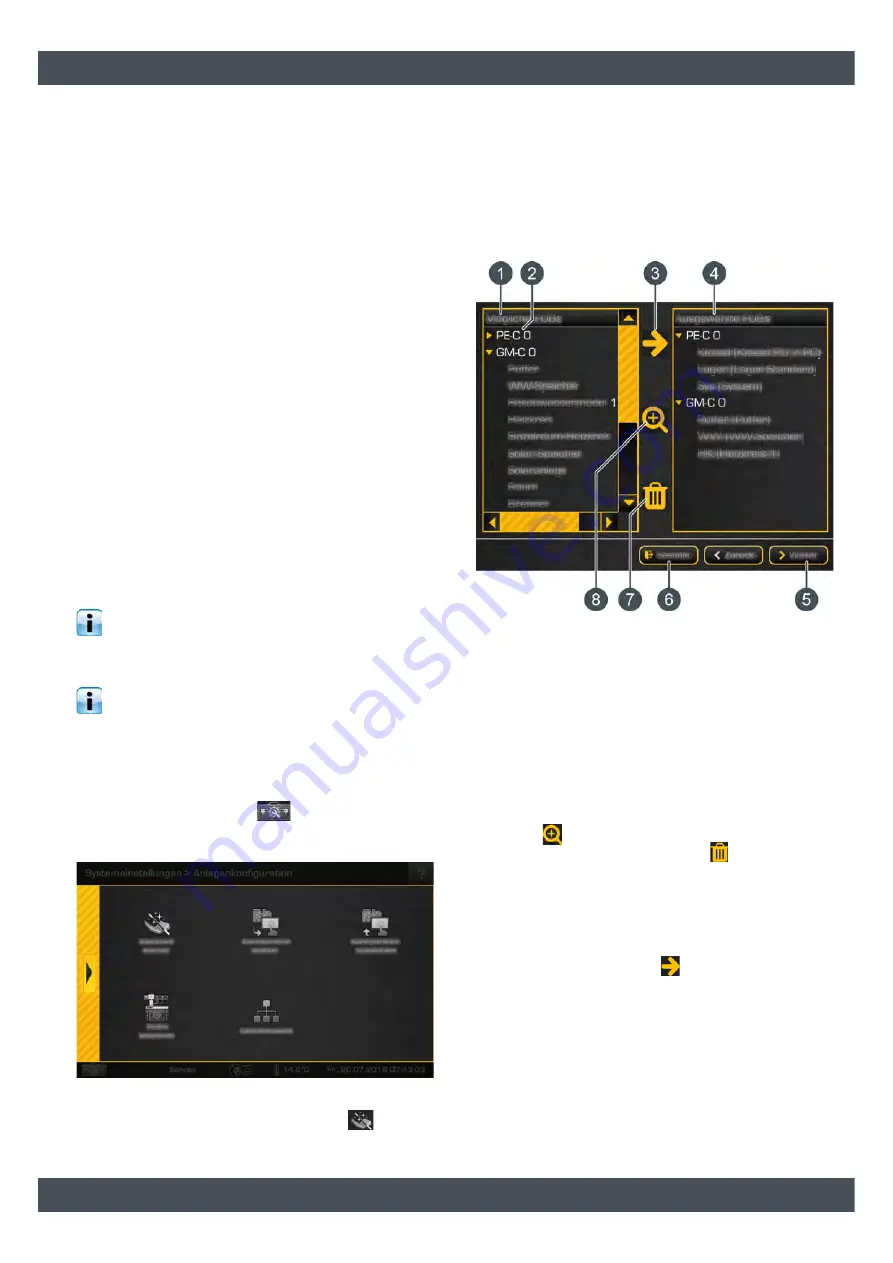
The  [Possible  function  blocks]  column  shows  the
function  blocks  available  for  selection,  and  the
[Selected function blocks] column shows the function
blocks that have already been added.

Fig. 2-2: Function block overview

1

Function blocks available for selection

2

Type and node number of circuit board

3

Add a function block

4

Function blocks already added

5

Next step of configuration

6

End configuration

7

Delete an added function block

8

Show the options of an added function block

Press the 

 button to see the options and settings for

an added function block. With the 

 button function

blocks that have already been added can be deleted.
Adding another function block is quick and uncompli-
cated.  In  this  example,  the  [Heating  circuit]  function
block  is  used  to  explain  the  process.  Select  the
function  block  from  the  [Possible  function  blocks]
column, and then press the 

 button.

Summary of Contents for T2-BT

Page 1: ...2019 11 18 EN 0000000227 V 007 X 47 0 939590 001 Control extensions T2 BT and T2 BTI Configuration...

Page 2: ...ETA Heiztechnik Gewerbepark 1 A 4716 Hofkirchen an der Trattnach Tel 43 0 7734 22 88 0 Fax 43 0 7734 22 88 22 info eta co at www eta co at...

Page 3: ...12 5 1 1 PufferFlex for automatic boilers 12 5 1 2 PufferFlex for log boiler 18 5 2 Hot water tank function block 20 5 3 Heating circuit function block 22 5 3 1 Basic settings 22 5 3 2 Heating circuit...

Page 4: ...ct to technical changes We reserve the right to make technical modifications without notice Printing and typesetting errors or changes of any kind made in the interim are not cause for claims Individu...

Page 5: ...t on a USB stick The description below explains the general way in which the configuration wizard works Your heating system s individual configuration depends on the installed components and can vary...

Page 6: ...button Connections overview screen In this window you can determine the individual connections between producers and consumers Fig 2 5 Connections overview screen 1 Overview of created connections 2...

Page 7: ...Next button to continue configuration You can already change the terminal allocations in this step The next section explains how to change the terminal allocation for the temperature sensor of the ho...

Page 8: ...tarted manually 1 Increase the authorisation to Service See Chapter 3 1 Changing the access level 2 Select the heating circuit and change the inputs and outputs in the menu by tapping on the symbol fo...

Page 9: ...sensors and mixers In this menu the terminal assignment can be changed In the example below the terminal assignment of the heating circuit pump is changed Modify terminal assignment of the heating cir...

Page 10: ...at Modify terminal assignment Checking outputs changing terminal assignments The factory terminal allocation is shown in the Available terminals list with a yellow font colour Fig 3 6 Factory setting...

Page 11: ...iler and perform the backup Restoring the configuration You can restore the heating system configuration at any time The configuration is restored either from a configuration saved in the ETAtouch con...

Page 12: ...eters can also be found in the settings of the PufferFlex Sensor assign ments Set or check the following parameters Explanation of Total volume The whole buffer volume needs to be indicated for this p...

Page 13: ...ure Therefore this parameter can be set to Yes in such cases Then the boiler starts as soon as the control system calculates a request on the buffer Previously collected control data is used for this...

Page 14: ...to request a total of 99 kW 110 of 90 kW from the buffer without actuating the second boiler This is only activated if more than 99 kW is requested Explanation of Switch off threshold This parameter...

Page 15: ...the current buffer temperature Charging according to buffer top min solar The solar heating system only begins to charge the buffer once the collector temperature is greater than the set minimum temp...

Page 16: ...rio Optional only with solar heating systems These parameters are used to set the time slots for the Solar priority function The first time slot lasts from Begin solar prio to Change priority at The s...

Page 17: ...y the control system after 13 minutes You can determine the required running time of the circulation pump in the following way Start the circulation pump in the control system by means of manual opera...

Page 18: ...buffer For example heating circuits hot water tanks external heat consumers fresh water modules This temperature forms the basis for calculating the buffer charging status If the buffer is charged uni...

Page 19: ...emperatures The function is turned on or off with the parameter Activate time programme For an immediate start the Immediately charge parameter must be set to On Explanation of Desired charging time T...

Page 20: ...er tank the factory setting is 35 C If the boiler is the heat producer the setting is 58 C In heating systems without a buffer and with the PelletsUnit boiler this parameter is not visible In heating...

Page 21: ...d last Explanation Circulation runtime Optional only for circulation pump This parameter specifies the duration for operating the circulation pump after it has been started by the control system Once...

Page 22: ...below this value the heating circuit is switched off The parameter is set to 18 C for underfloor heating systems and to 24 C for radiators Set this parameter higher for heating systems without a buff...

Page 23: ...ng circuit is started first and runs the longest when the buffer is cooling down In heating systems without a buffer and the Pel letsUnit boiler this parameter is not visible Explanation of MixValve r...

Page 24: ...lanation of Background lighting This sets the brightness of the background lighting for the room sensor display The setting 0 turns the background lighting off Explanation of Humidity indicator This d...

Page 25: ...emental reduction in tem perature This is configured with the Set back by and Set back every parameters factory setting 3 C every 24 hours Fig 5 1 Temperature profile of screed drying program 1 Incr b...

Page 26: ...ntrolled by way of a 0 10 V signal Explanation of Collector min This parameter sets the minimum temperature for starting the solar pump The solar pump can only be started once the solar panel has exce...

Page 27: ...ature difference for switching on the solar pump If the collector after exceeding the minimum temperature is warmer by this difference than the tank or area being charged the solar pump will be switch...

Page 28: ...temperature for the frost protection of the consumer pump are adjustable The start time is defined with the Start parameter If during this time the external temperature falls below the limit value se...

Page 29: ...he parameter to Lock aux boiler in the ETA boiler s Yes function block Explanation of Min runtime This parameter is used to set the minimum duration for auxiliary boiler operation when the ETAtouch co...

Page 30: ...the temperature of the auxiliary boiler AuxBoilerTemp for starting the auxiliary boiler charging pump Explanation of Hysteresis for auxiliary boiler charging pump Optional only for Aux boiler chargin...

Page 31: ...to the burner as soon as it heats up This setting is used for burners with low water content because the burner may overheat otherwise Explanation of Enable criterion This sets when the additional hea...

Page 32: ...xternal heat source for starting the charging pump of the external heat source Explanation of Thermostat diff Optional only with charging pump This parameter is used to set the minimum difference betw...

Page 33: ...d for the output for the strongest input signal Explanation of Enable temperature This parameter is used to set the minimum temperature of the heating system for starting the charging pump of the exte...

Page 34: ...ng 5 minutes If the feed temperature is below 60 C for more than 5 minutes a warning will be given No warning is issued if the setting is 0 seconds Explanation of Flow max This parameter is used to se...

Page 35: ...ponding data of the meter If in the serial number are letters the serial number must be rotated while entering Details to this can be found in the manual of heat flow meter example 1234 0A5678 5678123...

Page 36: ...www eta co at www eta co at downloads DOWNLOAD...

Reviews: