11
INSTALLATION EXAMPLE / Einbaubeispiel
13
14
15
16
IMPORTANT NOTE: If you want to install the enclosed ESX CD/DVD-Drive, continue with the next step 13. But you need to prepare and
modify the original radio accordingly. This should be ideally carried out by a qualified technician with an appropriate experience in order
to avoid damage to the device. If you want to use the original OPEL CD-Drive, continue with step 22 on page 13.
WICHTIGER HINWEIS: Falls Sie das beiliegende ESX CD/DVD-Laufwerk installieren möchten, fahren Sie bitte mit dem nächsten Schritt
13 fort. Allerdings müssen Sie dazu das Original-Radio entsprechend vorbereiten und modifizieren. Dies sollte idealerweise von einem
versierten Techniker mit enstprechender Erfahrung getätigt werden um Schäden am Gerät zu vermeiden. Falls Sie jedoch das originale
CD-Laufwerk weiter verwenden möchten, fahren Sie mit dem Schritt 22 auf Seite 13 fort.
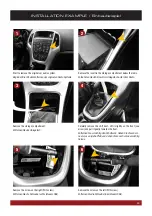
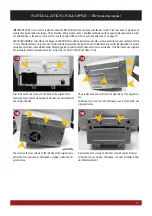
First remove the two screws on the back of the original radio.
Entfernen Sie zunächst die beiden Schrauben auf der Rückseite
des Original-Radios.
Then remove the five screws on the right side of the original ra-
dio.
Entfernen Sie dann die fünf Schrauben auf rechten Seite des
Original-Radios.
Then remove the four screws on the left side of the original radio.
Entfernen Sie dann die vier Schrauben auf linken Seite des Ori-
ginal-Radios.
Remove the both screws on the front cover above the disk slot.
Entfernen Sie die beiden Schrauben auf dem Frontblech über
dem Medienschacht.

