ESX VISION NAVICEIVER Installation Manual Download Page 10

10

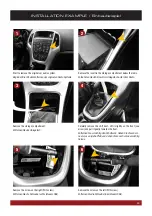
Carefully swing the plastic covers of the fan controllers to the side 
(right and left side of the radio).

Klappen Sie vorsichtig die Plastikabdeckungen an den Lüfterreg-
lern zur Seite (Rechts und links neben dem Radio).

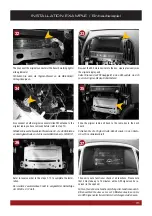
INSTALLATION EXAMPLE / Einbaubeispiel

12

7

Remove the decoration panel carefully with a mounting wedge. 
The decoration panel is only clipped.

Entfernen Sie die Zierblende vorsichtig mit einem Kunststoffhe-
bel. Die Blende ist nur geclipst.

Pull out the device and unplug the power and antenna connector 
on the back. Then lay the device aside.

Ziehen Sie das Gerät heraus und entfernen den Strom- und An-
tennenstecker auf der Rückseite. Legen Sie das Gerät zur Seite.

8

9

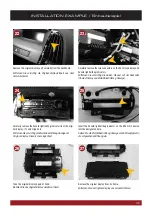
Remove the four screws (7mm nut) beneath the two fan control-
lers and on the right and left side of the A/C controller.

Entfernen Sie die vier Schrauben (7mm Nuss) unter den beiden
Lüfterreglern und rechts und links der Klimasteuerung.

10

Pull out the radio controller. Unplug the two connectors above, 
one on the right and one below. Lay the controller aside.

Ziehen Sie das Radiobedienteil heraus. Hierzu vorsichtig die zwei 
Stecker oben sowie den einen rechts und unteren Stecker abzie-
hen. Legen Sie das Bedienteil zur Seite.

11

Remove the both screws (7mm nut) on the right and left side.

Entfernen  Sie  die  beiden  Schrauben  (7mm  Nuss)  und  auf  der 
rechten und linken Seite.

Summary of Contents for VISION NAVICEIVER

Page 1: ...E IN B A U A N L E IT U N G IN S T A L L A T IO N G U ID E VN709 OP ASTRA V 1 0...

Page 2: ...ROTECTION BAG Schaumstoff Schutzbeutel 1 4 MICRO SD CARD 8GB INKL NAVIGATION SOFTWARE MicroSD Speicherkarte 8GB Navigationssoftware 1 5 SYSTEM CONNECTOR CD DVD DRIVE System Anschluss CD DVD Laufwerk 1...

Page 3: ...QUANTITY Anzahl 8 AUDIO VIDEO IN AND OUTPUTS Audio Video Ein und Ausg nge 1 9 BT MICROPHONE BT Mikrofon 1 10 GPS Antenna GPS Antenne 1 11 USB TMC WIRE ANTENNA USB TMC Kabelantenne 1 12 STYLUS Markiers...

Page 4: ...es CD DVD Laufwerks CONNECTOR FOR THE DVD DRIVE Anschluss f r das DVD Laufwerk SYSTEM CONNECTOR FROM ORIGINAL RADIO System Verbindung vom Original Radio TMC WIRE ANTENNA TMC Kabelantenne SYSTEM CONNEC...

Page 5: ...ng GREEN YELLOW REAR CAM INPUT Gr n Gelb R ckfahrkamera Eingang Green HANDBREAK CABLE Gr n Handbremsen Kabel BLUE REVERSE SIGNAL FOR REARCAM Blau R ckfahr Signal f r Kamera GREY WHITE LEFT AUDIO OUTPU...

Page 6: ...te alle Teile des Soundsystems und die Komponenten Ihres Fahrzeugs grunds tzlich mit Vorsicht 2 Beachten Sie unter allen Umst nden die Vorschriften des Fahrzeugherstellers und nehmen Sie keine Ver nde...

Page 7: ...se use the supplied microphone BT Mikrofon Montieren Sie das beiliegende Mikrofon 9 an einem geeigneten Montage punkt wie z B an der A S ule Fahrerseite oder am Dachhimmel bei der In nenraumleuchte Ve...

Page 8: ...prevent accidents by inattention while driving the screen is blanked Handbremsen Anschluss Das gr ne Kabel Brake vom Audio Video Stecker 8 muss an die Hand bremse angeschlossen werden Das Signal muss...

Page 9: ...e the storage compartment Entfernen Sie das Ablagefach 4 Carefully remove the shift boot Lift it slightly on the front see arrow and pull it gently towards the front Entfernen Sie vorsichtig den Schal...

Page 10: ...er t heraus und entfernen den Strom und An tennenstecker auf der R ckseite Legen Sie das Ger t zur Seite 8 9 Remove the four screws 7mm nut beneath the two fan control lers and on the right and left s...

Page 11: ...d modifizieren Dies sollte idealerweise von einem versierten Techniker mit enstprechender Erfahrung get tigt werden um Sch den am Ger t zu vermeiden Falls Sie jedoch das originale CD Laufwerk weiter v...

Page 12: ...rnen Sie GANZ vorsichtig das Flachband an der Haupt platine des Original Radios Legen Sie das originale CD Laufwerk auf die Seite Now re assamble the original radio unit onto the front cover be neath...

Page 13: ...eige 24 26 27 25 Carefully remove the hazard light airbag indicator from the origi nal display It s only clipped in Entfernen Sie vorsichtig die Warnblinker Airbag Anzeige am Original Display Diese is...

Page 14: ...n anderen Enden zum Einbauort des Displays und schlie en dort die Kupplung vom Kabel 6 an den original Opel Stecker an Then connect the gray ESX connector from the cable 7 with the connector of the or...

Page 15: ...nal Radio Einheit wieder in den Radio schacht ins Armaturenbrett 33 Now put the ESX main device into the bay where previously was the original display unit Setzen Sie nun das ESX Hauptger t in den Ein...

Page 16: ...D E S I G N ESX Car Media Systems Audio Design GmbH Am Breilingsweg 3 D 76709 Kronau Germany Tel 49 7253 9465 0 Fax 49 7253 946510 www esxaudio de www audiodesign de 2015 All Rights Reserved...

Reviews: