background image

7

Style 2: Direct wire strain relief

Remove the knockout as needed for the flexible conduit 
connection.

Assemble a UL listed conduit connector in the opening.

Tighten strain relief screw against the flexible conduit. 

4. Complete installation following instructions for your type of 

electrical connection:

4-wire (recommended)

3-wire (if 4-wire is not available)

Electrical Connection Options

4-wire connection: Power supply cord

Use this method for:

New branch-circuit installations (1996 NEC)

Mobile homes 

Recreational vehicles

In an area where local codes prohibit grounding through the 
neutral

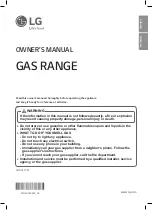
1. Remove the ground-link screw from the range frame. Save 

the ground link screw and cup washer. Bend the ground-link 
away from the range so that it does not contact the range.

2. Connect the green ground wire from the power supply cord to 

the range using the ground-link screw and cup washer. The 
ground wire must be attached first and must not contact any 
other terminal.

3. Use a ¼" nut driver to remove the hex washer head screws 

from the terminal blocks. 

4. Connect the neutral (center) wire to the center terminal 

connector using one of the hex washer head screws. 
Securely tighten screw for proper electrical connection.

5. Connect the other 2 wires (lines 1 and 2) to the outer 

aluminum terminal blocks.

6. Securely tighten screws for proper electrical connection.

7. Tighten strain relief screws.

8. Replace terminal block cover.

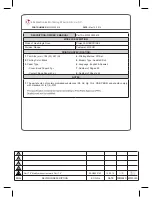
A. Removable retaining nut
B. Strain relief

If your home has:

And you will be 
connecting to:

Go to Section:

4-wire receptacle
(NEMA type 14-50R)

A UL listed, 
250-volt 
minimum, 
40-amp, range 
power supply 
cord

4-wire connection: 
Power supply cord

4-wire direct

A fused 
disconnect or 
circuit breaker 
box

4-wire connection: 
Direct wire

3-wire receptacle
(NEMA type 10-50R)

A UL listed, 
250-volt 
minimum, 
40-amp, range 
power supply 
cord

3-wire connection: 
Power supply cord

3-wire direct

A fused 
disconnect or 
circuit breaker 
box

3-wire connection:
Direct wire

A

B

(12.7 cm)

5"

3"

(7.6 cm)

1"

(2.5 cm)

A. Ground-link  screw
B. Cup washer

C. Ground-link bent away from range

A. Line 1
B. Green ground wire

C. Ground-link screw
D. Hex washer head 

screw

E. Silver-colored terminal 

block screw

F. Ground-link

G. Neutral (center) wire 

H. Line 2

I. UL listed strain relief 

and 40- or 50-amp 
range power supply 
cord

A

C

B

A

B

C

D

E

F

G

H

I

Summary of Contents for RF265LXTB

Page 1: ...potential hazard is tell you how to reduce the chance of injury and tell you what can happen if the instructions are not followed Your safety and the safety of others are very important We have provid...

Page 2: ...m beyond the bottom of the cabinets Cabinet opening dimensions that are shown must be used Given dimensions are minimum clearances The floor anti tip bracket must be installed To install the anti tip...

Page 3: ...he ground path is adequate Do not use an extension cord Be sure that the electrical connection and wire size are adequate and in conformance with the National Electrical Code ANSI NFPA 70 latest editi...

Page 4: ...be revised so the green ground wire of the 4 wire power supply cord is connected to the cabinet See Electrical Connection Grounding through the neutral conductor is prohibited for new branch circuit...

Page 5: ...nt anti tip bracket to wood floor drill two 3 2 mm holes at the positions marked on the bracket template Remove template from floor To mount anti tip bracket to concrete or ceramic floor use a 4 8 mm...

Page 6: ...e cover from range 3 Add strain relief Style 1 Power supply cord strain relief Remove the knockout for the power supply cord Assemble a UL listed strain relief in the opening Tighten strain relief scr...

Page 7: ...t the neutral center wire to the center terminal connector using one of the hex washer head screws Securely tighten screw for proper electrical connection 5 Connect the other 2 wires lines 1 and 2 to...

Page 8: ...icles In an area where local codes prohibit grounding through the neutral 1 Remove the ground link screw from the range frame Save the ground link screw and cup washer Bend the ground link away from t...

Page 9: ...secure the range to the floor Any method of securing the range is adequate as long as it conforms to the standards in the Location Requirements section LevelRange 1 Place rack in oven Place level on...

Page 10: ...ualified technician MovingtheRange When moving range slide range onto cardboard or hardboard to avoid damaging the floor covering If removing the range is necessary for cleaning or maintenance For pow...

Page 11: ...11 ANTI TIP BRACKET TEMPLATE Cut on dotted lines and place the left edge against the left side cabinet and the top edge against the rear wall Left edge Top edge...

Page 12: ...W10141166A 2007 All rights reserved 7 07 Printed in U S A...

Reviews: