background image

26

27

EN

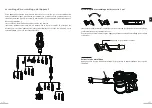
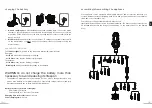
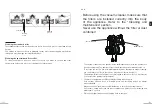
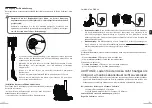
Assembling/disassembling the 3-in-1 accessory

Insert the upholstery (25) or flat (24) adapter into the crevice tool (23) until it clicks into place 
as shown in the diagram above.
To remove the upholstery or flat adapter, press the release point (see diagram below).

Press here to remove adapter

Remove metal tube

Press the release button (3) to remove the metal tube from the body of the appliance.

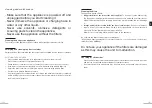
Using the floor cleaning accessory with wipe

The floor cleaning accessory with wipe combined with the rotating brush of the vacuum 
cleaner hoovers and washes the floor in a single pass.

•  Place the wipe under the accessory using the two adhesive bands, fill the tank with tap 

water (400 ml) and clip this accessory to the brush until you hear the click.

•  When you activate the brush, water is automatically released and moistens the wipe. The 

rotating brush hoovers dust and the wipe washes the floor.

•  To remove this accessory from the brush, simply press the pedal.
•  The wipe can be easily removed and machine-washed or hand-washed.

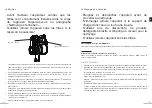
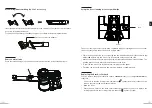
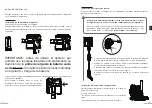
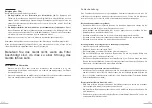
Replacing the brush-roller back

You can replace the brush-roller with either a 

standard

 roller (15) or a 

special hard floor


roller (22).

1. 

Use a coin to turn the locking screw towards the 

 symbol (unlocked) so that you can 

remove the locking tab (see diagram below).

2. 

Grab the roller.

3. 

Place the new roller on the drive shaft following the shape of the notch, replace the 
locking tab and turn the locking screw towards the 

 symbol (locked).

Tank

Pedal

Summary of Contents for EAMU 216 PET AQUA

Page 1: ...ser guide Instrucciones de uso Bedienungsanleitung Gebruiksaanwijzing Aspirateur balai sans fil Cordless stick vacuum cleaner Aspiradora escoba in lambrica Kabelloser Stabstaugsauger Snoerloze stofzui...

Page 2: ......

Page 3: ...l indicator Indicator oplaadniveau van de accu Akku Ladestandanzeige Indicador de carga de la bater a Boutons de d verrouillage de la batterie Battery release button Ontgrendelingsknoppen van de accu...

Page 4: ...ls durs Special hard floor brush Speciale borstel voor harde vloeren Spezial B rste f r harte B den Cepillo especial para suelos duros Accessoire 3 en 1 3 in 1 accessory 3 in 1 accessoire 3 in 1 Zubeh...

Page 5: ...pide fonction Boost 9 minutes clairage LED sur la brosse T moin de charge lumineux de la batterie Capacit utile du bac 0 5 L Filtre hygi nique Filtre grosses particules avant la premi re utilisation S...

Page 6: ...e chargeur secteur au connecteur du support de charge et branchez la fiche sur une prise murale facilement accessible Embo tez le bloc moteur sur le support en veillant ce que les contacts du bloc mot...

Page 7: ...me indiqu sur le sch ma ci apr s noter que les brosses et accessoires peuvent tre ins r s directement sur le corps de l appareil sur le tube m tallique ou encore sur le tuyau flexible Assemblage D sas...

Page 8: ...ls durs 22 1 l aide d une pi ce de monnaie faites tourner la vis de verrouillage vers le symbole d verrouill afin de pouvoir retirer la languette de verrouillage voir sch ma ci dessous 2 Retirez le ro...

Page 9: ...en 8 Placez l aspirateur sur le support de charge pour le recharger nettoyage et entretien teignez et d branchez l appareil avant de proc der au nettoyage N immergez jamais l appareil ni le support de...

Page 10: ...e des instructions ci dessous Avant de contacter le service apr s vente de votre magasin revendeur proc dez aux v rifications suivantes L aspirateur ne charge pas La batterie est mal install e Sortez...

Page 11: ...tery brush 1 floor cleaning accessory with wipe 1 wide upholstery tool 1 angled adapter 1 special hard floor brush 1 special pet brush 1 flexible hose 1 user guide Technical features EAMU 216 PET AQUA...

Page 12: ...ncrete solid brick stone etc 1 Place the wall bracket 17 against the wall in the desired location Make sure that the height of the bracket matches the height of the vacuum cleaner 2 Trace each of the...

Page 13: ...needs to be charged WARNING do not charge the battery more than necessary to avoid reducing its lifespan The appliance s performance may be reduced if you do not use the appliance for a long time or i...

Page 14: ...wo adhesive bands fill the tank with tap water 400 ml and clip this accessory to the brush until you hear the click When you activate the brush water is automatically released and moistens the wipe Th...

Page 15: ...filter or dust container On Off switch Boost function 1 The vacuum cleaner has two speeds Press the On Off button 6 on the handle once see above diagram The appliance turns on and the charge level ind...

Page 16: ...let it dry completely before putting it back on the vacuum cleaner to prevent water from being sucked into the electrical components Cleaning the filters The appliance has two filters 1 A hygienic fil...

Page 17: ...motorised brush is not rotating The brush is improperly installed Remove the brush and put it back correctly in the notches provided The motorised brush is obstructed Remove the brush and obstructions...

Page 18: ...tacos adaptados a paredes macizas hormig n ladrillo macizo piedra etc 1 Coloque el soporte para pared 17 contra la pared en la ubicaci n deseada Procure que la altura del soporte corresponda con la d...

Page 19: ...ste indicador est en color rojo parpadeante esto indica que hay que cargar la bater a ATENCI N no recarga la bater a m s de lo nece sario para evitar reducir su vida til Si no utiliza el aparato duran...

Page 20: ...ivas llene el dep sito con agua del grifo 400 ml y fije este accesorio al cepillo hasta que escuche un clic Cuando accione el cepillo el agua se liberar autom ticamente y humedecer la bayeta El cepill...

Page 21: ...dep sito de polvo Bot n Encendido Apagado Funci n Boost 1 La aspiradora dispone de dos velocidades Presione una vez el bot n Encendido Apagado 6 situado en la empu adura consulte el esquema anterior...

Page 22: ...locarlo en la aspiradora para evitar que el agua se introduzca en los componentes el ctricos Limpieza de filtros El aparato dispone de dos filtros 1 Un filtro higi nico en la parte delantera del bloqu...

Page 23: ...nes Los accesorios tubo met lico plegable cepillo motorizado accesorio 3 en 1 boquilla plana y ancha cepillo especial animales tubo flexible est n obstruidos o se han montado de forma incorrecta l mpi...

Page 24: ...Schnelle Geschwindigkeit Boost Funktion 9 Minuten LED Beleuchtung an der B rste Akku Ladestand Kontrollleuchte Fassungsverm gen des Beh lters 0 5 L Hygienefilter Grobpartikelfilter Vor dem ersten Gebr...

Page 25: ...rumfangs Laden des Akkus 1 Boden Ladestation 1 2 Nach dem Aufstellen der Ladestation auf dem Boden verbinden Sie das Netzladeger t mit dem Anschluss der Ladestation und schlie en es an eine leicht zug...

Page 26: ...e wie in der folgenden Abbildung gezeigt an Die B rsten und das Zubeh r k nnen direkt auf das Ger tegeh use auf das Metallrohr oder auf den Schlauch gesteckt werden Anbringen Entfernen des 3 in 1 Zube...

Page 27: ...etzt werden 1 Drehen Sie mit einer M nze die Verriegelungsschraube in Richtung des Symbols entriegelt um die Verriegelungszunge herausziehen zu k nnen siehe Abbildung unten 2 Nehmen Sie die Walze hera...

Page 28: ...ufladen auf die Ladestation Reinigung und Pflege berpr fen Sie ob das Ger t ausgeschaltet und vom Strom getrennt ist bevor Sie mit seiner Reinigung beginnen Tauchen Sie das Ger t oder die Halterung ni...

Page 29: ...genden Kontrollen durch bevor Sie sich an die Serviceabteilung Ihres H ndlers wenden Der Staubsauger wird nicht geladen Der Akku wurde falsch eingesetzt Nehmen Sie den Akku heraus und setzten Sie ihn...

Page 30: ...1 accessoire vloerreiniger met doekje 1 brede platte zuigmond 1 gebogen adapter 1 speciale borstel voor harde vloeren 1 dierenhaarborstel 1 slang 1 gebruiksaanwijzing Technische kenmerken Draadloze s...

Page 31: ...massieve muren bijvoorbeeld beton massieve baksteen stenen etc 1 Plaats de muurhouder 17 op de gewenste plaats tegen de muur Controleer of de hoogte van de houder overeenkomt met de hoogte van de sto...

Page 32: ...orden geladen LET OP laadt de accu niet vaker op dan nodig is dit kan de levensduur verkorten Als u het apparaat langere tijd niet gebruikt of als de accu volledig leeg is kunnen de prestaties afnemen...

Page 33: ...ruiken Met de accessoire vloerreiniger met doekje gecombineerd met de draaiborstel van de stofzuiger kan de vloer in n keer worden gestofzuigd en gedweild Plaats het doekje onderaan de accessoire dank...

Page 34: ...e beschadigen Vergrendelingsschroef Vergrendelingslipje Reinigingsgleuf gebruik Voordat u de stofzuiger gebruikt controleert u of het filter correct in het filterblok geplaatst is Raadpleeg de rubriek...

Page 35: ...atst om te voorkomen dat er water wordt opgezogen in de elektrische onderdelen Reinigen van de filters Het apparaat heeft twee filters 1 Een hygi nisch filter aan de voorkant van het motorblok 4 Om di...

Page 36: ...rkeerd ge nstalleerd Verwijder de borstel en plaats hem correct terug in de daarvoor bestemde inkepingen De gemotoriseerde borstel zit verstopt Verwijder de borstel en de verstopping Een van de onderd...

Page 37: ...huan Songgang Subdistrict Bao an District 518105 Shenzhen Guangdong P R China Identificador del modelo ZD12D260050EU Tensi n de entrada 100 240 V Frecuencia de la CA de entrada 50 60 Hz Tensi n de sal...

Page 38: ......

Page 39: ...de recogida de residuos y los distribuidores disponen de sistemas de devoluci n y recogida Reciclando su dispositivo al final de su vida til ayudar a proteger el medio ambiente y a evitar consecuenci...

Reviews: