


6
Basic operations
POWER ON
Plug the lead from the 5-way power supply marked DVR into the 12VDC power supply
input of the DVR. Turn on the DVR at the power switch located on the rear panel. The
Power supply indicator light ( Blue) will illuminate on the DVR front panel followed by
a short bleep.
POWER OFF
Turn off the DVR at the power switch located on the rear panel
Notes on power
1. Auto resume after power failure
If the DVR is shut down abnormally, it can automatically backup video and resume
previous working status after power restore.
2. Replacing the hard disk
Before replacing the hard disk, the power to the DVR must be turned off.
3. Replacing the battery
Before replacing the battery the power supply switch in the real panel must be turned
off. The system time must be checked regularly. If the time is not correct you must
replace the battery, we recommend replacing the battery every year and using the
same battery type.
Note: The settings information must be saved before replacing the battery otherwise
information will lose.
MOUSE CONNECTION
In order to prevent un-authorised tampering most functions of the DVR are mouse
controlled . Please plug in the supplied mouse via the USB interface on the front panel
below the status LEDs.
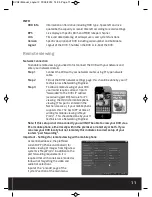
LIVE VIEWING
On start up the DVR will display a quad (four channel) image. Using Mouse double
click on any image to bring to full screen. Double click again to return to a quad screen.
System time and date, channel name, recording status and alarm status are indicated
by the following icons:
Recording status
Motion detect
Video loss
Camera lock
DVR4i Manual_Layout 2 01/05/2013 14:35 Page 6


