ESP 4 CHANNEL NETWORKABLE DVR WITH NTEGRAL 500GB HARD DRIVE User Manual Download Page 11

11

INFO

HDD Info

Information on Hard drive including HDD type . Space left on drive
quoted both a capacity or record time left according to record settings.

BPS

Live display of Specific KB/S and MB/H rate per channel.

LOG

Time and dated data log of all major users and system functions.

Version

Specific description of DVR including serial number and build date.    

Logout

Logout of the DVR , Shutdown the DVR or re-boot the DVR.

Remote viewing

Network Connection

To enable remote viewing you need to first connect the DVR with your network and
enter your networks details.

Step 1 

Connect the DVR with your networks router using PC type network
cable.

Step 2 

Fill out the DVRs network settings page; this should be done by your IT
technician or a Networking Engineer.

Step 3 

To allow remote viewing of your DVR,
your router requires at least 3 ports
“forwarded” to the DVRs IP address
(avoid using port 80), two are for PC
viewing, the third is for mobile phone
viewing ( This port is entered in the
Net Service area ), if your mobile phone
supports this. The best APP at time of
writing for mobile viewing is Meye
ProV2  - This should be done by your IT
technician or a Networking Engineer.

Note: If this setup is not done correctly you will NOT be able to view your DVR via a
PC or mobile phone, either locally within the premises or remotely or both. If you
can view your DVR locally but not remotely this indicates incorrect setup of your
routers “port forwarding”.

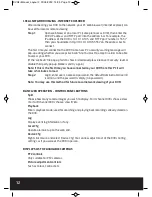
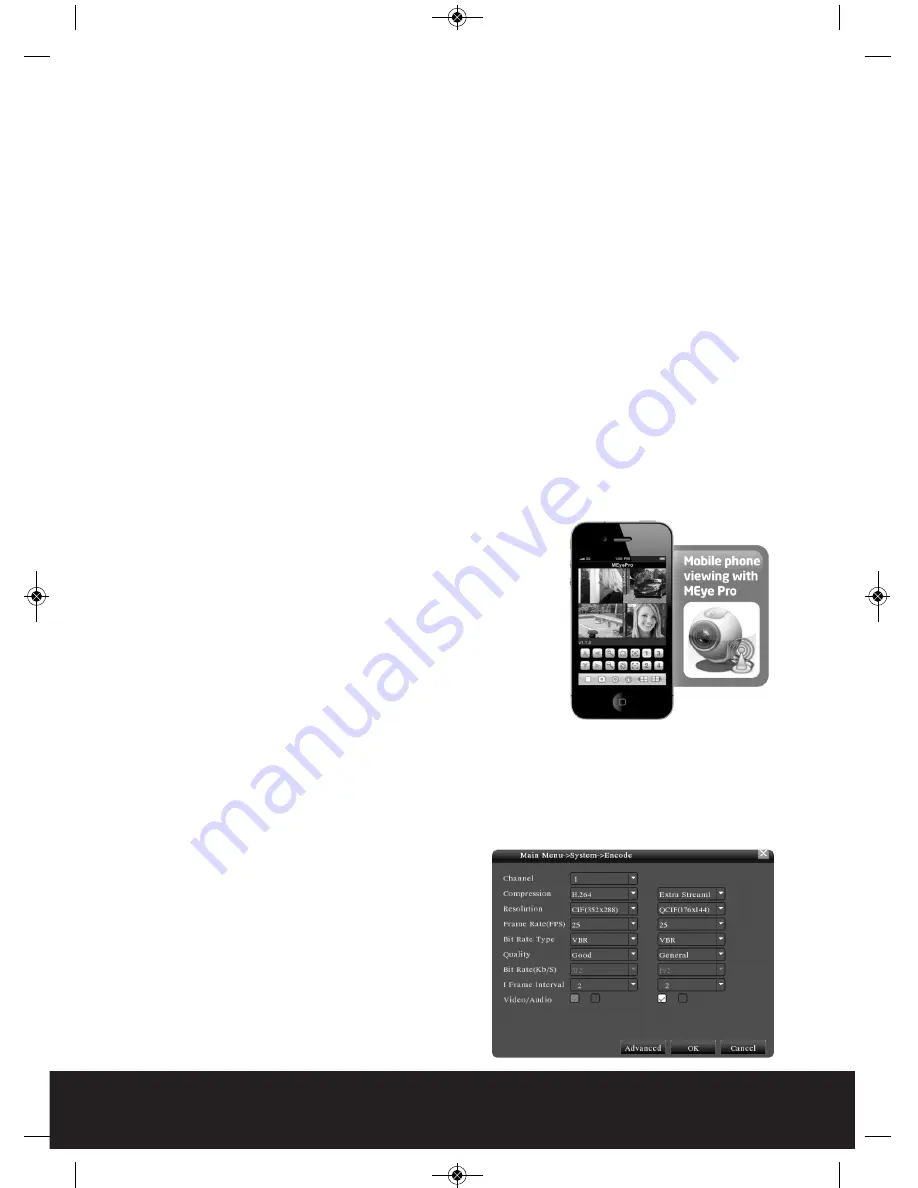
Important – Settings for remote viewing with a mobile phone

As mentioned above , the preffered
current APP ( iPhone and Android ) for
remote viewing of images from Digi-view
systems is MeyeProV2. In addition to the
port forwarding requirements it is
required that all channels are encoded as
follows not forgetting the video and
audio tick selections.

Input at the “ encode” page of the
“system” section of the main menu.

DVR4i Manual_Layout 2  01/05/2013  14:35  Page 11

Summary of Contents for 4 CHANNEL NETWORKABLE DVR WITH NTEGRAL 500GB HARD DRIVE

Page 1: ...4 CHANNEL NETWORKABLE DVR WITH INTEGRAL 500GB HARD DRIVE US ER MANUAL DVR4i Manual_Layout 2 01 05 2013 14 35 Page 1...

Page 2: ...ion if you are not sure about the power supply to be used Do not place anything on or around the power cord A damaged power cord may cause electric shock Please do not touch any control parts not ment...

Page 3: ...Trouble shooting 14 This manual is designed to be used as a quick start guide alongside the informative general user interface GUI of the DVR Additional details of the subjects covered may be found wi...

Page 4: ...2 Network connection on Green 3 Recording status on Red 4 Remote control receiver N A 5 Keys Control keys for main menu navigation 6 USB USB input for Mouse control or back up 1 2 3 4 6 5 Front Panel...

Page 5: ...ET LAN Network Interface 9 USB USB interface 10 OFF ON Power switch 11 RS485 RS485 Interface 12 DC 12V 12V Power Input from power supply NB To obtain best quality on screen display It is highly recomm...

Page 6: ...h in the real panel must be turned off The system time must be checked regularly If the time is not correct you must replace the battery we recommend replacing the battery every year and using the sam...

Page 7: ...Hard disk management password settings network settings Info Hard Drive status system usage log version details Making a recording RECORD CONFIGURATION This section allows you to configure the record...

Page 8: ...nywhere in the picture then move the mouse in any direction to create a selection window Once you are happy with the selection window release the left click and then left click again within the create...

Page 9: ...DVR can detect movement changes in the images being captured via detection it s own software Each channel can be configured to create alarm events via on screen movement Enable The area of detection...

Page 10: ...can be provided by your internet service provider or IT support Includes opportunity to enter forwarded Port number for mobile device viewing GUI Display Settings for how the on screen information is...

Page 11: ...to the DVRs IP address avoid using port 80 two are for PC viewing the third is for mobile phone viewing This port is entered in the Net Service area if your mobile phone supports this The best APP at...

Page 12: ...this is the first time you have connected to your DVR from this PC it will take 4 5 minutes to load Step 2 Login enter user s name and password the default Administrator User ID is admin and the passw...

Page 13: ...k and type in what is my IP Any of the top search results will take you to a website which will display your External IP address The first time you connect to the DVR from a new remote PC a security w...

Page 14: ...tection is set 4 The hardware of the DVR is damaged 5 No cameras connected 6 No power to connected cameras Real time image problems such as the image color or the brightness distortion Possible reason...

Page 15: ...tion is set 5 The user has no surveillance to view 6 The real time image of the hard disk recording machine itself is not clear Network connection is not stable Possible reasons are as followed 1 Netw...

Page 16: ...Elite Security Products Unit 7 Target Park Shawbank Rd Lakeside Redditch B98 8YN Telephone 01527 515150 email info espuk com DVR4i Manual_Layout 2 01 05 2013 14 35 Page 16...

Reviews: