background image

ESM32 Expansion Module

www.escene.cn/en

ESCENE COMMUNICATION

--5

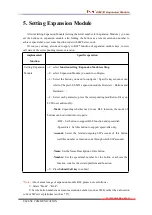
Press button "OK" or the "Enter" to submit**

*The serial number of Expansion Module is default "1", Don't install when there is

only one Expansion Module

**If not press button "OK" or "Enter" within 35seconds, it will automatically save the

Serial number of Expansion Module

Check the status

of the Expansion

Module

--1

select

viewing state

on the page

--2

If successfully installed and connected to Expansion Module, it will

show "online", otherwise show "offline".

Diagnose

Expansion

Module LED

--1

hold down button“C” to enter

Diagnostics> Expansion Module>

Indicator

--2

Press Button

OK

to start

Press 1st: LED, all " red"

Press 2nd: LED, all "off"

Press 3rd: LED, all “yellow-green"

Press 4th: LED, all “off"

Press 5th: LED, all "orange”

Press 6th: LED, all "off”

And so on

……

Press C key to exit diagnostic procedures

Diagnose

Expansion

Module buttons*

--1

hold down button “C” to enter Diagnostics> Expansion

Module

>

Button

--2

Press Button button “

OK

” to start

Press different buttons on

Expansion Module, the corresponding number will disappear in the

LCD screen to test if the button is normal.

*when diagnosing, the relation of he corresponding number of each button, the buttons

(left from top to bottom & right from top to botton) need to correspond with the

numbers.

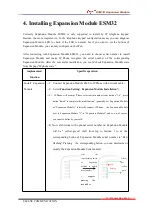
After installing Expansion Module (designating the corresponding ID for each Expansion
Module )

In order to facilitate the user to know the number of each Expansion Module, when

turning on Expansion Module, the corresponding button will quickly flash "red" in 2 seconds.

Summary of Contents for SayHi ESM32

Page 1: ...www escene cn en ESCENE COMMUNICATION Expansion Module ESM32 User Manual Escene Communication Co Ltd 2016 06 16 ...

Page 2: ...CATION Tables of Contents 1 Getting Started 1 About 1 Technical features 1 2 Connecting Expansion Module ESM32 2 3 ESM32 Expansion Module Overview 4 4 Installing Expansion Module ESM32 6 5 Setting Expansion Module 9 6 Web Setting 10 ...

Page 3: ...he server to achieve call forwarding call transfer call holding call pick up and other functions Expansion Module ESM32 is suitable for the front desk attendant administrative assistants call center agents and the user who needs to monitor or manage a large number of calls Technical features Items ESM32 Keys 32 programmable keys Dual color LEDs Interface 2xRJ 45 including IN OUT to easily connect ...

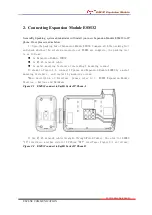
Page 4: ...ollows 1x Expansion Module ESM32 1x RJ 45 network cable 1x metal mounting fasteners including 4 mounting screws 2 shown in Figure 2 1 connect IP phone and Expansion Module ESM32 by a metal mounting fasteners and install by mounting screws More description of Interface please refer to 3 ESM32 Expansion Module Overview Buttons and Hardware Figure 2 1 EMS32 connect to SayHi Series IP Phone A 3 Use RJ...

Page 5: ... Figure 2 3 as follows Figure2 3 EMS32 connect to ESM32 5 On the back of ESM32 press the button on the side of the bracket then adjust the angle to make it as same as the angle of IP Phone Figure 2 4 as follows Figure2 4 ESM32 Expansion Module bracket angle adjustment 6 After connecting you can install and set Expansion Modules ESM32 more detials please refer to the following sections ...

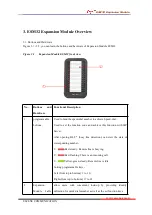
Page 6: ...number to achieve Speed dial Used to set the function code and achieve this function with SIP Server After opening BLF busy line detection can view the state of corresponding number 1 Red steady Remote line is busying 2 Red flashing There is an incoming call 3 Yellow green steady Remote line is idle Sorting programmable keys Left from top to bottom 1 to 16 Right from top to bottom 17 to 32 2 Expan...

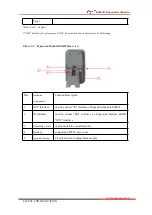
Page 7: ...nsion Module ESM32 Rear view No Hardware components Function Description 1 OUT Interface used to connect IN interface of Expansion Module ESM32 2 IN Interface used to connect EXT interface or Expansion Module ESM32 OUT interface 3 Fastening screw used to install the metal fasteners 4 Bracket supporting ESM32 easy to use 5 Button of bracket Press the button to adjust bracket angle 1 3 2 4 5 ...

Page 8: ...ction Specific operation Install Expansion Module 1 Connect Expansion Module EMS to IP Phone with network cable 2 Select Function Setting Expansion Module Installation 3 IP Phone will prompt Please select serial number from buttons 1 6 press button finish to complete the modification generally set Expansion Module as Expansion Module1 to directly connect IP Phone the Expansion Module next to Expan...

Page 9: ...LED all off Press 3rd LED all yellow green Press 4th LED all off Press 5th LED all orange Press 6th LED all off And so on Press C key to exit diagnostic procedures Diagnose Expansion Module buttons 1 hold down button C to enter Diagnostics Expansion Module Button 2 Press Button button OK to start Press different buttons on Expansion Module the corresponding number will disappear in the LCD screen ...

Page 10: ...ne cn en ESCENE COMMUNICATION Like Expansion Module with serial number 1 will flash firstly Expansion Module with serial number 2 will flash secondly Specific button configuration of Expansion Module please refer to the next section ...

Page 11: ...n refer to Chapter3 ESM32 expansion module Overview Buttons and Hardware 4 Select each parameter press the corresponding modified soft key on LCD to set and modify Mode depending whether need to use BLF function the mode of buttons can be divided into two parts BLF Set button to support BLF function and speed dial Speed dial Set this button to support speed dila only Account Select the related out...

Page 12: ...interface of IP Phone by Straight line 2 Ensure IP Phone is working view the IP address of IP phone 3 Enter IP phone address in address bar of browser 4 Enter the administrator user name and password to enter the web configuration page the default administrator user name is root the default password is root The system after landing as figure 5 Click on the left navigation bar programmable keys exp...

Page 13: ...ree busy Account Select the related outgoing SIP account of the button through which SIP account to call this number or function code Name Setting the key Name Description Number Set the speed dial number for the button or achieve function code for the certain platform and function If you want to view the status of Expansion Module you may open the page IP Phone status for viewing figure as follow...

Reviews: