background image

PAGE 7

Web UI User’s Manual

CHANGING THE CURRENT PLAY MODE

The default Play Mode will play the current Title from Track 1 to the last track 
in order, then stop. If you want to change the order of how tracks are played, 
there are six different Play Modes to choose from:

•  Normal – play each track in order in the current Title, then stop.
•  Repeat Track – repeat the same track over and over until you select stop.
•  Repeat Title – play each track in the current Title in order then repeat the 

entire disc until you select stop.

•  Repeat Group – play each track in each title in the current group and then 

repeat them until you select stop.

•  Random Title –randomly select and play a track from within the current 

title. Continue until you select stop or every track in the current title is 
played.

•  Random Group – randomly select and play a track from any title in the 

current group. Continue until you select stop or every track in the current 
group is played

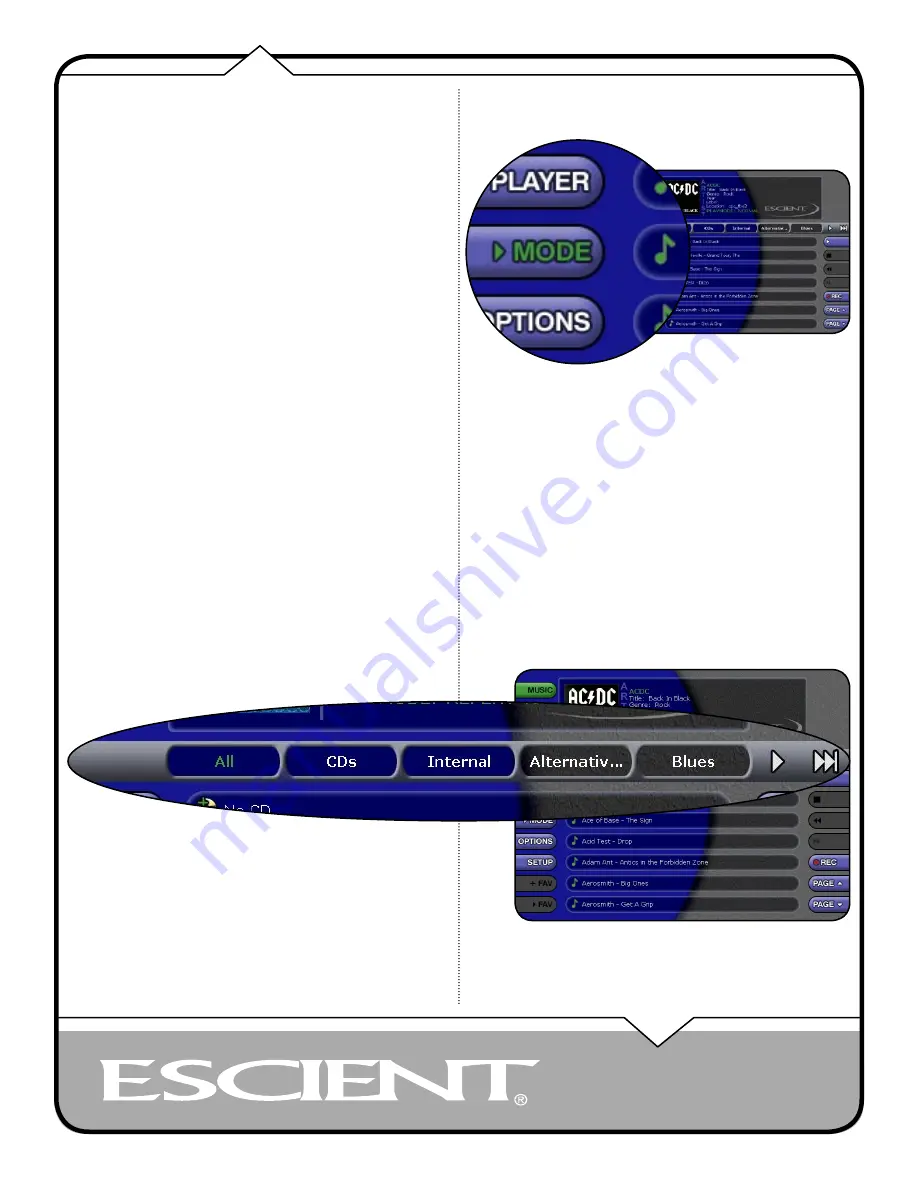
To change the current Play Mode, select the 

PLAY MODE

 key on the left edge 

of the screen. Each press of the 

PLAY MODE

 key will switch to the next Play 

Mode. Stop pressing the 

PLAY MODE

 key when you see the desired Play Mode 

appear on the screen.

VIEWING BY GENRE

In addition to the current Guide View, the 

Music Guide

 automatically organizes 

your Music into default “Genres” also called “Groups”. The Group Bar displays 
a horizontal scrolling list of Genres corresponding to the music in your library. 
Five Genres or Groups are visible at one time. The “All” genre is the default, 
which displays all Titles in your Music Library.

LEFT and RIGHT arrow buttons appear on the left and right edges of the 
Group Bar when more Groups are available. Pressing these arrows scrolls the 
Group Bar horizontally by one or 5 items at a time. Notice that the list of Titles 
updates to show only Titles in the selected Genre.

•  Scroll all the way to the left to return to the All Genre.
•  Genre list will scroll to the right to reveal more Genres.
•  Refer to the section “Managing Your Media” for instructions on creating 

your own Genres to create custom groupings of your favorite music titles

Summary of Contents for Web User Interface

Page 1: ...WEB User Interface USER S MANUAL...

Page 2: ...O FIREBALL 11 RECORDING FROM THE INTERNAL CD 11 RECORDING FROM AN EXTERNAL CHANGER 12 MANAGING YOUR MEDIA 13 CREATING PLAYLISTS 13 CREATING GROUPS 14 ADDING INTERNET RADIO STATIONS15 UPDATING THE INTE...

Page 3: ...r more music tracks or songs Title a collection of music tracks commonly referred to as a CD Album or Playlist Key refers to one of the buttons on your remote or keyboard MP3 a compressed digital audi...

Page 4: ...er browser From this web page you can control almost every aspect of your FireBall just as you would from the original IR remote and TV The familiar FireBall Guide Player Options and Setup mode are al...

Page 5: ...ou will expand the current Title to reveal a list of the Title s Tracks Select the Title again to collapse the current Title and hide the track names PLAYING THE CURRENT TITLE Playing the currently hi...

Page 6: ...sort your Music Library is by using the Music Views There are four Views that you can toggle through using the MENU VIEW button on the left edge of the screen View By Artist View By Title View By Song...

Page 7: ...he current Play Mode select the PLAY MODE key on the left edge of the screen Each press of the PLAY MODE key will switch to the next Play Mode Stop pressing the PLAY MODE key when you see the desired...

Page 8: ...location genre genre cover art and status about the current Internet Radio station stream FireBall will attempt to locate the station to make sure it is currently broadcasting over the Internet connec...

Page 9: ...play You ll notice that a new screen appears with a description of the movie a large cover image and DVD controls This is the Movies Player screen The Movies Player displays information about the curr...

Page 10: ...all DVDs in your Movie Library LEFT and RIGHT arrow buttons appear on the left and right edges of the Group Bar when more Groups are available Selecting these arrows scrolls the Group Bar horizontall...

Page 11: ...no additional equipment and is very fast as the internal CD drive can rip audio at several times the speed of normal playback This is known as fast ripping Follow these steps to record using the inter...

Page 12: ...Recording from an external changer is much slower than recording from the internal CD drive because each CD must be played and recorded in real time compared to the fast ripping speed of recording fro...

Page 13: ...n screen to advance to the Edit Playlist Select Guide The Edit Playlist Select Guide works just like the Music Guide Page up and down the list and select the OPEN or CLOSE button expand or collapse mu...

Page 14: ...m Radio Group 2 Select the OPTIONS button to display the Options Menu 3 Select the New Group menu item 4 Using the popup keyboard enter a name for your Group 5 Select the CONTINUE button on screen to...

Page 15: ...u have a valid URL for a station follow these steps to add your own Internet Radio Station to the Radio Guide 1 Make sure you are in the Radio source mode by selecting the RADIO source mode on the lef...

Page 16: ...tations you may have added from your Radio Guide It WILL replace the Escient supplied stations with a fresh new list If you want to replace the current Internet Radio Stations with a new list of stati...

Page 17: ...tem to display the Edit Music Information screen 4 Using the popup keyboard change the artist name album title label year of release or genre 5 Select the SAVE button to save your changes and return t...

Page 18: ...isc 1 Select the Music or Movie Title you want to edit in the Music or Movies Guide 2 Select the OPTIONS button to display the Options Menu 3 Select the EDIT MUSIC or EDIT MOVIE menu item to display t...

Page 19: ...You can change either one of these to modify the search Note that editing the Artist Name or Title WILL NOT change them in the Music Library These edits are ONLY used to search for a new cover 6 Sele...

Page 20: ...tle in the list of covers Notice that a preview of the selected cover appears on the right of the list as you highlight each name Note that it may take several minutes to display all the covers availa...

Page 21: ...utton to make sure you are in the Radio source 2 Select the OPTIONS button to display the Options Menu 3 Select the Edit Station menu item to display the Edit Station screen 4 Using the popup keyboard...

Page 22: ...ct the CONTINUE button on screen to keep the current name and advance to the Edit Playlist Select Guide 6 For each song you want to add to the Playlist select the box to the left of the song A checkma...

Page 23: ...to advance to the Edit Group Select Guide 6 For each item you want to add to the Group select the white box to the left of the Title A checkmark appears on the box of each selected Title or Station in...

Page 24: ...the Delete Music screen 4 For each Track you want to delete highlight the Track and select the SELECT key on the remote A checkmark appears to the right of each selected Track indicating that it will...

Page 25: ...select the SAVE button to permanently remove and delete the checked Playlists DELETING GROUPS Deleting Groups from the Group Bar is very similar to deleting Playlists The contents of the Group the Mus...

Page 26: ...t Mode your computer becomes the playback device This means that anytime you play pause stop or use any other transport control the your computer s playback system is affected This mode is useful beca...

Page 27: ...enable the Retail Demo Mode in your FireBall display model 1 Follow the Quick Start instructions to connect and register your demo FireBall 2 When your FireBall is con gured and you see the Music Gui...

Page 28: ...he password eld 2 Re enter the same password into the VERIFY eld 3 Select the SAVE button to save your password and enable Password Protection on the Setup Menus You must exit Setup and re enter setup...

Page 29: ...y reconnect to the FireBall Ethernet Settings Ethernet is the preferred networking choice which provides you with the best network performance and allows your FireBall to act as a server to deliver yo...

Page 30: ...ting service on your phone line you should enter 70 or any other code to temporarily disable it while using FireBall This prevents a Call Waiting call from interrupting any FireBall Internet functions...

Page 31: ...dio and will use less space for each song allowing you to store more songs on your FireBall FLAC audio will always take up approximately 50 of the original WAV AIFF le size The FLAC compression level...

Page 32: ...were added and then checks each previously occupied slot in the changer to see if any discs were removed One by one the Table of Contents is read from each CD and compared to the local music database...

Page 33: ...If you have more than 1 changer select which changer you want to use 5 Select the CHECK RANGE button 6 The Lookup Range screen displays the progress and results for each disc in the selected range Get...

Page 34: ...have both the digital and analog audio connections from your changers connected to FireBall FireBall will use the digital inputs rst but if there is digital copy protection on a CD FireBall will then...

Page 35: ...cord If you have more than 1 changer select which changer you want to use 5 Select the RECORD RANGE button 6 The Record Range screen displays the recording progress for each disc in the selected range...

Page 36: ...o display the Setup menu 2 Select the Restart System menu item under Utilities 3 Con rm that you want to restart the system and select the RESTART button 4 When the blue LED on the front panel glows s...

Reviews: