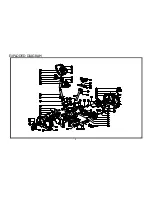
ESCALADE LS2005 Owners Assembly Manual & Operating Instructions Download Page 3


PARTS LIST 


No. 

Description 

Spec 

Q’ty 

Computer 

SM8000 

1PCS 

Handlebar 

TF2004(36B) 

1PCS 

Screw for computer  

M5 x 10L 

4PCS 

Handlebar post 

F 60 x1.5t x857.5L 

1PCS 

Semicircular washer 

F 8  x F 19 x2t 

8PCS 

Cone hex. screw 

M8 xP1.25 x16L(6m/m) 

4PCS 

Metal cover 


1PCS 

Handlebar cover 

TF2004 

1PCS 

T-knob 

M7 xP1.0 x 65L 

1PCS 

10 

Bushing 

F 7  x F 12 x40MML 

1PCS 

11 

Cone hex. screw 

M7 xP1.0 x 30L 

1PCS 

12 

Flat washer 

F 7  x F 12 x1t 

2PCS 

13 

Spring washer 

F 7 x 2t 

2PCS 

14 

Front stabilizer 

F 60 x1.5t x400L(190W) 

1PCS 

15 

Main frame 


1SET 

16 

Nut 

M8 

4PCS 

17 

Pedal 

E16(9/16”)  

1SET 

18 

Carriage bolt 

M8 xP1.25 x90L 

2PCS 

19 

Rear stabilizer 

F 76 x 1.5t x430L(190W) 

1PCS 

20 

Knob for saddle post 

707A M16 x P1.5t x 22L 

1PCS 

21 

Saddle post 

F 50.8 x1.5t x 510L 

1PCS 

22 

Saddle 

LS-A12+GEL  

1PCS 

23 

Slider 

38x38x1.5tx215L 

1PCS 

24 

Flat washer 

f 12.5xf20x2t  

1PCS 

25 

Horizontal knob 

3/8"ABS 

1PCS 

26 

Hand pulse 

WP1007-36B 

1SET 

27 

Cable(upper) 

912P 

1SET 

28 

Cable(lower) 

7,2P,3P 

1SET 

29 

End cap 

Black 

2PCS 

30 

Transportation wheel 

Nylon-6(Black) 

2PCS 

31 

Cone cross screw 

3/16"x3/4" 

6PCS 

32 

Cover 

Black ABS 

1PCS 

33 

Cone cross screw 

M4x12L 

22PCS 

34 

Crank cover 

Silver(ABS) 

1PCS 

35 

Bearing  

6203 

1PCS 

36 

Magnetic adjustment 

f 12x50L 

1PCS 

37 

Adjustable end cap 

f 76 

2PCS 

38 

Front cover 

I007-4 (ABS) 

1PCS 

39 

Patten nut 

3/8"-26(Black) 

2PCS 

40 

Flywheel 

9KG 

1PCS 

41 

Idler spring 

ODf 12xf 1.8x45T 

1PCS 

42 

Idler clamping 

5T 

1PCS 

43 

Hex. Screw 

M8x20 

1PCS 

Summary of Contents for LS2005

Page 1: ...INSTRUCTIONS ESCALADE INT LTD PRODUCT CODE LS2005 ERGOMETER BIKE Escalade International Limited Unit 1 Viking Way Winch Wen Industrial Estate Swansea SA1 7DA Tel 01792 796893 Fax 01792 796627 Email s...

Page 2: ...tone and develop during these rest periods Beginners should work out twice a week and increase gradually to 4 to 5 times per week 9 Remove all jewelry including rings chains and pins before commencing...

Page 3: ...Rear stabilizer F 76 x 1 5t x430L 190W 1PCS 20 Knob for saddle post 707A M16 x P1 5t x 22L 1PCS 21 Saddle post F 50 8 x1 5t x 510L 1PCS 22 Saddle LS A12 GEL 1PCS 23 Slider 38x38x1 5tx215L 1PCS 24 Fla...

Page 4: ...M8xP1 25x75L 2PCS 62 Pedal R L 9 16 6 5 1SET 63 Nylok screw M8xP1 0x20L 2PCS 64 Crank cover 2PCS 65 Chain cover PC 2PCS 66 C type f 17 Black 1PCS 67 Flat washer f 17 5xf25x0 3t Black 1PCS 68 Wave wash...

Page 5: ...5 EXPLODED DIAGRAM...

Page 6: ...of the foot caps in the back The pre assembled transportation wheels in the front allow easy maneuverings of the bike Step 2 1 Screw the pedals onto the crank The pedals are marked with R and L at th...

Page 7: ...ace the plastic cover on the handlebar and insert T shape knob into the metal cover and assemble with the lower spring washer flat washer Please ensure it is tightened very well 4 Make sure the handle...

Page 8: ...s just power on Function buttons QUICK START To start training directly without any presetting necessary UP To make upward adjustment of each setting DOWN To make backward adjustment of each setting M...

Page 9: ...and the pulse pirority sequence is earpule chest pulse and handpulse If you would like to check handpulse please do not wear on the chest transmitter belt and remove the earclip cable while holding t...

Page 10: ...y 0 5 km of the training distance 4 When you select your personal number Ux next time the profile created in this training will be called out for next training H R C 1 The monitor will calculate your...

Page 11: ...down when you start training in different mode 3 The monitor display will switch off automatically if you stop training and pressing any button for 4 minute You may wake up the monitor display by pres...

Reviews: