background image

esatto.house

 15


USING THE TIMER

OPERATING YOUR COOKTOP

You can use the timer in two different ways:

You can use it as a minute minder. In this case, the timer will not turn any

cooking zone off when the set time is up.

You can set it to turn one or more cooking zones off after the set time is up.
You can set the timer up to 99 minutes.

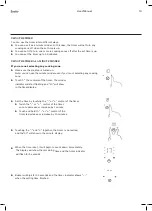
If you are not selecting any cooking zone

Make sure the cooktop is turned on.
Note: you can use the minute minder even if you’re not selecting any cooking
zone.

Touch”+” the controls of the timer. The minder
indicator will start flashing and “10” will show
in the timer display.

Set the time by touching the “-“ or ”+” control of the timer.

Touch the “-“ or ”+” control of the timer

once to decrease or increase by 1 minute.
Touch and hold th

-“ or “+” control of the

timer to decrease or increase by 10 minutes.

Touching the “-“ and ”+” together, the timer is cancelled,

and the”00” will show in the minute display.


USING THE TIMER AS A MINUTE MINDER

When the time is set, it will begin to count down immediately.

The display will show the remaining time and the timer indicator

will flash for 5 seconds.

Buzzer will bips for 30 seconds and the timer indicator shows “- - “
when the setting time finished.

USER MANUAL

PAGE 14


SETTING THE TIMER TO TURN ONE OR MORE COOKING ZONES OFF

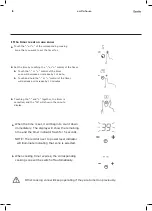
If the timer is set on one zone:

Touch the”-“ or ”+” of the corresponding cooking

zone that

want to set the timer for.

.

Set the time by touching the “-“ or “+” control of the timer.

Touch the “-“ or “+” control of the timer

once will decrease or increase by 1 minute.

Touch and hold the ”-“ or “+”control of the timer
will decrease or increase by 10 minutes.

Touching the ”-“ and “+” together, the timer is
cancelled, and the ”00” will show in the minute
display.

you

When the time is set, it will begin to count down

immediately. The display will show the remaining
time and the timer indicator flash for 5 seconds.

NOTE: The red dot next to power level indicator

will illuminate indicating that zone is selected.

When cooking timer expires, the corresponding

cooking zone will be switch off automatically.

Other cooking zone will keep operating if they are turned on previously.

PAGE 15

Summary of Contents for EE60T

Page 1: ...UserManual Exactly what you need Model Code s EE60T Online esatto house Product 60cm Electric Cooktop...

Page 2: ...of your appliance when cleaning our Support Team are here to help You can use our online Support Centre at anytime by visiting http support residentiagroup com au or you can contact us via calling us...

Page 3: ...lcome 04 Safety Instructions Contents 06 Your Esatto Cooktop 07 Installation Instructions 10 Operating your Cooktop 17 Cleaning Maintenance 17 Technical Data 18 Troubleshooting 19 Purchase Details 20...

Page 4: ...eement of Residentia Group will invalidate any warranty or liability claim You should not use this appliance to store items on or as a work surface No modifications to the appliance are permitted by R...

Page 5: ...ny damage After unpacking please dispose of all elements of packaging in a way that will not cause damage to the environment All materials used for packaging the appliance are environmentally friendly...

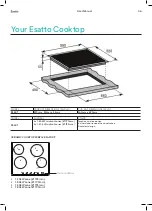
Page 6: ...60mm x 490mm MODEL BURNERS OTHER IE60T 2 x 1 80 kW radiant zones 190mm 2 x 1 20 kW radiant zones 155mm Touch control operation 4 x Individual residual heat indicators Frameless design CERAMIC COOKTOP...

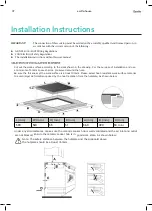
Page 7: ...ace according to the sizes shown in the drawing For the purpose of installation and use a minimum of 50mm space shall be preserved around the hole Be sure the thickness of the work surface is at least...

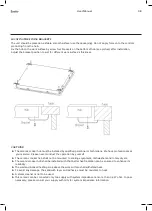
Page 8: ...We have professionals at your service Please never conduct the operation by yourself The ceramic cooker hob shall not be mounted to cooling equipment dishwashers and rotary dryers The ceramic cooker...

Page 9: ...Collection of such waste separately for special treatment is necessary This appliance is labeled in compliance with European directive 2002 96 EC for Waste Electrical and Electronic Equipment WEEE By...

Page 10: ...ll that exists and evaporate any humidity that has formed on the heating elements during transit Do not burn off more than one zone at once You must place a saucepan filled half full with cold water o...

Page 11: ...ERATING YOUR COOKTOP Always lift pans off the ceramic hob do not slide or they may scratch the glass The controls respond to touch so you don t need to apply any pressure Use the ball of your finger n...

Page 12: ...e that you wish to use Make sure the bottom of the pan and the surface of the cooking zone are clean and dry 3 Select a heat setting by touching the or control If you don t choose a heat setting withi...

Page 13: ...ntally turning the cooking zones on When the controls are locked all the controls except the ON OFF control are disabled Touch the keylock control The timer indicator will show Lo Make sure the cerami...

Page 14: ...ntrols of the timer The minder indicator will start flashing and 10 will show in the timer display Set the time by touching the or control of the timer Touch the or control of the timer once to decrea...

Page 15: ...er will decrease or increase by 10 minutes Touching the and together the timer is cancelled and the 00 will show in the minute display you When the time is set it will begin to count down immediately...

Page 16: ...saucepans with rough bottoms as this can scratch the ceramic surface Before use make sure that the bottoms of the saucepans are clean and dry When cold the bottom of the pans should be slightly concav...

Page 17: ...cooktop over with a damp cloth Dry the cooktop by rubbing the surface with a clean cloth Type of deposit Remove immediately Remove when the cooktop has cooled down What should I use to remove the dep...

Page 18: ...er you should make sure that the cleaning instructions are being followed regularly THE COOKTOP IS DIRTY AFTER COOKING Please note Once it has cooled down your cooktop should be cleaned after every us...

Page 19: ...invoice The rating plate of your cooktop is located on the underneath of the appliance Therefore please fit the duplicate data plates or label on the outside of the cupboard to sure that the label ca...

Page 20: ...pair an Appliance during the Warranty Period g Warranty Period means i where the Appliance is used for personal domestic or household use i e normal single family use as set out in the instruction man...

Page 21: ...use or non use of the Appliance 10 For Appliances and services provided by Residentia Group in Australia the Appliances come with a guarantee by Residentia Group that cannot be excluded under the Aus...

Page 22: ...User Manual 22 This page is intentionally left blank...

Page 23: ...esatto house 23 This page is intentionally left blank...

Page 24: ...Appliances Exactly what you need W W W R E S I D E N T I A G R O U P...

Reviews: