12
6.18 Electrolock assembly and manual unlocking
If the door does not have any electrolock system, go directly to the next chapter, otherwise follow the instructions
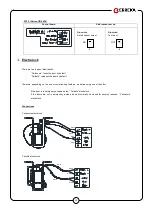
below. Depending on the type of installation, the electrolock will be placed in different positions:
2 Moving leaves
Electric lock
Manual Unlocking System
1 Moving Leaf
Desbloqueo
Electrobloqueo
Desbloqueo
Electrobloqueo
- Secure the "Locking plate (2) to the "Carriage "(1) with two screws. With the door open, insert the two "Elongated Nuts" (3) more or less
in the middle of the support profile,.
- Fix the "Electrolock" (9) with two screws. Manually, take the door to the closed position. Adjust the location of
the Electrolock so that the electromagnet couples the "Locking plate."
- Place the "Release cable bracket" (4) at 60mm on the left (or right as appropriate) of the "Electrolock".
- Place the "Unlock puller" (5) at one end of the support profile (right or left as per installation)
- Slide the "Case" (7) between the "Unlock Cable Support" (4) and Puller (6).
- Pass the "Cable" (8) from the "Electrolock" to "Release Puller." Be careful to insert the "Spring" (11) and “The
Brass Bracket" (10) between the "Unlocking Cable Support" and "Electrolock".
- With “Unlock Puller " in down position and the "electromagnet" in up position, cut the "Cable" to the height of
the base of the "Unlock Puller" and attach the "Cable" to the puller with the catch. Pulling the lever to check
that the "Electrlock" unleashes the carriage and releasing the" Electrolock so it falls down.
Fasten the "Brass Bracket" (10) to the "Cable", so when the "electrolock" is down the "Spring" (11) will gently push the "Cable" towards the
"Electrolock"!
- Connect the wires to the frame. Adjust the length of the cable using the terminal block, if installing a single moving leaf door.
Inner unlock
Internal and exterior unlock
11
10
9
8
7
6
5
4
3
2
1
Desbloqueo
exterior
Electric lock
Manual Unlocking System


