background image

or  carrying  the  tool. 

Carrying power tools with your finger on the switch or 

energising power tools that have the switch on invites accidents.

d. Remove any adjusting key or wrench before turning the power tool 

on. 

A wrench or a key left attached to a rotating part of the power tool may result 

in personal injury.

e. Do not overreach. Keep proper footing and balance at all times. 

This 

enables better control of the power tool in unexpected situations.

f. Dress properly. Do not wear loose clothing or jewellery. Keep your 

hair, clothing and gloves away from moving parts. 

Loose clothes, jewellery 

or long hair can be caught in moving parts.

g.  If  devices  are  provided  for  the  connection  of  dust  extraction  and 

collection facilities, ensure these are connected and properly used. 

Use 

of these devices can reduce dust related hazards.

4.   Power tool use and care

a.  Do  not  force  the  power  tool.  Use  the  correct  power  tool  for  your 

application. 

The correct power tool will do the job better and safer at the rate 

for which it was designed.

b. Do not use the power tool if the switch does not turn it on and off. 

Any power tool that cannot be controlled with the switch is dangerous and must 
be repaired.

c.  Disconnect  the  plug  from  the  power  source  and/or  the  battery 

pack  from  the  power  tool  before  making  any  adjustments,  changing 

accessories,  or  storing  power  tools. 

Such  preventive  safety  measures 

reduce the risk of starting the power tool accidentally.

d. Store idle power tools out of the reach of children and do not allow 

persons unfamiliar with the power tool or these instructions to operate 

the power tool.

Power tools are dangerous in the hands of untrained users.

e. Maintain power tools. Check for misalignment or binding of moving 

parts,  breakage  of  parts  and  any  other  condition  that  may  affect  the 

power tools operation. If damaged, have the power tool repaired before 

use. 

Many accidents are caused by poorly maintained power tools.

f. Keep cutting tools sharp and clean. 

Properly maintained cutting tools with 

sharp cutting edges are less likely to bind and are easier to control.

g. Use the power tool, accessories and tool bits etc., in accordance with 

these instructions and in the manner intended for the particular type of 

power tool, taking into account the working conditions and the work 

to be performed.

Use of the power tool for operations different from intended 

could result in a hazardous situation.

5.   Service

a. Have your power tool serviced by a qualified repair person using only  

Safety  Instructions  identical  replacement  parts.

This  will  ensure  that  the 

safety of the power tool is maintained.

Summary of Contents for ERB108SDR

Page 1: ...300W ORBITAL SANDER ERB108SDR WARRANTY YEARS...

Page 2: ...oods Thisguaranteedoesnotaffectyourstatutoryrights ThisguaranteeisonlyvalidintheUK For further technical advice spare parts or repair service outside of guarantee please contact the customer helpline...

Page 3: ...or wet conditions Water entering a power tool will increase the risk of electric shock d Do not abuse the cord Never use the cord for carrying pulling or unplugging the power tool Keep cord away from...

Page 4: ...the plug from the power source and or the battery pack from the power tool before making any adjustments changing accessories or storing power tools Such preventive safety measures reduce the risk of...

Page 5: ...lead based paint due to the risk of lead poisoning test any paint work with a lead paint test kit to con rm if lead paint is present 13 Do not eat or drink in the working area of the sander 14 Do not...

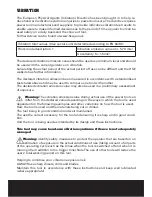
Page 6: ...lue may also be used in a preliminary assessment of exposure Warning The vibration emission value during actual use of the power tool can differ from the declared value depending on the ways in which...

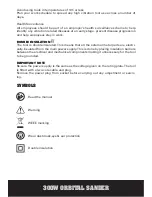
Page 7: ...The tool is double insulated This means that all the external metal parts are electri cally insulated from the main power supply This is done by placing insulation barriers between the electrical and...

Page 8: ...1 ON OFF WITCH 2 SOFT GRIP HANDLE 3 VARIABLE SPEED CONTROL 4 DUST EXTRACTION OUTLET 5 BASE PLATE 6 SANDING PAPER See Fig B 7 DUST BAG 5 1 2 3 4 7...

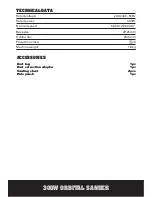
Page 9: ...ted voltage 230 240V 50Hz Rated power 300W No load speed 5 000 12 000min 1 Base size 125mm Orbital dia 2 5mm Protection class II Machine weight 1 8kg ACCESSORIES Dust bag 1pc Dust extraction adaptor 1...

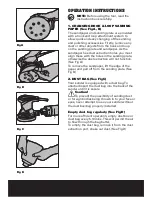
Page 10: ...will not function See Fig A To remove the sandpaper lift the edge of the paper and pull off from the sanding plate See Fig B 2 DUST BAG See FigC Your sander is equipped with a dust bag To attached ins...

Page 11: ...on Allow the sander to reach full speed before gently applying it to the work piece Always keep the sander moving in paralell or circular movements to ensure a consistent nish to the work piece Regul...

Page 12: ...oad Replacing the sandpaper regularly will maintain optimum sanding ef ciency MAINTENANCE Remove the plug from the socket before carrying out any adjustment servicing or maintenance Your power tool re...

Page 13: ...ace if it is allowed to become damp the abrasive particles will lose their adhesion to the backing paper and will not abrade 3 If the sander does not move smoothly the sanding paper may be loose damag...

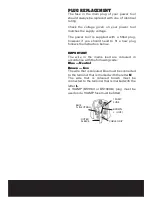
Page 14: ...ollows the instruction below IMPORTANT The wire in the mains lead are coloured in accordance with the following code Blue Neutral Brown Live The wire that is coloured blue must be connected to the ter...

Page 15: ...37 EC Low Voltage Directive 2006 95 EC Electromagnetic Compatibility Directive 2004 108 EC Restrictions of the Use of Certain Hazardous Substances in Electrical and Electronic Equipment 2002 95 EC Sta...

Page 16: ......

Reviews: