ERAE Electronics Industry ELM-1700N Series User Manual Download Page 16

31

Network configurations

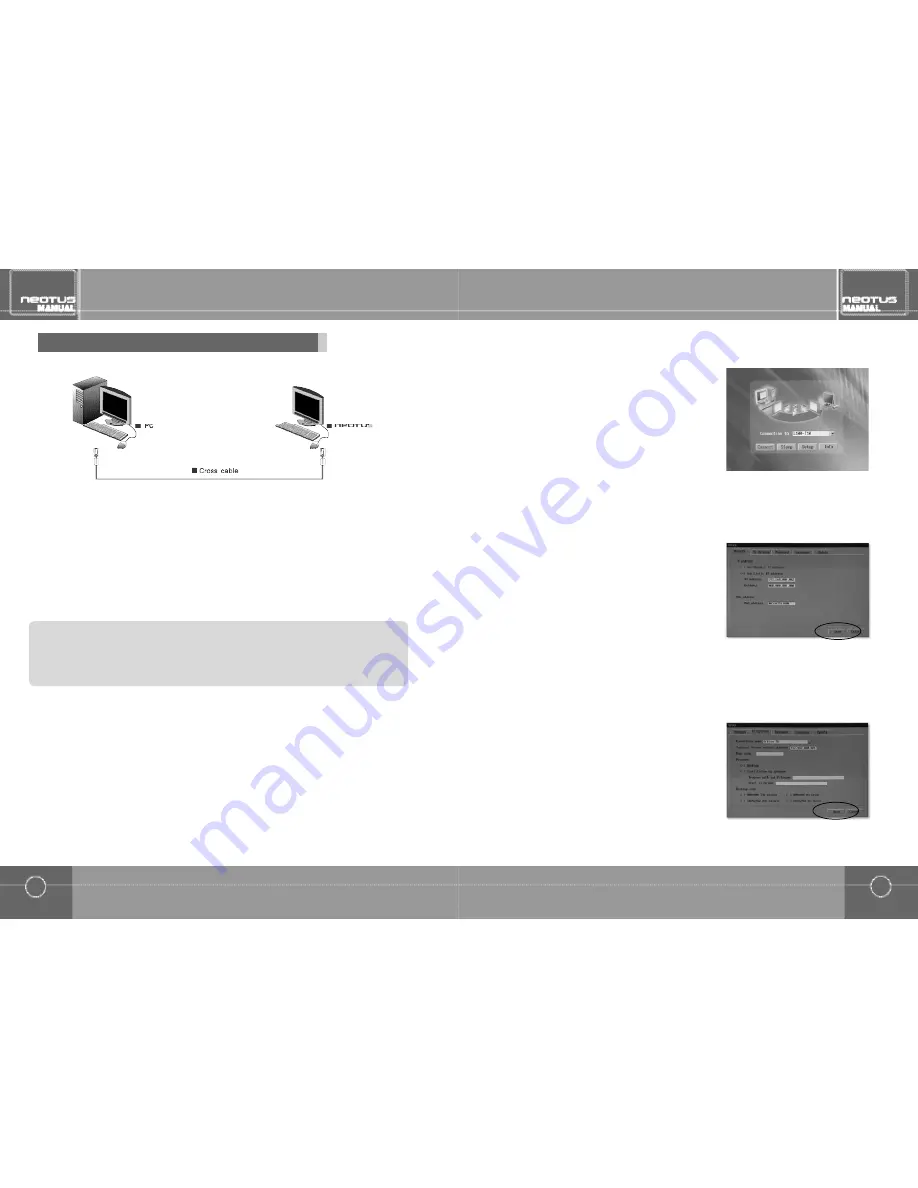
Directly connecting PC and NEOTUS

30

Network configurations

Configure the settings as shown in the following screen and click <OK>.(For example, IP address:192.168.0.1,
Subnet mask:255.255.255.0.IP address and subnet mask are different depending on the PC environment.)

5.

Select "Internet Protocol (TCP/IP)" and click <Properties>.

4.

When there is one LAN card ((supports 100M or higher)(Internet cannot be used)

1. To configure  the  PC,click <Start>from  Windows  and  select  "Control  Panel".  (For  Windows 200,click  <Start>from

Windows and select <Setting 

Control Panel >.)

2. Double  click  on  "Network  Connections"  (For Windows 2000,double  click  on  the  "Network  and dial-up  connections"

i c o n . )

3. Select the LAN  card  ,right click with  the  mouse  and  select  "Properties".(For  Windows  2000,  select "Registration

I n f o r m a t i o n " . )

If connecting multiple NEOTUS units,there must the same number of LAN cards installed in

the PC as the number of NEOTUS you wish to connect.

>

R e f e r e n c e s

You can see that PC and NEOTUS are now connected.
You can start using the NEOTUS.

9.

When configuration is complete,click <Save>to  exit the set-
tings screen and click <Connect>.

8.

To configure NEOTUS' settings,turn on the NEOTUS moni-
tor and press the input signal button to conver to the network
and click the "Setup" menu from the start page.

6.

Select the 'Network' tab.Then,select the 'Use Static IP address'item
to enter as follows.(For example,enter IP Address : 192.168.0.2,
Gateway : 000.000.000.000. IP address and gateway are different
depending on the host PC's environment.)

7.

Summary of Contents for ELM-1700N Series

Page 1: ...700N Series ELM 1900N Series Please observe all safety precautions when using this product Please read this manual carefully before using this product Network monitor user guide Network monitor user g...

Page 2: ...s software or pay for an upgrade Windows XP and Windows 2000 are the registered trademarks of Microsoft Corporation Other trademarks are the registered trademarks of each respectable company This prod...

Page 3: ...lecting and adjusting OSD screen Adjusting monitor screen 42 Adjusting screen colors menu options 43 46 Other Recommendations 47 Affect of settins 47 Self test function 48 FAQ 49 52 Warnings 52 Produc...

Page 4: ...ese safety precautions are ignored it can lead to serious injury or even fatality and may also lead to prop erty damage Warning indicates conditions that can cause serious injury or fatality Cation in...

Page 5: ...ot allow children to hold onto or climb on top of the monitor They may be injured when the monitor falls Do not disassemble repair or modify the monitor on your own This may cause electric shock or fi...

Page 6: ...P Home Professional Windows 2000 Professional When using 1 unit Intel Pentium 4 1 0GHz main memory of 256MB or more When using 2 3 units HT technology based Intel Pentium 4 2 4GHz main memory of 512MB...

Page 7: ...1700N Series ELM 1900N Series Turns power on off SOURCE press the button to change the input signal Analog Network Analog MENU Opens OSD menu SELECT select a menu item When the button is pressed while...

Page 8: ...Analog RGB input outlet Speaker connection outlet Keyboard connection outlet Mouse connection outlet LAN connection outlet ELM 1700N Series ELM 1900N Series Turns power on off SOURCE press the button...

Page 9: ...rsions ofOS the monitor is automatically detected as shown by the plug play function Connectingto Analog RGBor DVI 3 Complete theinstallation as follows If the monitor driver is installed resolution a...

Page 10: ...river Install exe file in the CD and follow the below steps Monitor installation is complete When installation does not work Windows XP 1 Insert the CD packaged with NEOTUS in the CD ROM 2 Double clic...

Page 11: ...reen appears enter the produce seri al number license key company and email and click Next 6 When the screen shown to the right appears enter the adminis trator password select Network management cons...

Page 12: ...he right appears enter the serial number and license key and click Next The newly entered serial number is added Look at the back of the product for the serial number and license key Serial number Ent...

Page 13: ...well as dynamic IP can be used Except dynamic IP can only be used if the IP sharing device has DHCP server function and the DHCP function has been enabled If you wish to IP sharing device but also us...

Page 14: ...and the gateway 7 Click the TS Options tab and configure as follows Enter the host computer s IP address in the Terminal Server Network address field 9 In the Dos prompt window enter ipconfig and hit...

Page 15: ...e LAN card Right click with the mouse and select Properties Registration Information and set to fixed IP for both the computer and NEOTUS Set the fixed IP as fol lows 1 28 Network configurations When...

Page 16: ...k and dial up connections icon 3 Select the LAN card right click with the mouse and select Properties For Windows 2000 select Registration Information If connecting multiple NEOTUS units there must th...

Page 17: ...e previous chapter the following application pro gram groups are automatically created From Windows click Start then select All programs NCT 2000 XP to check that NCT 2000 XP application program has b...

Page 18: ...user Logon name of the NEOTUS user 3 Default user Shows the name of the user that last logged in 4 Status Show whether the unit is connected and in use or is in standby 5 Logon program This menu can b...

Page 19: ...es connected to the PC can be ver ified This item allows new serial number to be added when a new monitor is to be added You can right click with the mouse on the serial num ber category or in the scr...

Page 20: ...gistration must be canceled 1 When all information has been entered correctly serial number registration starts Do not turn off the computer or disconnect from the Internet unit the registration is co...

Page 21: ...Cancel Registration is selected 1 When Offline Cancel file e mail registration is selected Program download from the website and upgrade using CD or floppy disk Note 1 In this case user registration m...

Page 22: ...g configuration the screen will go to the previous screen The number may change according to the saved value Adjusts brightness Brightness Dimsthescreen Brightens thescreen Contrast Adjusts contrast D...

Page 23: ...toward the left Screen moves toward the right Menu horizontal position adjustment Adjusts menu horizontal position Menu vertical position adjustment Adjusts menu vertical position Semi transparent men...

Page 24: ...too harshly If you put too much pressure on the screen it may cause a damage 4 If you are not satisfied with the picture quality use the uto Adjustment unc tion for better picture quality If noise ap...

Page 25: ...the monitor are con nected properly and the message does not disappear even after the cable is changed please contact our service cen ter This monitor has a self test function that can test the statu...

Page 26: ...rt 1 RJ45 LAN port Protocol WoIP Windows over IP TCP IP Support Windows XP Home Pro OS Windows 2000 Pro Network Product standards model with DVI input outlet 1 PS 2 Keyboard port Support 1 PS 2 mouse...

Page 27: ...nt generates uses and can radi ate radio frequency Energy and if not installed and used in accordance with the instructions If this equipment does cause harmful interference to radio communi cations H...

Reviews: