


After the product checks the cartridges, ink replacement is complete. If you see an error message on
the LCD screen, an ink cartridge may not be installed properly. Remove the ink cartridge and
reinstall it to clear the error.
Note:
Do not turn off the printer during ink replacement.
If you remove a low or expended ink cartridge, you cannot re-install and use the cartridge.
Caution:
If you remove an ink cartridge for later use, protect the ink supply area from dirt and dust and
store it in the same environment as the printer. The valve in the ink supply port is designed to contain
any excess ink, but do not touch the ink supply port or surrounding area. Always store ink cartridges with
the label facing up; do not store cartridges upside-down.
Parent topic:
Replacing Ink Cartridges and Maintenance Boxes
Related concepts
Purchase Epson Ink Cartridges and Maintenance Box
Replacing the Maintenance Box
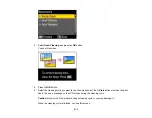
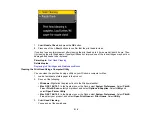
Make sure you have a new maintenance box before you begin.
Caution:
Do not reuse a maintenance box that has been removed and left uninstalled for more than a
week. Keep the maintenance box away from direct sunlight.
1.
Make sure the product is not printing.
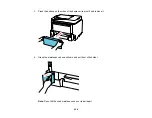
2.
Remove the new maintenance box from its package.
Caution:
Do not touch the green chip on the maintenance box.
203
Summary of Contents for WorkForce Pro WP-4530
Page 1: ...WorkForce Pro WP 4530 User s Guide ...
Page 2: ......
Page 12: ......
Page 13: ...WorkForce Pro WP 4530 User s Guide Welcome to the WorkForce Pro WP 4530 User s Guide 13 ...
Page 28: ...4 Load a stack of paper printable side down in the cassette as shown 28 ...
Page 50: ...Parent topic Placing Originals on the Product 50 ...
Page 51: ...Related topics Copying Scanning Faxing 51 ...
Page 115: ...3 Adjust the scan area as necessary 115 ...
Page 122: ...122 ...
Page 130: ...3 Adjust the scan area as necessary 130 ...
Page 176: ...5 Select Fax Settings for Printer You see this window 176 ...
Page 177: ...6 Select your product 7 Select Speed Dial Group Dial List You see this window 177 ...
Page 215: ...215 ...
Page 220: ...220 ...
Page 246: ...6 Lower the document cover 7 Raise the ADF input tray 8 Carefully remove the jammed pages 246 ...


