background image

48

6. Click the 

Page Setup

 icon. You see your Page Setup dialog box.

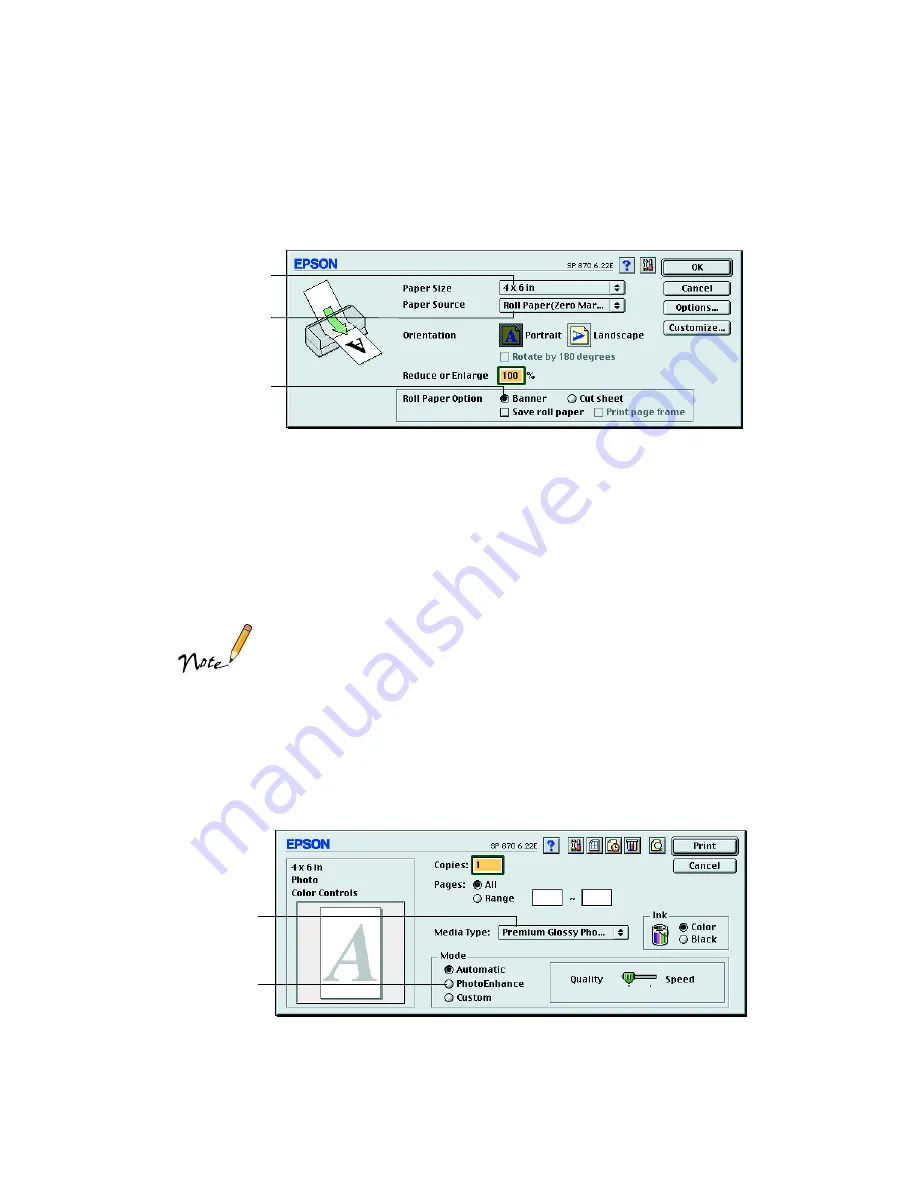
7. Select these settings:

Roll Paper (Zero Margins) 

as the Paper Source

× 

6 in

 as the Paper Size

Banner 

as the Roll Paper Option

Don’t

 select 

Save roll paper

 if you’re printing a 4 

×

 6 snapshot.

If you’re printing an image smaller than your selected page size (such 
as a 3 

×

 5 picture on a 4 

×

 6 page) so you’ll have a white border, click 

the Save roll paper checkbox. This retains the border around your 
picture and feeds less paper before your next print job on roll paper.

If you want to print a cutting line at your page boundaries, select Cut 
sheet, then click the Print page frame checkbox.

8. Click 

OK

9. Click the 

Print

 icon. You see your printer settings dialog box.

Select Roll Paper 
(Zero Margins)

Select 4 

× 

6 in

Select Banner

Select Premium 
Glossy Photo 
Paper

Make sure 
PhotoEnhance 
is turned 

off

Summary of Contents for Stylus Photo 1270

Page 1: ... EPSON Stylus Photo 870 EPSON Stylus Photo 1270 Printer Basics Printed on recycled paper with at least 15 post consumer content ...

Page 2: ...his product or excluding the U S failure to strictly comply with SEIKO EPSON CORPORATION s operating and maintenance instructions SEIKO EPSON CORPORATION shall not be liable for any damages or problems arising from the use of any options or any consumable products other than those designated as Original EPSON Products or EPSON Approved Products by SEIKO EPSON CORPORATION Trademarks EPSON and EPSON...

Page 3: ...tructions 9 VIEWING YOUR ELECTRONIC PRINTER MANUAL 11 Accessing Your Electronic Printer Manual 11 Navigating Your Electronic Printer Manual 12 PRINTING FROM START TO FINISH 15 Printing with Windows 15 Loading Paper 15 Opening the Printer Software 16 Selecting Printer Software Settings 17 Controlling Printing 19 Printing on a Macintosh 20 Loading Paper 20 Opening the Printer Software 21 Selecting P...

Page 4: ... Photo Paper 28 Envelopes 30 Taking Care of Your Photographs 31 Selecting Your Paper Type 32 USING ROLL PAPER 33 Loading Roll Paper 33 Printing on Roll Paper 36 Roll Paper Basics 36 Printing Edge to Edge 4 x 6 Snapshots 37 Printing Panoramics or Banners on Roll Paper 50 Printing on Paper Cut From a Roll 54 Removing and Storing Roll Paper 56 MAINTAINING YOUR PRINTER 57 Cleaning the Print Head 57 Us...

Page 5: ...Parts 70 Problems and Solutions 71 Problems Setting Up the Printer or Installing Software 71 Problems with Printing 72 Problems Getting Good Print Quality 73 Problems with Paper Feeding 76 Solving Miscellaneous Printout Problems 77 Uninstalling Printer Software 78 Uninstalling Windows Software 78 Uninstalling Macintosh Software 78 Reinstalling Printer Software 78 Where To Get Help 79 EPSON Technic...

Page 6: ...440 by 720 dpi dots per inch even on plain paper Six color printing for PRQ photo reproduction quality color and incredibly smooth gradations EPSON s exclusive Micro Piezo ink jet technology for cleaner unvisible dots as small as 4 picoliters Wide variety of ink jet papers to choose from including Photo Paper Premium Glossy Photo Paper Matte Heavyweight Paper Photo Stickers transparencies and more...

Page 7: ...s from a convenient roll EPSON Stylus Photo 1270 Your EPSON Stylus Photo 1270 is the ideal printer for advanced photography and all your large format printing projects Whether you re creating over sized panoramics photography portfolios client proofs or enlargements you ll get professional photo lab quality results You ll also get Great results on a variety of paper sizes from 3 5 3 5 inch up to 1...

Page 8: ...ort web site periodically for possible updates to your printer driver Visit www epson com and check the section for your product to see if there is a new driver available for downloading to your computer To check the version number of your current driver access the driver as described on page 16 for Windows or page 21 for Macintosh the version number is shown below the EPSON logo EPSON Software Fi...

Page 9: ...ets you build ICC device profiles for accurate color between scanned displayed and printed images The offer is available at a discounted price for EPSON Stylus Photo 1270 owners for a limited time Call 978 749 9944 to order from Monaco Systems The color management package includes software a target print and a corresponding target file You can install the software and target file from your printer...

Page 10: ...oll paper maintaining the printer solving basic problems For more details about printing with maintaining or troubleshooting your printer see your electronic Reference Guide For instructions on viewing it see page 11 Warnings Cautions Notes and Tips Please follow these guidelines Warnings must be followed carefully to avoid bodily injury Cautions must be observed to avoid damage to your equipment ...

Page 11: ...100MB of free hard disk space 200MB or more recommended CD ROM or DVD drive for installing the printer software Parallel connection an IEEE 1284 compliant parallel cable up to 10 feet long 3 meters USB connection a computer running Windows 98 with a Windows 98 compliant USB port and a shielded USB AB cable up to 9 8 ft 3 meters long Using an improperly shielded USB cable especially a cable more th...

Page 12: ... OS 8 5 or 8 5 1 Apple recommends that you install iMac Update 1 1 Download the update for your system from the Apple web site Contact Apple if you have problems installing an update To find out which operating system your iMac is running select About This Computer from the Apple menu 64MB of available RAM more recommended 150MB of free hard disk space 200MB recommended CD ROM or DVD drive for ins...

Page 13: ... Do not place the printer on an unstable surface or near a radiator or heating vent or in direct sunlight Use only the type of power source indicated on the printer s label Connect all equipment to properly grounded power outlets Avoid using outlets on the same circuit as photocopiers or air control systems that regularly switch on and off Place the printer near a wall outlet where the plug can be...

Page 14: ...vered by the operating instructions Ink Cartridge Safety Instructions Keep ink cartridges out of the reach of children and do not drink the ink Do not shake an ink cartridge this can cause leakage If ink gets on your skin wash the area thoroughly with soap and water If ink gets in your eyes flush them immediately with water Install the ink cartridge immediately after you remove it from its foil pa...

Page 15: ... date printed on the cartridge carton otherwise it may result in reduced print quality For best results use up the ink cartridges within six months of first installing them Store ink cartridges in a cool dark place After bringing an ink cartridge inside from a cold storage site allow it to warm up at room temperature for at least three hours before using it Do not put your hand inside the printer ...

Page 16: ...s may not display correctly A browser is not included on the printer software CD ROM Accessing Your Electronic Printer Manual Youcanviewyourelectronic Reference GuidefromtheCD ROMorcopyit to yourhard drive and view it from there Follow these steps 1 Insert your printer software CD ROM 2 Windows Double click My Computer double click your EPSON CD ROM or DVD drive icon then double click the EPSON ic...

Page 17: ...tion If you copied the manual to your hard drive you can access it at any time as follows Windows Select Start Programs EPSON and double click ESP870 Guide or ESP1270 Guide Macintosh Open the EPSON Stylus Photo 870 or EPSON Stylus Photo 1270 folder and double click View Reference Guide Navigating Your Electronic Printer Manual When you first open the Reference Guide you see this screen Click a top...

Page 18: ...right arrow click it to view subtopics then click on a topic to go to it Click the down arrow to close a subtopic list If you see an icon for a graphic when viewing your Reference Guide in Netscape Navigator click the Reload button to load the graphic Closed list click to expand Click to go to topic ...

Page 19: ...14 ...

Page 20: ...an skip ahead to these sections Using PhotoEnhance Custom and Advanced Settings on page 24 Using Advanced Color Management on page 26 Using Special Papers on page 27 Taking Care of Your Photographs on page 31 Printing with Windows This section describes the basic steps for printing with Windows To print on a Macintosh see page 20 Loading Paper Make sure your printer and computer are turned on Plac...

Page 21: ...u re ready to select your printer software settings From the File menu click Print You see your application s Print dialog box Make the following selections on the Print dialog box your dialog box may look slightly different Make sure your EPSON Stylus Photo printer model is selected Click the Properties button If you see a Setup Printer or Options button click it Then click Properties on the next...

Page 22: ... If you re not sure which setting to select see page 32 Set the Ink option to Color to print a color document To print a black text document click Black Set the Mode option to Automatic It s the easiest way to get good printing results on all types of paper Set the slider in the Mode box to Quality or Speed to select high resolution or faster printing The slider may not be available for your paper...

Page 23: ... this using the Windows Printer utility 1 Click Start point to Settings and then select Printers 2 Right click your EPSON Stylus Photo printer icon 3 Select Properties Document Defaults in Windows NT 4 Click the Main tab 5 Select the default settings you want to use for all your applications Click OK when you re finished Remember you can always change the default settings in your application when ...

Page 24: ...nd view printing tips For more advanced printer settings see pages 24 through 26 For more information on printing for example previewing your printout changing the paper size or adding a watermark see your electronic Reference Guide described on page 11 Click OK to start printing Click to cancel printing Does not appear if you are printing over a network Click to pause or resume printing The color...

Page 25: ...ge guide against the paper Keep the following in mind when loading paper Load the printable side face up It s usually whiter or brighter than the other side Load letterhead or preprinted paper into the printer top edge first Don t load paper above the arrow on the left edge guide If you re printing on envelopes or other special paper sizes or types see page 27 for loading instructions Slide paper ...

Page 26: ...ferent Make sure your EPSON Stylus Photo printer model SP 870 or SP 1270 is selected If the printer model is incorrect you need to select your printer in the Chooser see the Start Here poster for instructions Select the correct Paper Size Paper Source Orientation and Printable Area settings for your document See your electronic Reference Guide for details Click OK to close the page setup dialog bo...

Page 27: ... Type list If you re not sure which setting to select see page 32 Set the Ink option to Color to print a color document To print a black text document click Black Set the Mode option to Automatic It s the easiest way to get good printing results on all types of paper Set the slider in the Mode box to Quality or Speed to select a high resolution or faster printing The slider may not be available fo...

Page 28: ... printing but you need to cancel the current print job hold down the J key and press the period key For more advanced printer settings see pages 24 through 26 For more information on printing for example previewing your printout changing the paper size or adding a watermark see your electronic Reference Guide described on page 11 Click to cancel printing Click to pause printing Click to restart yo...

Page 29: ...mages you may want to use the Automatic setting instead see page 17 Windows or page 22 Macintosh PhotoEnhance does not affect your original image it only affects your printout Printing with PhotoEnhance may take longer on some systems and images To use PhotoEnhance you must select Color ink you cannot turn on PhotoEnhance with Black ink selected If your photograph was taken with a digital camera y...

Page 30: ... compatible application using sRGB colors such as those designed for the World Wide Web See your Windows 98 online help for details ColorSync Macintosh only For printing documents in conjunction with ColorSync compatible devices and applications Using Advanced Settings For maximum control over your project you can customize your print settings such as Print Quality Halftoning and Gamma and use spe...

Page 31: ...is larger color space transfers directly to your printer without any loss of color information inherent in color space conversions Using Color Management Profiles If you ll be printing in Adobe Photoshop using a color management profile created in another program such as MonacoEZcolor you ll need to turn off your printer software s color management features to get accurate results If you use a pro...

Page 32: ...parable lightfastness to normal color photo lab prints in an album or in normal indoor display conditions in a glass frame See page 31 for more information Load one sheet of paper at a time as described on page 15 Before printing select Premium Glossy Photo Paper as the Media Type setting Remove each sheet from the output tray immediately after it s done printing A sample roll of 4 inch wide EPSON...

Page 33: ...ect them from heat humidity and direct sunlight Return unused paper to the original package as soon as you finish printing If you re using letter size or larger Photo Paper follow the instructions on page 15 to load and print on the paper If you re using 4 6 inch or Panoramic Photo Paper see the next sections If you re using Photo Paper on a roll see page 33 4 6 inch Photo Paper EPSON 4 6 inch Pho...

Page 34: ...r back and forth along the perforations and carefully tear off the margins Panoramic Photo Paper 1 Pull up the paper support extension Load one sheet of Panoramic paper glossy side up 2 Hold up the paper s top edge and press the E load eject button to feed it into the printer 3 Choose Photo Paper as the Media Type setting and Panoramic 210 594 mm 8 3 23 4 inches as the Paper Size setting Trim size...

Page 35: ... lever to the position when you print on envelopes or other thick media Return the lever to the 0 position before you print on regular paper Select Plain paper as the Media Type setting and choose the correct envelope size as the Paper Size setting If the printing smears or you have banding light lines try turning off High Speed printing in the Advanced dialog box See page 25 for instructions on a...

Page 36: ...esistant but can be preserved if kept in a photo album As with all photos care should be taken to preserve the long life of your prints All color dyes change over time For storage in photo albums we recommend acid free archival sleeves that are commonly available from camera shops and other retailers For indoor display we recommend avoiding direct sunlight and mounting prints under glass to help p...

Page 37: ...paper Select this Media Type setting Plain paper sheets or envelopes Plain paper EPSON 360 dpi Ink Jet Paper EPSON Iron On Cool Peel Transfer Paper 360 dpi Ink Jet Paper EPSON High Quality Ink Jet Paper EPSON Photo Quality Ink Jet Paper EPSON Photo Quality Ink Jet Cards EPSON Photo Quality Self Adhesive Sheets Photo Quality Ink Jet Paper Matte Paper Heavyweight Matte Paper Heavyweight EPSON Photo ...

Page 38: ... Stylus Photo 870 optional for the EPSON Stylus Photo 1270 part number C811062 or cut paper from the roll and load it as a single sheet When you re finished printing you need to remove the roll paper carefully from the printer Follow the instructions in these sections Loading Roll Paper below Printing on Roll Paper on page 36 Printing on Paper Cut From a Roll on page 54 Removing and Storing Roll P...

Page 39: ...ble surface 3 Remove the printer s paper support and install the roll paper holder in the same mounting slots The sides of the holder are marked R and L to indicate its right and left sides 4 Now insert the roll paper onto the holder s spindle making sure both are oriented as shown here Then insert the spindle into the roll paper holder 13 inch wide roll paper 4 inch wide roll paper ...

Page 40: ...ree seconds to feed the paper backward to where you can pull it out Then reload it making sure the end is straight and not damaged If necessary trim the end again before reloading as shown in step 1 7 Gently rotate the roll backward to remove any slack from the paper 8 Make sure the output tray is open but the extensions are closed and leave ample room at the front of the printer for your paper to...

Page 41: ...roll paper To print 4 6 snapshots with no side margins see Printing Edge to Edge 4 x 6 Snapshots on page 37 To print panoramics or banners see Printing Panoramics or Banners on Roll Paper on page 50 Roll Paper Basics Whenever you print on roll paper you must select or deselect these basic options to use the paper correctly Always select either Photo Paper for the 13 inch wide roll paper or Premium...

Page 42: ...hotoDeluxe on page 45 Printing Snapshots with Photoshop on page 49 Printing Snapshots with Film Factory First load 4 inch wide roll paper in your printer as described on page 33 Then follow the steps in the section for your operating system below For more information on Film Factory see the program s online help Windows Instructions 1 Start Film Factory To do this click Start point to Programs Fil...

Page 43: ...selected then click the or button to select the number of copies you want to print 5 When you re ready to print click the Print Assignment button You see various printing options 6 Click the 4 6 icon as the Print Size option 7 Select Trim to Fit Print Size from the Height Width Ratio pull down menu Similar to traditional photo finishing Film Factory may not print your entire image within the 4 6 i...

Page 44: ...6 100 152 mm as the Page Size Banner Mode as the Roll Paper Option Don t select Save roll paper if you re printing a 4 6 snapshot If you want to print a cutting line at your page boundaries select Cut Sheet Mode then click the Print page frame checkbox 12 Click OK You return to the Print Assignments screen Select Premium Glossy Photo Paper Make sure PhotoEnhance is turned off Select Roll Paper Zer...

Page 45: ...ted beneath the first picture thumbnail 15 Click the Print icon Your pictures print with no space between them and no space on the sides Follow the steps on page 56 to remove and store your pictures The spaces between pages or print jobs on roll paper may vary depending on the application you re using and the way you create your document If you select Save Roll Paper when printing 4 6 inch images ...

Page 46: ...ed 4 If you want to retouch your photos before you print click the Standard Prints button on the left You see the Standard Prints screen Select the retouching option you want to use See Film Factory Help for assistance If you don t need to retouch your photos before printing click the Duplicate Prints button on the left You see the Duplicate Prints screen Click the number of copies on each photo y...

Page 47: ...tire image within the 4 6 inch print area This is because your image s width height or aspect ratio may not match the ratio for a true 4 6 inch print Film Factory will trim larger images or enlarge and trim smaller images to fit the 4 6 inch print area 8 Click the Properties button You see your Page Setup dialog box Print Assignment button Print button Click 4 6 Select Trim to Fit Print Size from ...

Page 48: ...een 11 Click the Print button on the left You see additional printing options 12 If you re using the Standard Prints function click the arrows in the Number of Copies box to select the number of pictures you want If you selected more than one picture for printing and want multiple copies of each one select the amount of each you want the total number of prints is listed beneath the first picture t...

Page 49: ...ween them and no space on the sides Follow the steps on page 56 to remove and store your pictures The spaces between pages or print jobs on roll paper may vary depending on the application you re using and the way you create your document If you select Save Roll Paper when printing 4 6 inch images you may create a space between each print job Select Premium Glossy Photo Paper Make sure PhotoEnhanc...

Page 50: ...luxe Home Edition 3 1 and double click the PhotoDeluxe Home Edition 3 1 icon You see the PhotoDeluxe main screen 2 Click the Get Fix Photo tab then click the Get Photo icon Select your picture from one of the options on the menu that appears 3 Modify the picture as necessary and size it to 4 6 inches See PhotoDeluxe Help for instructions 4 Click the Print icon then select Print from the menu that ...

Page 51: ...ler that your selected page size such as a 3 5 picture on a 4 6 page so you ll have a white border click the Save roll paper checkbox This retains the border around your picture and feeds less paper before your next print job on roll paper If you want to print a cutting line at your page boundaries select Cut Sheet Mode then click the Print page frame checkbox 10 Click OK You return to the Page Se...

Page 52: ...ll Paper when printing 4 6 inch images you may create a space between each print job Macintosh Instructions 1 Start PhotoDeluxe Open the Adobe PhotoDeluxe 2 0 folder and double click the Adobe PhotoDeluxe icon You see the PhotoDeluxe main screen 2 Click the Get Photo button then click the Get Photo tab Select your picture from one of the options on the menu that appears 3 Modify the picture as nec...

Page 53: ... as a 3 5 picture on a 4 6 page so you ll have a white border click the Save roll paper checkbox This retains the border around your picture and feeds less paper before your next print job on roll paper If you want to print a cutting line at your page boundaries select Cut sheet then click the Print page frame checkbox 8 Click OK 9 Click the Print icon You see your printer settings dialog box Sele...

Page 54: ...shop First load 4 inch wide roll paper in your printer as described on page 33 Then follow the steps in the section for your operating system below Adobe Photoshop LE comes with the EPSON Stylus Photo 1270 only Windows Instructions 1 Start Photoshop Click Start point to Programs Adobe Photoshop 5 0 LE and double click the Adobe Photoshop 5 0 LE icon You see the Photoshop main screen 2 Select the p...

Page 55: ...our favorite panoramic photographs or colorful banners on a roll of EPSON Photo Paper using an application such as Adobe Photoshop First load 13 inch wide roll paper in your printer EPSON Stylus Photo 1270 only as described on page 33 Then follow the steps in one of the sections below Other sizes of roll paper suitable for printing banners on the EPSON Stylus Photo 870 may become available in the ...

Page 56: ...as the Page Size enter the size of your document in the dialog box that appears and name your custom page size Banner Mode as the Roll Paper Option If you added margins to the top and bottom of your panoramic or banner click the Save roll paper checkbox This retains your margin and feeds less paper before your next print job on roll paper If you want to print a cutting line at your page boundaries...

Page 57: ...int job Macintosh Instructions 1 Start Photoshop To do this open the Adobe Photoshop 5 0 LE folder and double click the Adobe Photoshop 5 0 LE icon You see the Photoshop main screen 2 Open your panoramic picture or banner document or create a new one with Photoshop See Photoshop Help for instructions 3 Size your panoramic or banner as necessary If you want white borders on the top and bottom of yo...

Page 58: ...want to print a cutting line at your page boundaries select Cut Sheet Mode then click the Print page frame checkbox 6 Click OK 7 Select Print from the File menu You see your printer settings dialog box 8 Select Photo Paper as the Media Type setting Also make sure the PhotoEnhance setting is turned off 9 Click Print Your banner prints with 0 12 inch 3 mm margins on each side Follow the steps on pag...

Page 59: ...er to prevent your hands from marring the printable surface 3 Then remove the printer s paper support and load the sheet printable side up as far as it will go Slide the left edge guide against the paper 4 Gently hold the paper in place on the top as you press and release the E load eject button to feed the paper into the printer If the paper feeds incorrectly pull it out backward and reload it If...

Page 60: ...er your cut paper size should be at least two inches longer than your document size to provide the correct margins In Windows click the Paper tab to access the Paper Size and Paper Source settings on a Macintosh select Page Setup from the application s File menu 9 Click OK or Print You may need to click OK or Print on another screen to start printing 10 When you re finished printing hold down the ...

Page 61: ...If you re finished printing on roll paper follow the rest of the steps to remove it 3 Cut the roll paper on the side of the line facing away from the printer Make your cut as straight as possible to avoid feeding problems Don t pull on the paper as you cut it you may damage your printout 4 Hold down the E load eject button for about three seconds The roll paper feeds backward so you can remove it ...

Page 62: ... printed image is unexpectedly light or faint or dots are missing from the image you may need to clean the print head This unclogs the nozzles so they can deliver ink properly Cleaning the print head uses ink so clean it only if print quality declines You can clean the print head in either of the following ways using the Head Cleaning utility when the printer is connected to a local port not over ...

Page 63: ...n select Properties Document Defaults in Windows NT 3 Windows Click the Utility tab Macintosh Click the Utility button 4 On the Utility menu click the Head Cleaning button 5 Follow the instructions on the screen to clean the print head Cleaning takes about 30 seconds during which the printer makes some noise and the Ppower light flashes Never turn off the printer while the Ppower light is flashing...

Page 64: ...e off If an ink out light is flashing replace the ink cartridge before continuing 2 Press the R cleaning button and hold it down for three seconds Cleaning takes about 30 seconds during which the printer makes some noise and the Ppower light flashes Never turn off the printer while the Ppower light is flashing unless the printer hasn t moved or made noise for more than 5 minutes 3 After the Ppower...

Page 65: ...tern is missing dots click Clean to clean the print head again 8 If you don t see any improvement after cleaning three or four times check the solutions beginning on page 73 You can also turn the printer off and wait overnight this allows any dried ink to soften and then try cleaning the print head again Examining the Nozzle Check Pattern Examine the nozzle check pattern you print It should look s...

Page 66: ...pty Leave the empty cartridge installed in the printer until you have obtained a replacement otherwise the ink remaining in the print head nozzles may dry out Use these EPSON ink cartridges within six months of installing them and before the expiration date on the package To ensure good results use genuine EPSON ink cartridges and do not refill them Other products may cause damage to your printer ...

Page 67: ... cover and press the orange ink cartridge replacement button The print head moves left and the Ppower light begins flashing 4 The color cartridge is on the right and the black cartridge is on the left Pull up the ink cartridge clamp all the way The cartridge rises up from its holder 5 Lift the cartridge out of the printer and dispose of it carefully orange ink cartridge replacement button To avoid...

Page 68: ... t touch the green circuit boards on the back You must remove the yellow tape from the top of the cartridge or you will permanently damage it Don t pull off the blue portion or try to remove the clear seal underneath the cartridge Don t touch the green circuit board on the back of the cartridge you may inhibit normal operation and printing tabs hooks Don t place the cartridge tabs under the hooks ...

Page 69: ... If your printouts contain misaligned vertical lines you may need to align the print head Your printer must be connected to a local port not on a network to use the Print Head Alignment utility Follow these steps 1 Make sure the printer is turned on but not printing and letter size paper is loaded Load paper that s at least 8 27 inches 210 mm wide to prevent ink from spraying inside the printer an...

Page 70: ...o keep your printer working at its best you should clean it several times a year Follow these steps 1 Turn off the printer and wait for the Ppower light to go out 2 Unplug the power cord and disconnect the printer cable 3 Remove all the paper from the sheet feeder 4 Clean the exterior of the printer with a soft damp cloth 5 Clean ink out of the printer s interior with a soft damp cloth Don t touch...

Page 71: ...om the printer 3 Remove any paper from the printer and remove the paper support 4 Open the printer cover Secure the ink cartridge holder to the printer with tape as shown then close the printer cover 5 Push in the output tray extensions and close the tray 6 Repack the printer and attachments in the original box using the protective materials that came with it See the unpacking sheet that was packe...

Page 72: ... there is a new driver available for downloading to your computer To check the version number of your current driver access the driver as described on page 16 for Windows or page 21 for Macintosh the version number is shown below the EPSON logo Diagnosing Printer Problems You can diagnose some problems by checking the printer s control panel lights as described below or running a printer check as ...

Page 73: ...placement cartridge B or A are on When an ink out light comes on you need to replace the ink cartridge Make sure you have a replacement cartridge See page 61 for replacement instructions If an ink out light comes on after you ve replaced a cartridge you installed a cartridge your printer can t use Remove it and replace it with the correct type P and S flash and B and A are on When the Ppower and S...

Page 74: ... it The printer prints one page showing its ROM version number ink counter and a nozzle check pattern Only the nozzle check pattern is shown below If the pattern has gaps in its dots you need to clean the print head see page 57 5 To end the check turn off the printer after it prints the check page Then reconnect the interface cable and turn on your printer and computer If the check page prints the...

Page 75: ...nsions output tray printer cover paper support right edge guide paper support extension pulls up here ink cartridge holders not removable ink cartridge replacement button paper thickness lever roll paper holder and spindle standard with the EPSON Stylus Photo 870 optional for the EPSON Stylus Photo 1270 part number C811062 Probsolv fm Page 70 Monday July 31 2000 3 00 PM ...

Page 76: ...r computer and turn it on again to clear the error Then turn it off reconnect it and turn it on again If the printer stops moving or making noise but the Ppower light is still flashing after five minutes turn off the printer If the light is still flashing when you turn it back on contact your EPSON dealer or see Where To Get Help on page 79 You re having problems installing the printer software Ca...

Page 77: ... If you re printing a high resolution image you need more than the minimum requirements listed You may also need to Clear space on your hard disk or run a defragmentation utility Close open applications that you re not using Increase your system s memory RAM If you upgraded from Windows 95 to Windows 98 you may need to uninstall and reinstall your printer software For the fastest printing try the ...

Page 78: ...ke sure the paper thickness lever is in the 0 position shown at right Set it to the position to print on thick paper or envelopes Also turn off High Speed in the printer software Run the Print Head Alignment utility using EPSON ink jet paper See page 64 for instructions You see vertical banding Run the Print Head Alignment utility using EPSON ink jet paper See page 64 for instructions Make sure th...

Page 79: ...inter is set for thicker paper or envelopes and your image may smear For most papers set the paper thickness lever to the 0 position as shown on page 73 Remove each sheet from the output tray after printing especially when you re printing on transparencies Your printout is faint or has gaps in the image Make sure the print head nozzles are not clogged To clean the print head see page 57 Check the ...

Page 80: ...photograph You may be printing the gray tones in color mode Color mode provides the smoothest gradations but may make some hues noticeable To eliminate color hues from the gray tones make sure the Media Type setting matches the paper you loaded see page 32 and try one of the following Select Black as the Ink setting your image may be grainier with less subtle gradations see page 17 Windows or page...

Page 81: ...rinter If the S paper out light is flashing paper is jammed Reload the paper and don t set the left edge guide too tightly If you re loading roll paper carefully follow the steps in Loading Roll Paper on page 33 Paper jams inside the printer Press the E load eject button turn off your printer open the cover and remove all the paper that s inside including any small pieces that may have torn off If...

Page 82: ...ng again Make sure your printer is selected in your application or as the Windows default printer or the current printer in the Macintosh Chooser If you re using a switch box with your printer connect the printer directly to your computer and try printing again The image size or position is incorrect Make sure the paper and or layout options are set correctly see page 17 Windows or page 22 Macinto...

Page 83: ...r computer Uninstalling Macintosh Software 1 Insert your printer software CD ROM 2 Double click the EPSON CD ROM icon if necessary Then double click the EPSON icon in the CD ROM folder You see the Main Menu 3 Click Install Printer Driver then click Continue 4 On the installer screen click the arrow in the Easy Install list at the top and select Uninstall Then click the Uninstall button at the bott...

Page 84: ...upport at http www epson com At this site you can download drivers and other files look at documentation such as product brochures and user manuals and access troubleshooting information EPSON Internet FTP Site If you have Internet FTP capability use your Web browser or other software for FTP downloading to log onto ftp epson com with the user name anonymous and your e mail address as the password...

Page 85: ... the following information ready Product name EPSON Stylus Photo 870 or EPSON Stylus Photo 1270 Product serial number located on the back of the printer Proof of purchase such as a store receipt and date of purchase Computer configuration Description of the problem EPSON Accessories You can purchase ink cartridges paper manuals and accessories from EPSON at 800 873 7766 or visit the EPSON Store at...

Page 86: ...stems The color management package includes software a target print and a corresponding target file You can install the software and target file from your printer CD ROM However you won t be able to use the software until you obtain the target print available by mail when you purchase the color management package for 149 U S that s half off the retail price of 299 The offer expires 3 31 01 Softwar...

Page 87: ...82 ...

Page 88: ...ontrol panel 59 to 60 67 to 68 Controlling printing 19 23 Copies setting 76 Custom project types 24 to 25 Cut sheet printing on roll paper 54 to 55 D Default settings Windows 18 Documentation 5 E Economy setting 25 Electronic manual 5 11 to 13 ENERGY STAR 8 Envelopes 30 EPSON accessories 61 80 help 79 to 80 Monitor3 23 papers 27 to 32 F Faint images 74 Flip Horizontal setting 77 G Gamma setting 25...

Page 89: ...ttern 58 to 60 69 O Orientation 21 P Page Setup dialog box 21 Panoramic Photo Paper 29 Panoramic printing on roll paper 50 to 53 Paper EPSON 27 to 32 feeding problems 76 loading 15 to 16 20 28 to 30 loading roll 33 to 35 size 19 21 23 thickness lever 30 73 74 type setting see Media Type setting Photo Paper 28 to 29 32 33 to 36 50 to 56 Photo Quality Glossy media 32 Photo Quality Ink Jet Paper 32 P...

Page 90: ...7 to 50 removing 56 storing 56 using 33 to 56 S Safety instructions 8 to 10 Saving settings 25 Service 79 to 81 Smears 30 74 Software problems solving 71 reinstalling 78 uninstalling 78 Special effects 25 Special papers 27 to 32 sRGB Standard Red Green Blue setting 25 Support 79 to 81 System requirements 6 to 7 T Technical support 79 to 81 Text Graph setting 25 Thickness lever 30 73 74 Transfer Pa...

Page 91: ...ment interface cable with this device If this equipment has more than one interface connector do not leave cables connected to unused interfaces Changes or modifications not expressly approved by the manufacturer could void the user s authority to operate the equipment For Canadian Users This Class B digital apparatus meets all requirements of the Canadian Interference Causing Equipment Regulation...

Page 92: ... reproductions and all your photo and craft projects Premium Glossy Photo Paper Fade resistant water resistant photographic weight paper with a high gloss finish Perfect for all photographic applications and available in a variety of sizes including 4 inch by 26 2 foot rolls Photo Paper and Panoramic Photo Paper Photo quality heavier weight glossy paper available in a variety of sizes even a 13 in...

Page 93: ... 8 5 x 11 inches Panoramic 8 3 x 23 inches A3 11 7 x 16 5 inches B 11 x 17 inches Super B 13 x 19 inches Super B Roll 13 inches x 32 8 feet S041134 S041141 S041145 S041142 S041156 S041143 S041233 EPSON Photo Stickers Kit CD ROM paper EPSON Photo Stickers refill A6 4 1 x 5 8 inches A6 4 1 x 5 8 inches S041144 KIT S041144 EPSON Photo Quality Glossy Film Letter 8 5 x 11 inches A6 4 1 x 5 8 inches A3 ...

Reviews: