background image

Printing From Your Computer

19

Printing From Your Computer

This section describes the basic steps for printing a photo or document stored on 
your Windows or Macintosh computer. 

Note: 

For detailed instructions on printing, see the on-screen 

Reference Guide

.

Before you start, make sure you’ve installed your printer software and connected 
the Stylus CX to your computer as described on the 

Start Here

 sheet. Also be sure 

to use the right paper and select the correct paper Type or Media setting in the 
printer driver. (See page 25 for more information.)

Follow the instructions in these sections:

“Printing in Windows” (below)

“Printing With Macintosh OS X” on page 22

“Using Special Papers” on page 25

Printing in Windows

1. Load paper (see page 4).

2. Open the photo or document in your application program.

3. Open the File menu and select 

Print

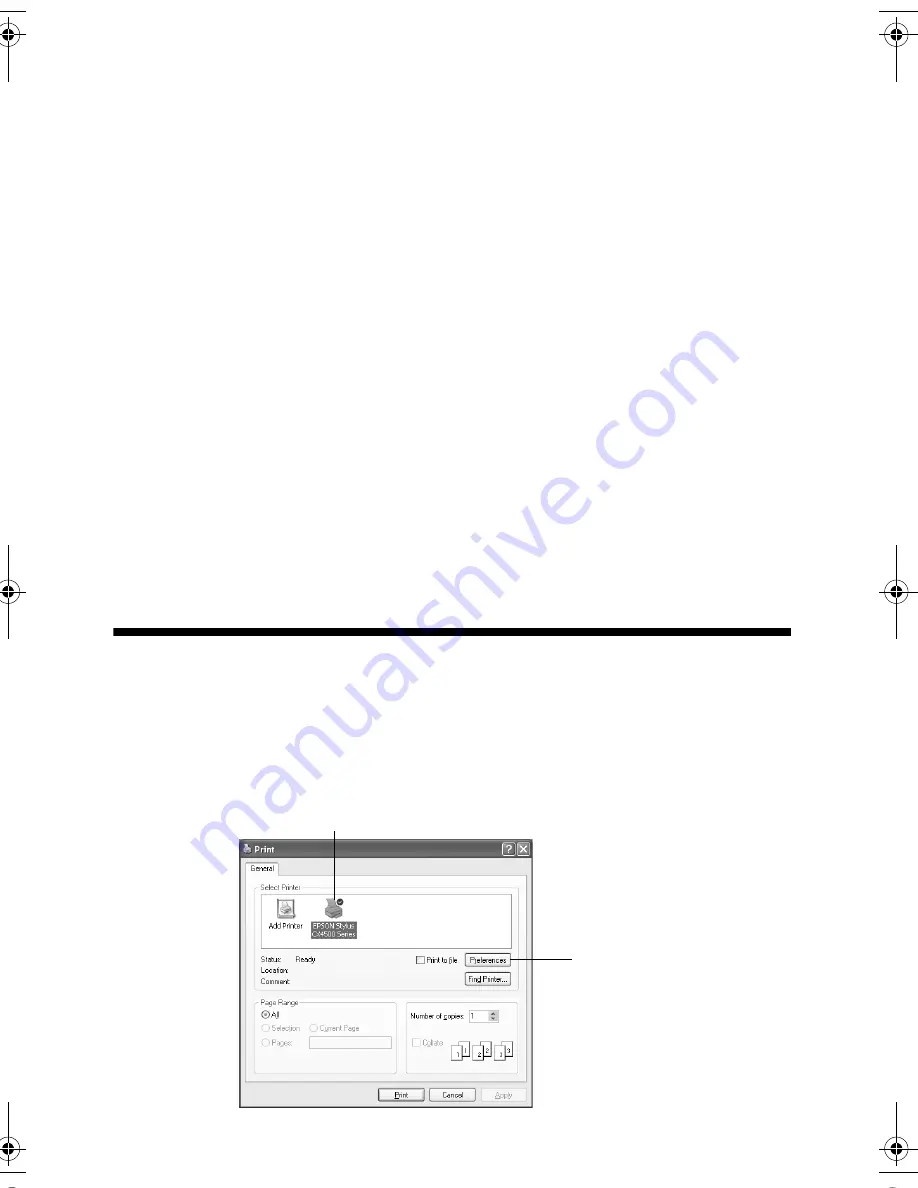
. You see a window like this one:

Click here to open 
your printer software

Select 

EPSON Stylus CX3500 

or 

CX4500 Series

4049978_b0_00.book  Page 19  Thursday, July 22, 2004  3:47 PM

Summary of Contents for Stylus CX3500 Series

Page 1: ...ncia rápida Procedimento básico de cópia impressão e escaneamento Manutenção da sua Stylus CX Solução de problemas Quick Reference Guide Basic Copying Printing and Scanning Maintaining your Stylus CX Solving Problems CPD 18257 4049431 00 XXX ...

Page 2: ...memória 15 Impressão do índice de fotos 17 Impressão de todas as fotos ou de fotos DPOF 20 Impressão com o computador 21 Impressão no Windows 21 Impressão com o Macintosh OS X 24 Uso de papéis especiais 27 Como escanear fotos ou documentos 28 Manutenção da Stylus CX 32 Verificação dos jatos e da tinta 32 Limpeza do cabeçote de impressão 33 Substituição de cartuchos de tinta 34 Solução de problemas...

Page 3: ...4 Instruções de segurança importantes 44 Conformidade com a ENERGY STAR 46 Declaração de conformidade com a FCC 46 Declaração de conformidade 47 Garantia e Centros de Serviço 47 Avisos sobre direitos autorais 50 ...

Page 4: ... a cor e a qualidade de impressos e de imagens escaneadas ou imprimir documentos frente e verso Para obter instruções completas sobre tudo o que a Stylus CX é capaz de fazer consulte o Guia do usuário Quando o software é instalado o ícone do guia é colocado na área de trabalho automaticamente Observação As ilustrações neste manual mostram a Stylus CX4500 mas as instruções são as mesmas para a Styl...

Page 5: ... tamanho carta ou 4 6 10 15 cm na Stylus CX Consulte no Guia do usuário as instruções sobre como colocar outros tipos de mídia na impressora 1 Abra o suporte para papel e a bandeja de saída e puxe as extensões 2 Mova o condutor do alimentador para frente 3 Deslize a guia do lado esquerdo para a esquerda ...

Page 6: ...ultado melhor convém usar um dos papéis para jato de tinta especiais da Epson desenvolvidos para esta impressora Por exemplo suas fotos ficarão ótimas se forem impressas no Epson DURABrite Ink Glossy Photo Paper Veja a página 27 para obter mais informações 5 Deslize a guia do lado esquerdo em direção ao papel mas sem apertar demais 6 Gire o protetor do alimentador para a posição original Além diss...

Page 7: ...Colocar papel na impressora 7 ...

Page 8: ...onamento do original no vidro 1 Abra a tampa de documentos e coloque o original voltado para baixo sobre o vidro alinhado com o canto superior esquerdo Afaste o original cerca de 2 5 mm das bordas superior e esquerda para que ele seja copiado por inteiro 2 Feche a tampa devagar para não desalinhar o original Cuidado Nunca abra a tampa do equipamento além do seu limite e não coloque objetos pesados...

Page 9: ... la para cima Se for necessário pressionar o documento para que ele fique liso durante a cópia ou escaneamento não aplique muita força e tenha cuidado para não movê lo Cuidado Não exerça muita força sobre a tampa de documentos nem a gire na diagonal Isso poderá danificá la Concluído o processo reposicione a tampa do scanner inserindo as guias nos encaixes ...

Page 10: ...onar até 9 cópias por vez Para efetuar mais de 9 cópias consulte a página 10 5 Pressione o botão de tipo de papel e escolha Plain Paper Papel comum A luz indicará o papel escolhido 6 Pressione o botão de tamanho de papel para selecionar Letter Carta 7 Para que as cópias sejam reduzidas ou aumentadas automaticamente de acordo com o tamanho de papel pressione o botão Fit to Page Ajustar à página 8 P...

Page 11: ...pressione x Start Color Para cópias em preto e branco pressione x Start B W A luz On acenderá e após um momento a impressão iniciará Para interromper a cópia a qualquer momento basta pressionar o botão y Stop Não puxe o papel a ser impresso ele será ejetado automaticamente para a bandeja de saída Observação É possível que as cópias não sejam exatamente do mesmo tamanho que o original Como efetuar ...

Page 12: ... a luz On começar a piscar solte os dois botões Cópias com o computador O EPSON Smart Panel instalado no computador quando se instala o software da impressora dispõe de um utilitário de cópia que possibilita o controle do processo de cópia pelo computador Proceda da seguinte forma para usá lo 1 Certifique se de que a Stylus CX esteja ligada 2 Coloque o original no vidro descrito na página 7 Feche ...

Page 13: ...pode se utilizar o recurso Restaurar Cor como descrito abaixo para dar vida a fotos desbotadas Restauração de cores em fotos desbotadas 1 Na tela do Copy Utility Utilitário de cópia clique na caixa Tipo de Fonte A seguinte tela será apresentada Clique aqui para obter mais informações Confirme se a sua Stylus CX está selecionada Selecione o tipo de documento Clique aqui para selecionar o tamanho do...

Page 14: ...oto e clique em OK A seguinte tela será apresentada 3 Clique na caixa Restaurar Cor 4 Altere qualquer outra configuração de cópia conforme necessário 5 Clique no botão Copy Cópia da tela para começar a copiar Clique nesta caixa Inicie a cópia ...

Page 15: ...es a seguir Cartões e formatos compatíveis a seguir Inserção do cartão de memória na página 15 Impressão do índice de fotos na página 17 Impressão de todas as fotos ou de fotos DPOF na página 20 Para obter instruções sobre como copiar os arquivos do cartão de memória entre a Stylus CX4500 e um computador ou outro dispositivo veja o Guia do usuário Cartões e formatos compatíveis Tipos de cartões qu...

Page 16: ...tível com Exif Version 2 1 2 2 Inserção do cartão de memória 1 Certifique se de que a Stylus CX4500 esteja ligada Observação Se estiver imprimindo diretamente do cartão de memória é melhor que a Stylus CX4500 não esteja conectada ao computador ou ele deve estar desligado 2 Abra a porta do cartão de memória Formato de mídia DCF compatível com a versão 1 0 Formato de arquivo JPEG DOS FAT FAT 12 ou 1...

Page 17: ...rimir página 17 Imprimir todas as fotos do cartão página 20 Imprimir as fotos pré selecionadas na câmera usando DPOF página 20 Para remover o cartão verifique se a luz do leitor não está piscando e então puxe o cartão para fora do slot Observação Caso esteja imprimindo diretamente do cartão de memória só será possível imprimir fotos coloridas Não será possível imprimir fotos em preto e branco Cuid...

Page 18: ...anto se houver mais de 30 fotos no cartão de memória serão necessárias folhas suficientes para a impressão do índice 3 Insira o cartão de memória caso ainda não esteja no slot veja a página 15 4 Pressione o botão Memory Card Cartão de memória uma ou mais vezes até a luz Print Index Sheet Imprimir índice acender se 5 Certifique se de que as opções Plain Paper Papel comum e Letter Carta estejam sele...

Page 19: ...ada e marque a folha cuidadosamente depois do escaneamento não será possível alterar as seleções Observação Para imprimir uma cópia de todas as fotos do índice preencha a figura oval ALL Todas localizada no início da página 2 Coloque o índice virado para baixo no canto superior esquerdo para que a parte superior do índice fique alinhada com a borda esquerda do vidro 3 Feche a tampa do scanner 4 Co...

Page 20: ...aper Papel comum as fotos serão impressas com uma margem branca Se você selecionar Photo Paper Papel fotográfico elas serão impressas sem margem até a borda do papel 7 Selecione Letter Carta ou 4 6 10 15 cm para o tamanho do papel 8 Pressione o botão x Start Color Iniciar cor para iniciar a impressão Observação Para interromper a impressão pressione y Stop Parar 9 Concluída a impressão remova o ca...

Page 21: ...y Card Cartão de memória até a luz Print All DPOF Imprimir todas DPOF acender se Observação Caso o cartão de memória não contenha informações DPOF será impressa uma cópia de cada foto do cartão 4 Selecione Plain Paper Papel comum ou Photo Paper Papel fotográfico de acordo com o tipo de papel colocado na impressora Se você selecionar Photo Paper elas serão impressas sem margem até a borda do papel ...

Page 22: ...talação Além disso confirme se está utilizando o papel certo e se selecionou a configuração correta de tipo de papel no driver da impressora Consulte a página 27 para obter mais informações Siga as instruções detalhadas nas seções Impressão no Windows a seguir Impressão com o Macintosh OS X na página 24 Uso de papéis especiais na página 27 Impressão no Windows 1 Coloque o papel na impressora consu...

Page 23: ...Confirme se selecionou a configuração correta de tipo de papel de acordo com o papel que está utilizando Consulte a página 27 para obter detalhes Observação Para obter mais informações sobre as configurações de impressão clique no botão ou em Ajuda Selecione o tipo de documento a imprimir escolha Foto ou Foto de alta qualidade para imagens Selecione a orientação Selecione o tamanho do papel Seleci...

Page 24: ...a salvar as configurações e clique em OK ou em Imprimir para iniciar a impressão Esta janela aparecerá indicando o status da tarefa Selecione um método de gerenciamento de cores Para selecionar a opção Sem ajuste de cores clique primeiro em ICM Clique aqui para selecionar o recurso Photo RPM para a melhor qualidade de impressão em determinados tipos de papel Selecione as opções de impressão confor...

Page 25: ...ina 5 2 Abra a foto ou o documento no aplicativo 3 Selecione Configurar Página no menu Arquivo e faça estas configurações Para impressão sem margens escolha a opção Sem margens Borderless na lista do tamanho do papel em uso Carta 8 10 ou 4 6 4 Clique em OK para fechar a janela Configurar Página 5 Selecione Imprimir no menu Arquivo Você verá uma janela como esta Selecione a sua impressora Selecione...

Page 26: ...quema para selecionar as opções de layout da página Opções de saída para salvar o trabalho de impressão como um PDF Expansão para reduzir ou ampliar o tamanho da imagem para impressão sem margens ColorSync ou Gestão de cores para selecionar a opção ColorSync ou ajustar os controles de cores alterar as definições de gama ou ainda para desativar os ajustes efetuados pelo driver da impressora Sumário...

Page 27: ...e no ícone da Stylus CX quando ele aparecer na parte inferior da área de trabalho Se estiver usando o OS X 10 2 x clique no ícone do Centro de Impressão e então clique duas vezes na sua Stylus CX na janela Lista de impressoras Você verá uma janela como esta 11 Ao terminar feche a janela do utilitário ou o Centro de Impressão Selecione aqui Photo RPM para obter a melhor qualidade de impressão em de...

Page 28: ... margens S041467 Carta 21 6 27 9 cm S041257 ML Epson Double Sided Matte Paper Carta 21 6 27 9 cm S041568 Epson Premium Semigloss Photo Paper Carta 21 6 27 9 cm S041331 ML Epson Photo Quality Self Adhesive Sheets A4 21 29 7 cm S041106 Epson Glossy Photo Greeting CArd Kit Carta 21 6 27 9 cm S041606 Epson Photo Quality Ink Jet Paper Carta 21 6 27 9 cm S041062 ML A4 21 29 7 cm S041061 Epson Photo Qual...

Page 29: ...aneamento para níveis progressivos de controle sobre a imagem escaneada O Modo Automático faz um escaneamento rápido e fácil com configurações automáticas de tipo de imagem e resolução O Modo Casa apresenta uma tela simples com ajustes automáticos de imagem visualização e recurso de corte e configurações predefinidas para vários tipos de escaneamento Inclui o recurso de restauração de cores O Modo...

Page 30: ...bra o menu Arquivo e escolha Importar ou Adquirir e selecione a Stylus CX Se o EPSON Scan estiver definido para o padrão Modo Automático completo ele iniciará a visualização da imagem Para trocar de modo clique no botão Pausa localizado na parte inferior da tela Em seguida siga para a etapa 4 Se estiver escaneando diretamente do computador execute um dos seguintes procedimentos No Windows selecion...

Page 31: ...da clique em OK A imagem será escaneada e seu ícone será exibido na pasta aberta 4 Para trocar de modo selecione Modo Casa ou Modo Profissional no menu suspenso localizado na parte superior da tela Observação O EPSON Scan será iniciado no último modo utilizado mas é possível mudá lo quando quiser Será exibida uma destas telas 5 Clique no botão Antever Após um momento a imagem aparecerá na janela d...

Page 32: ...o Modo Profissional vá até o fim da tela e clique na caixa de seleção Restaurar Cor No Modo Casa é preciso primeiramente visualizar a foto etapa 5 e depois selecionar Ajustes de Imagem e clicar na caixa de seleção Restaurar Cor 7 Clique no botão Digitalizar Caso tenha escaneado a imagem usando um aplicativo como o Photoshop essa imagem será aberta na janela do aplicativo Caso tenha aberto o EPSON ...

Page 33: ... para verificar os jatos do cabeçote de impressão e os níveis restantes de tinta usando o painel de controle 1 Desligue a Stylus CX 2 Coloque papel tamanho carta no alimentador de folhas 3 Pressione os botões de tinta B e P On juntos e os mantenha pressionados por cerca de 5 segundos A Stylus CX será ligada e imprimirá um padrão de teste Também mostrará a porcentagem de tinta em cada cartucho Se h...

Page 34: ...gada 2 Mantenha pressionado o botão de tinta B por 3 segundos até a luz On começar a piscar A Stylus CX executará um ciclo de limpeza do cabeçote e a luz On piscará Cuidado Nunca desligue a Stylus CX durante a limpeza do cabeçote Isso poderá danificá la 3 Quando a luz On parar de piscar execute a verificação de jatos como descrito na página 32 para verificar se o cabeçote de impressão está limpo 4...

Page 35: ...es números de referência para encomendar ou comprar cartuchos novos Cuidado Deixe o cartucho vazio instalado até adquirir o de substituição caso contrário a tinta remanescente nos jatos do cabeçote de impressão poderá secar Para garantir bons resultados use cartuchos de tinta Epson originais e não os recarregue Outros produtos podem causar danos à Stylus CX que não serão cobertos pela garantia Eps...

Page 36: ...e for pressionado por mais 3 de segundos a impressora iniciará a limpeza do cabeçote de impressão Cuidado Não mova o cabeçote com a mão pois isso poderá danificar a Stylus CX Sempre pressione o botão de tinta B para movê lo 4 Pressione novamente o botão de tinta B Caso haja mais de um cartucho vazio ou com pouca tinta o suporte moverá o próximo cartucho para baixo da marca indicadora de cartucho v...

Page 37: ...nte água e sabão Se a tinta entrar em contato com seus olhos lave os imediatamente com bastante água 6 Antes de abrir a embalagem do novo cartucho agite o levemente quatro ou cinco vezes Em seguida remova o da embalagem Cuidado Não remova nem rasgue a etiqueta do cartucho pois isso causará vazamentos Não toque na placa verde localizada na lateral do cartucho Isso poderá danificar o cartucho de tin...

Page 38: ...os de tinta 37 7 Coloque o novo cartucho no suporte e aperte até ouvir um clique 8 Substitua quaisquer cartuchos conforme necessário 9 Feche a tampa de cartucho pressionando a até ouvir um clique 10 Feche a unidade do scanner ...

Page 39: ...n deixará de piscar e permanecerá acesa e a luz vermelha de tinta B ficará apagada Cuidado Nunca desligue a Stylus CX enquanto a luz On estiver piscando ou gastará tinta Observação Se a luz de tinta B continuar acesa sem piscar talvez o cartucho não tenha sido instalado corretamente Pressione novamente o botão de tinta B e reinstale o cartucho de tinta até que se encaixe no lugar ...

Page 40: ...a seguir Problemas e soluções na página 41 Onde obter ajuda na página 43 Indicadores de erro Luz estado Mensagem Causa Solução Erro acesa On intermitente Não há papel no alimentador Coloque papel no alimentador de folhas Em seguida pressione x Start Color Iniciar cor para continuar ou y Stop Parar para cancelar Consulte a página 5 Muitas páginas foram colocadas no alimentador Remova e recoloque o ...

Page 41: ...a do vidro Em seguida pressione x Start Color Iniciar cor para continuar ou y Stop Parar para cancelar 3 O índice de fotos está marcado incorretamente Nenhuma marca foi detectada ou o índice contém mais de uma marca para a mesma imagem Remova o índice de fotos marque o corretamente e tente novamente Consulte a página 18 4 O índice de fotos não está de acordo com as fotos do cartão de memória Remov...

Page 42: ...folhas Em seguida coloque novamente o papel no canto direito e deslize a guia do lado esquerdo contra o papel mas não aperte demais Verifique se o papel não está na frente do protetor do alimentador Não coloque um número excessivo de folhas de uma vez até 20 folhas de papel fotográfico e 100 de papel comum Consulte o Guia do usuário para obter mais informações Erro acesa Tinta acesa Todas as outra...

Page 43: ...ma geralmente o lado mais branco claro ou brilhante Verifique se o papel não está molhado ou enrugado Use uma folha de suporte com papel especial ou coloque uma folha de papel de cada vez Retire as folhas da bandeja de saída para que não se acumulem Veja se o papel usado corresponde ao papel e às configurações de papel definidas no painel de controle e no software da impressora veja a página 27 Pa...

Page 44: ...X4500 ou Epson Stylus CX3500 Número de série do produto localizado na parte de trás do equipamento Prova de compra como a nota da loja e data da compra Configuração do computador Descrição do problema Adquira cartuchos papéis manuais e acessórios através do seu distribuidor Epson Suporte técnico para outros softwares Serviço Acesso Internet Na Internet receba assistência no endereço http www epson...

Page 45: ...de nominal dela Mantenha a Stylus CX e o computador longe de fontes potenciais de interferência eletromagnética tais como alto falantes e bases de telefones sem fio Evite locais sujeitos a variações bruscas de umidade e temperatura choques vibrações e poeira Deixe espaço suficiente em torno da Stylus CX para ventilação adequada Não coloque a Stylus CX próximo a radiadores geradores de calor ou sob...

Page 46: ... lo pode provocar perda de qualidade de impressão Não use o cartucho de tinta além da data de validade na embalagem Para obter os melhores resultados use os cartuchos de tinta por um período de até seis meses depois de instalá los Armazene os cartuchos em um local fresco e escuro Guarde cada cartucho de tinta com seu rótulo voltado para baixo Não armazene os cartuchos virados de cabeça para baixo ...

Page 47: ...ção de rádio e televisão Entretanto não existem garantias de que a interferência não ocorrerá em uma determinada instalação Se este equipamento causar interferências à recepção de rádio e televisão o que pode ser verificado ligando se e desligando se o equipamento o usuário será aconselhado a tentar corrigir o problema por meio de uma ou mais das seguintes medidas Reorientar ou reposicionar a ante...

Page 48: ... no manual do produto ou em qualquer documentação que acompanhe o produto durante o período especificado na seção 6 Cobertura da Garantia Limitada Epson a partir da data de entrega ao comprador por parte da Epson ou de um distribuidor autorizado Epson veja Relação de subsidiárias e escritórios Epson no Brasil no país no qual foram comprados A Epson também garante que os produtos consumíveis cartuc...

Page 49: ... recorrer a qualquer Centro Credenciado de Assistência Técnica Epson com uma cópia do recibo de compra ou ligar para os Centros de Assistência Técnica veja adiante a relação por países Nos casos em que o cliente telefonar o mesmo deve ter em mãos os números do modelo e de série do produto bem como os dados sobre o local e data de compra a garantia só é válida no país de compra Se o produto conta c...

Page 50: ...ivreto entre em contato com a empresa que lhe vendeu o produto Registre o seu equipamento Epson na nossa página na internet no endereço http www latin epson com promos registration html Suporte e Serviço de Garantia Prolongada Em alguns países a Epson oferece a possibilidade de ampliar a cobertura da garantia original de seus produtos Pode se obter mais detalhes através dos Centros de Assistência ...

Page 51: ...lquer produto opcional ou suprimentos que não possuírem a designação produtos Epson originais ou produtos aprovados pela Epson por parte da Seiko Epson Corporation Uso responsável de materiais protegidos por direitos autorais Câmeras digitais scanners e impressoras de jato de tinta da mesma forma que fotocopiadoras e câmeras podem ser usadas indevidamente para cópia ou impressão de materiais prote...

Page 52: ...ard 14 Printing an Index Sheet to Select Photos 15 Printing All Photos or DPOF Photos 18 Printing From Your Computer 19 Printing in Windows 19 Printing With Macintosh OS X 22 Using Special Papers 25 Scanning a Photo or Document 27 Maintaining Your Stylus CX 30 Checking the Print Head Nozzles and Ink 30 Cleaning the Print Head 31 Replacing Ink Cartridges 32 Solving Problems 37 Error Indicators 37 P...

Page 53: ...2 Contents Notices 43 Important Safety Instructions 43 ENERGY STAR Compliance 45 FCC Compliance Statement 45 Declaration of Conformity 46 Limited Warranty 46 Copyright Notice 49 ...

Page 54: ...ving the color and quality of your prints and scanned images or producing double sided documents For complete instructions on everything the Stylus CX can do see the on screen Reference Guide An icon for the manual was automatically placed on your desktop when you installed the software Note The illustration in this manual shown the Epson Stylus CX4500 but the instructions are the same for the Sty...

Page 55: ...r 4 6 inch 10 15 cm paper in your Epson Stylus CX3500 CX4500 See the Reference Guide for instructions on loading other types of media 1 Open the paper support and output tray then slide out the extensions 2 Flip the feeder guard forward 3 Slide the left edge guide to the left ...

Page 56: ...per is fine However for the best results you ll want to use one of Epson s special ink jet papers designed for your printer For example your photos will look great printed on Epson DURABrite Ink Glossy Photo Paper See page 25 for more information 5 Slide the left edge guide against the left edge of the paper but not too tightly 6 Flip the feeder guard back Also make sure the paper thickness lever ...

Page 57: ...e 10 Placing the Original on the Glass 1 Open the document cover and place your original face down on the glass in the upper left corner Move your original about 2 5 mm 1 10 inch away from the top and left edges so all of it will be copied 2 Close the cover gently so you don t move the original Caution Never open the document cover beyond where it stops and do not place heavy objects on top of the...

Page 58: ... excessive force on the document cover and do not twist it diagonally You may damage the document cover When you are done replace the document cover by inserting the tabs back into the slots Simple Copying You can make simple copies using letter size 8 5 11 inch or 4 6 inch 10 15 cm paper as described below If you want to copy to a different size you need to do it from your computer See Printing F...

Page 59: ... 7 If you want your copies automatically reduced or enlarged to fit the loaded paper size press the Fit to Page button 8 To make a color copy press the x Start Color button To make a black and white copy press the x Start B W button The On light flashes and after a moment the Stylus CX starts printing If you need to stop copying at any time just press the y Stop button Do not pull out paper that i...

Page 60: ...p copying at any time just press the y Stop button Do not pull out paper that is being printed it will be ejected automatically to the output tray Note The copies may not be exactly the same size as the original Making 10 or More Copies If you want to make 10 or more copies at a time press the Copy button until you see in the Copy window This tells the CX4500 to print up to 100 copies Load enough ...

Page 61: ... flashing release both buttons Using the Computer to Copy EPSON Smart Panel installed on your computer when you installed your printer software includes a Copy Utility that lets you control copying from your computer Follow these steps to use it 1 Make sure the Stylus CX is turned on 2 Place the original on the glass as described on page 6 Be sure to close the document cover 3 Open EPSON Smart Pan...

Page 62: ...e image quality or color For example you can use the Color Restoration feature as described on page 11 to bring faded photographs back to life Restoring Color in Faded Photos 1 From the Copy Utility screen click the Source Type box You see this screen Click for more information Make sure your Stylus CX is selected Select your document type Click to select output paper size Select the copied page s...

Page 63: ...ocument 2 Choose Photo and click OK You see this screen 3 Click the Color Restoration check box 4 Change any other copy settings as necessary 5 Click the Copy button on the screen to begin copying Click this box Start copying ...

Page 64: ...y copies of each See these sections Compatible Cards and Image Formats below Inserting the Card on page 14 Printing an Index Sheet to Select Photos on page 15 Printing All Photos or DPOF Photos on page 18 For instructions on copying memory card files between your CX4500 and a computer or other device see the Reference Guide Compatible Cards and Image Formats You can use the following types of card...

Page 65: ... 2 1 2 2 Inserting the Card 1 Make sure the CX4500 is turned on Note When you are printing directly from a memory card it is best if the CX4500 is not connected to your computer or your computer should be turned off 2 Open the memory card door Media format DCF version 1 0 compliant File format JPEG DOS FAT FAT 12 or 16 one partition taken with a DCF version 1 0 compliant digital camera Image size ...

Page 66: ...e the memory card light is not flashing then pull the card straight out of its slot Note You can print only in color when printing directly from a memory card you cannot print in black and white Caution Do not remove the card or turn off the CX4500 while the memory card light is flashing you may lose data on the card Printing an Index Sheet to Select Photos You can print an index sheet which is li...

Page 67: ...ted 6 Press the x Start Color button The On light flashes and the CX4500 starts printing the index sheet s This may take a few minutes For multiple index sheets the pages are printed from the last sheet to the first so the most recent images are printed first Now you can follow the instructions below to select which photos to print Selecting Photos on the Index Sheet 1 Once you have printed the in...

Page 68: ...s you ll be printing 5 Make sure the Print From Index Sheet light is on 6 Select Plain Paper or Photo Paper whichever you loaded If you select Plain Paper the photo s print with a white border If you select Photo Paper the photos print borderless to the edge of the paper 7 Select Letter or 4 x6 for the paper size 8 Press the x Start Color button to start printing Note If you need to stop printing ...

Page 69: ...inting 3 Press the Memory Card button until the Print All DPOF light comes on Note If the memory card does not contain DPOF information one copy of all the photos on the card will be printed 4 Select Plain Paper or Photo Paper whichever you loaded If you select Photo Paper the photos print borderless to the edge of the paper 5 Select Letter or 4 6 10 15 cm for the paper size 6 Press the x Start Co...

Page 70: ...escribed on the Start Here sheet Also be sure to use the right paper and select the correct paper Type or Media setting in the printer driver See page 25 for more information Follow the instructions in these sections Printing in Windows below Printing With Macintosh OS X on page 22 Using Special Papers on page 25 Printing in Windows 1 Load paper see page 4 2 Open the photo or document in your appl...

Page 71: ...Main Properties window select the basic print settings Make sure you choose the correct paper Type setting for the paper you are using See page 25 for details Note For more information about print settings click the or Help button Select the type of document you re printing choose Photo or Best Photo for pictures Select your document Orientation Select your paper Size Select your paper Type Click ...

Page 72: ...necessary 8 Click OK to save your settings then click OK or Print to start printing This window appears and shows the progress of your print job Select a color management method To choose No Color Adjustment click ICM first Click here to select Photo RPM for the best print quality on certain paper types Select Print Options as necessary Select Paper Quality Options as necessary Click here if you w...

Page 73: ...cument in your application 3 Select Page Setup from the File menu Make the following settings For Borderless printing choose the Sheet Feeder Borderless option in the Paper Size list for your paper size Letter 8 10 or 4 6 4 Click OK to close the Page Setup window 5 Select Print from the File menu You see a window like this one Select Stylus CX3500 or Stylus CX4500 Select your Paper Size Select you...

Page 74: ... copies you want or a page range Layout Select page layout options Output Options Save your print job as a PDF file Expansion Reduce or enlarge the image size for borderless printing ColorSync or Color Management Select ColorSync or adjust the color controls change the gamma setting or turn off color adjustments in the printer software Summary View a list of all your selections Select your Media T...

Page 75: ...t job click the CX3500 CX4500 icon when it appears in the dock on the bottom of your desktop If you re using OS X 10 2 x click the Print Center icon instead then double click Stylus CX3500 or Stylus CX4500 in the Printer List window You see a screen like this 11 When you re finished close the Stylus CX window or Print Center Select Photo RPM for the best print quality on certain paper types Cancel...

Page 76: ...Paper Letter 8 5 11 in 21 6 28 cm S041586 Epson Glossy Photo Paper Borderless 4 6 in 10 15 cm S041809 Letter 8 5 11 in 21 6 28 cm S041141 ML S041649 Epson Matte Paper Heavyweight Borderless 8 10 in 20 3 25 4 cm S041467 Letter 8 5 11 in 21 6 28 cm S041257 ML Epson Double Sided Matte Paper Letter 8 5 11 in 21 6 28 cm S041568 Epson Premium Semigloss Photo Paper Letter 8 5 11 in 21 6 28 cm S041331 ML ...

Page 77: ...lossy Photo Paper DURABrite Ink Glossy Photo Paper Plain paper sheets or envelopes Epson Premium Bright White Paper Plain Paper Bright White Paper Epson Matte Paper Heavyweight Epson Double Sided Matte Paper Matte Paper Heavyweight Epson Photo Paper or Glossy Photo Paper Epson Glossy Photo Greeting Cards Glossy Photo Paper Epson Premium Semigloss Photo Paper Premium Semigloss Photo Paper ...

Page 78: ... type and resolution settings Home Mode provides a simple screen giving you automatic image adjustments previewing and cropping capability and preset configurations for various types of scans Includes Color Restoration Professional Mode lets you manually configure advanced image settings including Color Restoration You can scan from any TWAIN compliant application such as Adobe Photoshop using EPS...

Page 79: ...creen Then go to step 4 If you are scanning directly from your desktop do one of the following In Windows select Start All Programs or Programs EPSON Scan EPSON Scan On a Macintosh double click EPSON Scan in the Applications folder If you see the File Save Settings window choose the location where you want to save your scanned file and type a name for it in the Prefix box Select a file format in t...

Page 80: ... If you re using Professional mode scroll down to the bottom of the screen and click the Color Restoration check box In Home mode you need to Preview the photo first step 5 above then select Image Adjustments and click the Color Restoration check box 7 Click the Scan button If you scanned from an application like Photoshop your scanned image opens in your application window If you opened EPSON Sca...

Page 81: ...e of the ink cartridges Follow the steps below to check the print head nozzles and remaining ink levels using the control panel 1 Turn off the Stylus CX 2 Load letter size paper in the sheet feeder 3 Press the B ink and P On buttons together and hold them down for about 5 seconds The Stylus CX turns on and prints a test pattern It also shows the percentage of ink left in each cartridge If the patt...

Page 82: ...nk button for 3 seconds until the On light starts flashing The CX4500 runs a head cleaning cycle and the On light flashes Caution Never turn off the Stylus CX while head cleaning is in progress You may damage it 3 When the On light stops flashing run a nozzle check as described on page 30 to verify that the print head is clean 4 If there are still gaps or the test patterns are faint run another cl...

Page 83: ...e part numbers when you order or purchase new ones Caution Leave the empty cartridge installed until you have obtained a replacement or the ink remaining in the print head nozzles may dry out To ensure good results use genuine Epson ink cartridges and do not refill them Other products may cause damage to your Stylus CX not covered by Epson s warranty 1 Make sure the Stylus CX is on 2 Make sure tha...

Page 84: ...ton when held down for 3 or more seconds it tells the printer to start cleaning the print head Caution Do not move the print head by hand this may damage the Stylus CX Always press the B ink button to move it 4 Press the B ink button again If more than one cartridge is empty or low the next cartridge moves to the _ ink out mark If all of the empty or low ink cartridges have been identified the pri...

Page 85: ...s on your hands wash them thoroughly with soap and water If ink gets into your eyes flush them immediately with water 6 Before you open the new ink cartridge package shake it four or five times Then remove it from the package Caution Do not remove or tear the label on the cartridge otherwise ink will leak Do not touch the green chip on the side of the cartridge This can damage the ink cartridge Do...

Page 86: ...he new ink cartridge into the cartridge holder and push it down until it clicks into place 8 Replace any other cartridges that need to be replaced 9 Close the ink cartridge cover and press it until it clicks into place 10 Close the scanner ...

Page 87: ... it s finished the On light stops flashing and remains on and the B ink light goes out Caution Never turn off the Stylus CX while the On light is flashing or you ll waste ink Note If the B ink light stays on not flashing the ink cartridge may not be installed correctly Press the B ink button again and reinstall the ink cartridge until it clicks into place ...

Page 88: ...ns on page 39 Where To Get Help on page 41 Error Indicators Light status LED message Cause Solution Error On On Flashing No paper is loaded in the sheet feeder Load paper in the sheet feeder Then press x Start Color to continue or y Stop to cancel See page 4 Multiple pages have been fed into the sheet feeder Remove and reload the paper Then press x Start Color to continue or y Stop to cancel See p...

Page 89: ... and try again See page 16 4 The index sheet does not match the photos on the memory card Remove the memory card and insert the card used to print the index sheet see page 14 or place the correct index sheet on the glass Then press x Start Color to continue or y Stop to cancel Error Flashing fast H The paper thickness lever is set to the position If you have set the lever to the position because y...

Page 90: ...nst the right edge guide and slide the left edge guide against the paper but not too tightly Make sure the paper is not in front of the feeder guard Do not load too many sheets at once up to 20 sheets of photo paper and 100 sheets of plain paper See the Reference Guide for more information If paper is jammed the red m Error light flashes Follow these steps to clear the jam 1 Press the x Start Colo...

Page 91: ...genuine Epson ink cartridges see page 32 Set the paper thickness lever to the m position for most paper types If you are printing on envelopes set the lever to the position If you notice light or dark bands across your printouts or they are too faint you may need to clean the print head This unclogs the nozzles so they can deliver ink properly Run a nozzle check as described on page 30 to see if t...

Page 92: ...of of purchase such as a store receipt and date of purchase Computer configuration Description of the problem You can purchase ink cartridges paper manuals and accessories from the nearest Epson distributor Service Access World Wide Web From the Internet you can reach Epson Support at http www latin epson com where you can download drivers and other files look at product documentation access troub...

Page 93: ...re Telephone Fax Online and E mail EPSON Smart Panel 510 445 8616 Fax 510 445 8601 www newsoftinc com contactus newsoftinc com ArcSoft PhotoImpressionTM 510 440 9901 8 30 AM 5 30 PM Pacific Time Monday Friday Fax 510 440 1270 www arcsoft com support arcsoft com ...

Page 94: ... of the devices plugged into the extension cord does not exceed the cord s ampere rating Also make sure the total ampere rating of all devices plugged into the wall outlet does not exceed the wall outlet s ampere rating Keep your Stylus CX and computer system away from potential sources of electromagnetic interference such as loudspeakers or cordless telephone base units Avoid locations that are s...

Page 95: ...nd may prevent the Stylus CX from printing Do not put your hand inside the Stylus CX or touch any cartridges during printing Do not move the print head by hand this may damage the Stylus CX Install the ink cartridge immediately after you remove it from its package Leaving the cartridge unpacked for a long time before use may result in reduced print quality Do not use an ink cartridge beyond the da...

Page 96: ...lled and used in accordance with the instructions may cause harmful interference to radio or television reception However there is no guarantee that interference will not occur in a particular installation If this equipment does cause interference to radio and television reception which can be determined by turning the equipment off and on the user is encouraged to try to correct the interference ...

Page 97: ...ions as indicated in the product documentation for the period specified in the product s documentation Coverage begins as of the date of delivery to the purchaser by Epson or by an authorized Epson dealer see Epson subsidiaries and offices in Latin America in the country of purchase Epson also guarantees that the consumables ink cartridges toner batteries included with the product will perform acc...

Page 98: ...n Furthermore in order for the unit to operate optimally always use original Epson supplies and consumables To obtain warranty service the purchaser may take the product to any Authorized Epson Service Center along with proof of purchase or call any of the Epson Technical Assistance Centers see country list starting on page 24 Upon calling an Authorized Epson Service Center the purchaser will be a...

Page 99: ...11 4346 0300 Mexico 52 55 1323 2000 01 800 087 1080 Chile 562 200 3400 Peru 511 224 2336 Colombia 571 523 5000 Venezuela 58 212 240 1111 Costa Rica 506 210 9555 1 800 377 6627 Epson Argentina S A Avenida Belgrano 964 970 1092 Buenos Aires Tel 54 11 4346 0300 Fax 54 11 4346 0333 Epson Colombia Ltda Diagonal 109 No 15 49 Bogotá Colombia Tel 57 1 523 5000 Fax 57 1 523 4180 Epson Perú S A Av Del Parqu...

Page 100: ...all not be liable for any damages or problems arising from the use of any options or any consumable products other than those designated as Original Epson Products or Epson Approved Products by Seiko Epson Corporation Responsible Use of Copyrighted Materials Digital cameras scanners and ink jet printers like conventional photocopiers and cameras can be misused by improper copying or printing of co...

Page 101: ...País de impressão XXXXXX Printed in XXXXXX XX XX XX ...

Reviews: