

EPSON Stylus COLOR 300
10 -
EPSON Stylus COLOR 300
5/98
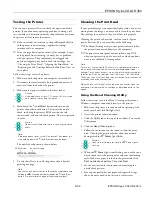
Using the Control Panel
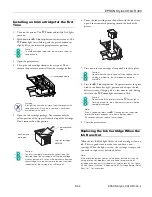
Follow these steps to clean the print head using the control
panel buttons:
1. Make sure the printer is turned on and not printing. Also
make sure the
V
Ink Out
light is off.
2. Hold down the
R
Cleaning
button for three seconds. The
P
Power
light starts flashing and the printer begins
cleaning the print head. Cleaning the print head takes about
one minute.
Caution:
Never turn off the printer while the
P
Power light is
flashing.
Note:
If you accidentally pressed the
R
Cleaning button while the
V
Ink Out light is flashing or on, the ink cartridge replacement
procedure starts. If you don’t want to replace the ink cartridge at
this time, press the
R
Cleaning button again to return the print
head to its home position.
3. When the
P
Power
light stops flashing, you need to print
a page to test the print quality and reset the cleaning cycle.
If you’re using DOS or your printer is part of a network,
open an application and print a document containing black
and color data.
If your printer is connected directly to your computer, run a
nozzle check. To do this, access the printer software window
and click the
Utility
tab to display the Utility menu. Click
the
Nozzle Check
icon, then click
Next
. (See the next
section for instructions on examining the nozzle check
pattern.)
4. If your print quality has not improved, repeat the steps
above. You may need to do this two or three times.
Examining the Nozzle Check Pattern
Examine the nozzle check pattern you print. It should look
something like this, with the right side of the pattern colored
cyan, magenta, and yellow:
Each staggered horizontal and straight vertical line should be
complete, with no gaps in the dot pattern. If any dots are
missing, clean the print head again, as explained in the
previous sections.
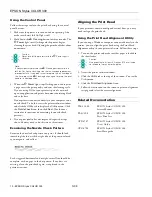
Aligning the Print Head
If your printouts contain misaligned vertical lines, you may
need to align the print head.
Using the Print Head Alignment Utility
If you’re using a Windows computer connected directly to the
printer, you can align the print head using the Print Head
Alignment utility in your printer software. Follow these steps:
1. Turn on the printer and make sure that paper is loaded in
the sheet feeder.
Caution:
Use paper that is at least 8.3 inches (210 mm) wide
so ink doesn’t spray onto the platen.
2. Access the printer software window.
3. Click the
Utility
tab at the top of the window. You see the
Utility menu.
4. Click the
Print Head Alignment
icon.
5. Follow the instructions on the screen to print an alignment
test page and select the correct alignment.
Related Documentation
TM-SC300
EPSON Stylus COLOR 300
Service Manual
PL-SC300
EPSON Stylus COLOR 300
Parts Price List
CPD 6707
EPSON Stylus COLOR 300
User’s Guide
CPD 6708
EPSON Stylus COLOR 300
Start Here guide


