


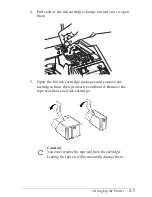


8. Press the
Alt
button again to return the print head to its
home position. (Even if you do not press
Alt
, the printer
moves the print head back to its home position about
60 seconds after you close the clamps.)
9. Close the printer cover.
After you install the ink cartridges, the printer charges the
ink delivery system. This takes about one minute. During
this time, the
Pause
light flashes. When the printer is
finished charging, the
Pause
light comes on without
flashing.
c
Caution:
Never turn off the printer while the
Pause
light is
flashing.
In order to maintain optimum print quality, the printer
periodically performs a cleaning operation. You may notice
the cleaning cycle being performed when the printer has
been on for a while without being used or when you turn
on the printer after it has been off a while.
10. After the printer completes the charging cycle, press the
Pause
button.
After you install the ink cartridges, you should make sure that
the paper thickness lever, which controls the distance between
the paper and the printer carriage, is set correctly.
1. Open the printer cover and press the
Pause
button.
2. While holding down the
Alt
button, press the
Font
button.
The carriage moves to the left.
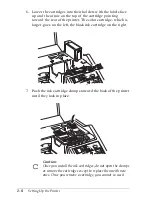
3. Locate the small blue lever in front of the ink cartridges. Try
rotating this lever to the left. If it cannot be rotated any
further, it is in the correct position.
Setting Up the Printer
1-9