


Perfection 4870 Photo
Revision A
DISASSEMBLY/ASSEMBLY
Disassembly Procedure
61
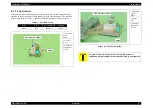
4.2.18 Removal of TPU CR Timing Belt/
TPU Driven Pulley Unit
1. Remove of TPU Lower Housing.
(Refer to 4.2.11 Removal of TPU Lower Housing )
2. Move the TPU Carriage Unit to the centre.
(Refer to 4.2.13 Removal of TPU Carriage
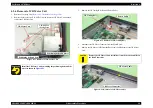
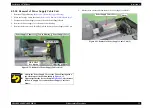
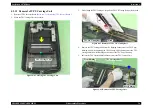
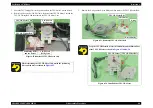
3. Remove the two screws (C.B.P M3x8) which secure the TPU Driven Pulley Unit and
then remove the TPU Driven Pulley Unit.
Figure 4-55. Removal of TPU Driven Pulley Unit
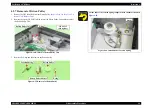
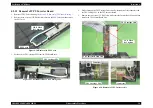
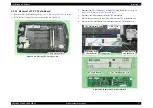
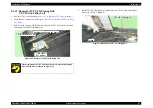
4. Pull the TPU CR Timing Belt out of the hook of the TPU Carriage Unit and then
remove the TPU CR Timing Belt.
Figure 4-56. Removal of TPU CR Timing Belt
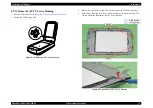
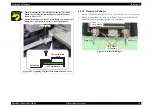
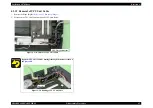
When reinstalling the TPU Driven Pulley Unit, match the positioning
holes and the bosses as shown in
Positioning holes and the bosses
C.B.P M3x8
(5±1 kgfcm)
TPU Driven Pulley Unit
Hook
TPU CR Timing Belt
Summary of Contents for Perfection 4870 Photo
Page 1: ...EPSON Perfection4870Photo Color Image Scanner Service Manual SESC03 008 ...
Page 5: ...Revision Status Revision Date of Issue Description A December 10 2003 First release ...
Page 8: ...C H A P T E R 1 PRODUCTDESCRIPTION ...
Page 19: ...C H A P T E R 2 OPERATINGPRINCIPLES ...
Page 29: ...C H A P T E R 3 TROUBLESHOOTING ...
Page 37: ...C H A P T E R 4 DISASSEMBLY ASSEMBLY ...
Page 63: ...C H A P T E R 5 ADJUSTMENT ...
Page 65: ...C H A P T E R 6 MAINTENANCE ...
Page 68: ...C H A P T E R 7 APPENDIX ...
Page 71: ......
Page 72: ......
Page 73: ......
Page 74: ......
Page 75: ......
Page 76: ......
Page 77: ......
Page 78: ......
Page 79: ......
Page 80: ......
Page 81: ......


