background image

Projector Placement

17

a

If you project from the ceiling or from the rear, select the correct

Projection setting and, if necessary, adjust the OSD Rotation setting.

s

Settings Installation OSD Rotation

Projecting Images onto a Ceiling

Warning

Do not cover the projection window. If the window is covered, the internal

temperature could rise and cause a fire.

Attention

When projecting images onto a ceiling, make sure that the rear cover is replaced

correctly.

g

g

Related Links

• "Projection Modes"

p.30

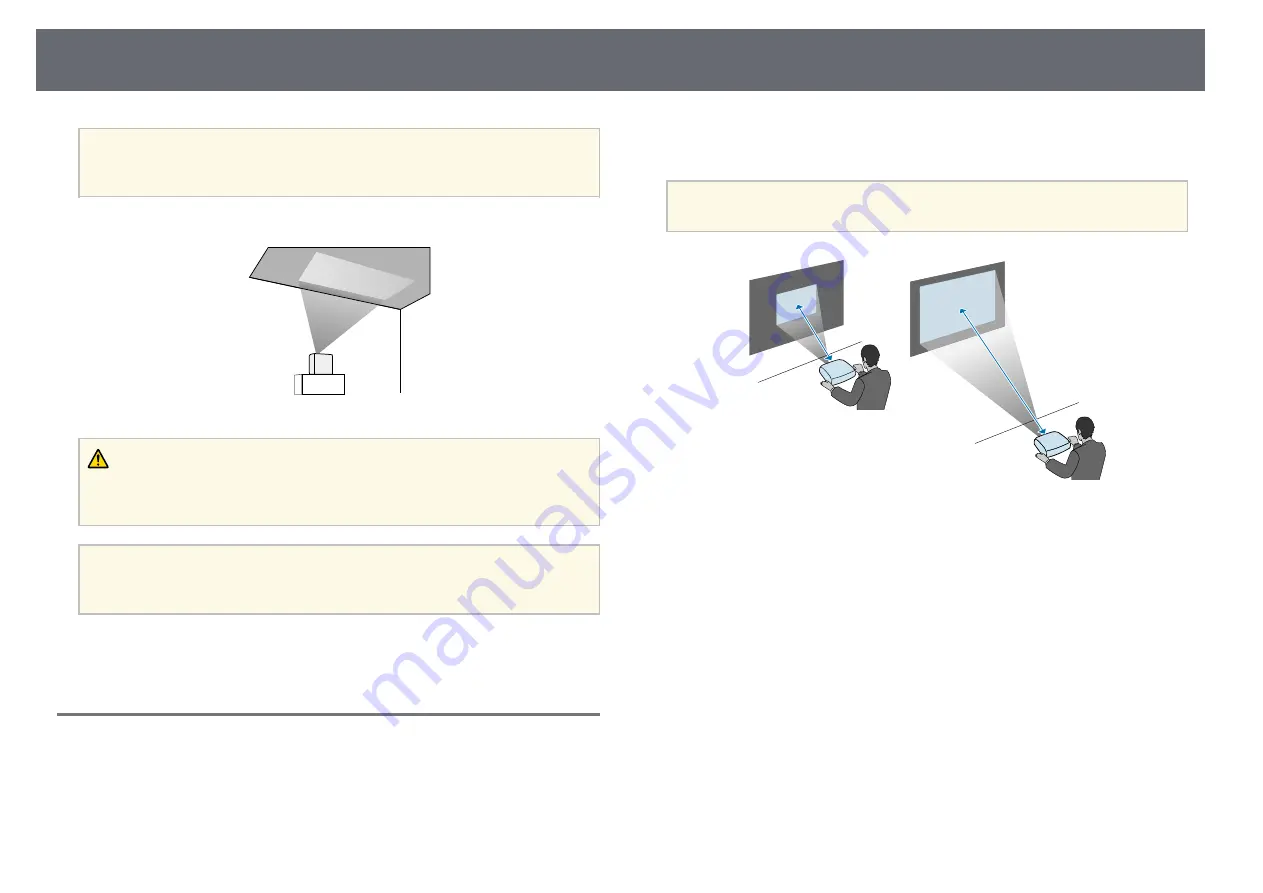
Projection Distance

The distance at which you place the projector from the screen determines the

approximate size of the image. The image size increases the farther the

projector is from the screen, but can vary depending on the zoom factor,

aspect ratio, and other settings.

See the Appendix for details about how far to place the projector from the

screen based on the size of the projected image.

a

When correcting keystone distortion, your image is slightly smaller.

g

g

Related Links

• "Screen Size and Projection Distance"

p.87

Summary of Contents for EB-W70

Page 1: ...User s Guide ...

Page 2: ... Mode Using the Menus 30 Adjusting the Image Height 31 Image Shape 32 Auto V Keystone 32 Correcting the Image Shape Horizontally with the Horizontal Keystone Buttons 32 Correcting the Image Shape with the Keystone Button 33 Correcting the Image Shape with Quick Corner 34 Focusing the Image Using the Focus Lever 36 Resizing the Image with Zoom 37 Image Aspect Ratio 38 Changing the Image Aspect Rati...

Page 3: ...t Maintenance 71 Cleaning the Air Filter and Vents 71 Replacing the Air Filter 71 Solving Problems 73 Projection Problems 74 Projector Indicator Status 75 Solving Projector Power On or Power Off Problems 77 Solving Projector Power Problems 77 Solving Projector Shutdown Problems 77 Solving Image Problems 78 Solving Missing Image Problems 78 Adjusting an Image that is not Rectangular 78 Adjusting a ...

Page 4: ...Information 94 Laser Warning Labels 94 Glossary 96 Notices 97 FCC Compliance Statement 97 Indication of the manufacturer and the importer in accordance with requirements of EU directive 98 Restriction of Use 98 Trademarks 98 Copyright Notice 99 Copyright Attribution 99 ...

Page 5: ...ention This label indicates procedures that may result in damage or injury if sufficient care is not taken This label indicates additional information that may be useful to know button Indicates the buttons on the remote control or the control panel Example button Menu Setting name Indicates projector menu and setting names Example Select the Image menu s Image Color This label indicates links to ...

Page 6: ...ick or to view the lower level titles in that section To return to the previous page perform the following operation on your keyboard Windows Hold down Alt and then press Mac OS Hold down the command key and then press Printing only the pages you need You can extract and print only the pages you need Click Print in the File menu and then specify the pages you want to print in Pages in Pages to Pri...

Page 7: ... To specify pages that are not in series divide the pages with commas Example 5 10 15 ...

Page 8: ...Introduction to Your Projector See these sections to learn more about your projector g g Related Links Projector Parts and Functions p 9 ...

Page 9: ...at may become warped or damaged by heat near the vent Hot air from the air exhaust vent could cause burns warping or accidents to occur E Air intake vent air filter Takes in air to cool the projector internally F Projection window Images are projected from the lens inside the projector G Remote receiver Receives signals from the remote control H Focus lever Adjusts the image focus I Control panel ...

Page 10: ...ble through here to secure it F Rear cover slots Slots to install the rear cover G Cable hook Pass the power supply USB cable through here H HDMI port with an extension cable Inputs video signals from a streaming media player or other HDMI compatible video equipment This projector is compatible with HDCP You cannot remove this extension cable Name Function I Service port This port is not normally ...

Page 11: ...ge E Air filter cover Open to access the air filter g g Related Links Air Filter and Vent Maintenance p 71 Adjusting the Image Height p 31 Projector Parts Control Panel Name Function A Power button Turns the projector on or off B Focus lever Adjusts the image focus C Indicators Indicates the projector s status D Volume up down buttons Adjusts the volume for the speaker and headphones You can also ...

Page 12: ...ojector s menu You can use the projector s menus to adjust the settings that control how your projector works Hold down this button to display the Bluetooth menu F A V Mute button Turns the video and audio on or off temporarily G Volume up down buttons Adjusts the volume for the speaker and headphones You can also control the volume for Bluetooth audio devices connected to the projector H Keystone...

Page 13: ... p 40 Correcting the Image Shape with the Keystone Button p 33 Correcting the Image Shape with Quick Corner p 34 Turning On the Projector p 27 Controlling the Volume with the Volume Buttons p 49 Shutting Off the Image and Sound Temporarily A V Mute p 54 Using the Projector s Menus p 58 ...

Page 14: ...ing Up the Projector Follow the instructions in these sections to set up your projector g g Related Links Projector Placement p 15 Projector Connections p 18 Installing Batteries in the Remote Control p 24 ...

Page 15: ... angles There is no vertical or horizontal limit to how the projector can be installed Note the following points when selecting a projector location Place the projector on a sturdy level surface or install it using a compatible mount Leave plenty of space around and under the projector for ventilation and do not place it on top of or next to anything that could block the vents Place the projector ...

Page 16: ...nd dust such as on a kitchen counter in the kitchen or near a humidifier or in locations exposed to oil smoke or steam Doing so could cause fire or electric shock In addition the oil content could cause the projector s outer case to deteriorate and could cause the projector to fall off from the ceiling where it is suspended Attention If you are using the projector at altitudes above 1500 m set the...

Page 17: ...ure that the rear cover is replaced correctly g g Related Links Projection Modes p 30 Projection Distance The distance at which you place the projector from the screen determines the approximate size of the image The image size increases the farther the projector is from the screen but can vary depending on the zoom factor aspect ratio and other settings See the Appendix for details about how far ...

Page 18: ...onal or commercially available cables when necessary g g Related Links Connecting to a Streaming Media Player p 18 Connecting to Video Sources p 20 Connecting Headphones p 21 Connecting to Bluetooth Audio Devices p 22 Connecting to a Streaming Media Player You can connect your streaming media player to the projector s HDMI port By connecting the power supply USB cable you can power the streaming m...

Page 19: ...e to the streaming media player s USB port Type B USB port on the side USB port at the bottom e Pass the power supply USB cable through the cable hook and cable clamp and then close the cable clamp to secure the cable USB port on the side USB port at the bottom ...

Page 20: ...t it to the projector using an HDMI cable and send the image source s audio with the projected image Attention Do not turn on the video source before connecting it to the projector Doing so could damage the projector a If the port on the device you connect has an unusual shape use the cable supplied with the device or an optional cable to connect to the projector Some video equipment is capable of...

Page 21: ...s You can connect headphones to the projector s Audio Out port You can control the volume using the projector s remote control Attention The projector s Audio Out port only supports 3 pin headphones If you use any other headphones audio may not be output normally a Open the Audio Out port cover b Connect the stereo headphone s mini jack cable to the projector s Audio Out port ...

Page 22: ...ons a Turn on the projector and display an image b Hold down the button on the remote control for about two seconds The Bluetooth screen is displayed a You can also select Bluetooth settings in the projector s Settings menu s Settings Sound Bluetooth c Select On as the Bluetooth Audio setting d Turn on pairing mode on the Bluetooth audio device you want to connect to See your Bluetooth audio devic...

Page 23: ...tooth device that supports copyright protection SCMS T You may not be able to connect depending on the standard and type of device Even when connecting within the specified communication distance connections can be lost due to the status of the signal The communication method for Bluetooth uses the same frequency 2 4 GHz as wireless LAN IEEE802 11b g or microwave ovens Therefore if these devices a...

Page 24: ...ulations c Insert the batteries with the and ends facing as shown Warning Check the positions of the and marks inside the battery holder to ensure the batteries are inserted the correct way If the batteries are not used correctly they could explode or leak causing a fire injury or damage to the product d Replace the battery cover and press it down until it clicks into place g g Related Links Remot...

Page 25: ...e projector s receivers within the distance and angles listed here a Avoid using the remote control in conditions with bright fluorescent lights or in direct sunlight or the projector may not respond to commands If you are not going to use the remote control for a long time remove the batteries ...

Page 26: ...ction Modes p 30 Adjusting the Image Height p 31 Image Shape p 32 Focusing the Image Using the Focus Lever p 36 Resizing the Image with Zoom p 37 Image Aspect Ratio p 38 Adjusting Image Quality Color Mode p 40 Adjusting the Sharpness p 42 Adjusting the Image Color p 43 Adjusting the Light Source Brightness p 47 Saving Settings to Memory and Using Saved Settings p 48 Controlling the Volume with the...

Page 27: ...r children When turning on the projector at a distance using the remote control make sure there is no one looking into the lens During projection do not block the light from the projector with a book or other objects If the light from the projector is blocked the area on which the light shines becomes hot which could cause it to melt burn or start a fire Also the lens may get hot due to the reflec...

Page 28: ... leave it on press any other button The light source turns off and the status indicator turns off c To transport or store the projector make sure the power indicator is blue but not flashing and the status indicator is off then unplug the power cord a You can keep supplying power to the streaming media player even if the projector is in standby mode by selecting On as the USB Power in Standby sett...

Page 29: ...us and messages in another language you can change the Language setting a Turn on the projector b Press the button on the remote control c Select the Settings menu and press d Select the Language setting and press e Select the language you want to use and press f Press or to exit the menus ...

Page 30: ...he image over top to bottom and horizontally to project from a ceiling or wall mount and behind a translucent screen g g Related Links Changing the Projection Mode Using the Menus p 30 Projector Setup and Installation Options p 16 Changing the Projection Mode Using the Menus You can change the projection mode to flip the image over top to bottom and or left to right using the projector menus a Tur...

Page 31: ... to focus Locate the projector so that it only needs to be tilted at a small angle a Turn on the projector and display an image b Press the foot release lever to extend and retract the front adjustable foot The foot extends from the projector You can adjust the position up to 11 degrees c Release the lever to lock the foot If the projected image is unevenly rectangular you need to adjust the image...

Page 32: ...can correct the shape of an image vertically in a projection angle of 360 degrees If you want to correct the shape of the image finely use the button on the remote control to correct images manually If you do not want to use the Auto V Keystone function set Auto V Keystone to Off in the projector s menu s Settings Installation Keystone H V Keystone Auto V Keystone g g Related Links Projector Featu...

Page 33: ... combine H V Keystone correction with other image shape correction methods You can correct horizontal keystone distortion up to 40º right or left a Turn on the projector and display an image b Press the button on the remote control You see the Keystone adjustment screen c Use the arrow buttons on the remote control to select between vertical and horizontal keystone correction and to adjust the ima...

Page 34: ...l c Select the Settings menu and press d Select Installation Keystone and press e Select Quick Corner and press Then press again if necessary You see the area selection screen f Use the arrow buttons to select the corner of the image you want to adjust Then press a To reset the Quick Corner corrections hold down for about two seconds while the area selection screen is displayed and then select Yes...

Page 35: ...you see this screen you cannot adjust the shape any further in the direction indicated by the gray triangle h Repeat steps 6 and 7 as needed to adjust any remaining corners i When you are finished press g g Related Links Projector Feature Settings Settings Menu p 61 ...

Page 36: ...Focusing the Image Using the Focus Lever 36 You can correct the focus using the focus lever ...

Page 37: ...tor s menu a Turn on the projector and display an image b Press the button on the remote control c Select the Settings menu and press d Select Installation Zoom and press e Press the left or right arrow button to adjust the zoom setting and press f Press or to exit the menus ...

Page 38: ...ctor s Image menu g g Related Links Changing the Image Aspect Ratio p 38 Available Image Aspect Ratios p 39 Projected Image Appearance with Each Aspect Mode p 39 Image Quality Settings Image Menu p 60 Changing the Image Aspect Ratio You can change the aspect ratio of the displayed image a Turn on the projector and display an image b Press the button on the remote control c Select the Image menu an...

Page 39: ...escription Auto Automatically sets the aspect ratio according to the input signal 16 9 Converts the aspect ratio of the image to 16 9 Full Displays images using the full size of the projection area but does not maintain the aspect ratio Zoom Displays images using the full width of the projection area and maintains the aspect ratio of the image Projected Image Appearance with Each Aspect Mode Black...

Page 40: ...the screen and then image appearance changes c To cycle through all of the available color modes for your input signal press the button repeatedly a You can also set the Color Mode setting in the projector s Image menu g g Related Links Image Quality Settings Image Menu p 60 Available Color Modes You can set the projector to use these color modes depending on your environment and image types Color...

Page 41: ...he Image menu and press d Select Brightness Dynamic Contrast and press e Select one of the following options and press Normal for standard brightness adjustment High Speed to adjust brightness as soon as the scene changes f Press or to exit the menus ...

Page 42: ...n the remote control c Select the Image menu and press d Select Sharpness and press e Do the following as necessary for each setting To adjust the outline of the image adjust the Sharpness setting To reduce flickering in images adjust the Noise Reduction setting To reduce flickering in MPEG images adjust the MPEG Noise Reduction setting f Press or to exit the menus ...

Page 43: ...bluish or reddish a Turn on the projector and display an image b Press the button on the remote control c Select the Image menu and press d Select Color White Balance Color Temp and press e Press the left or right arrow button to adjust the color tone of the image Higher values tint the image blue and lower values tint the image red f Press or to exit the menus Adjusting the RGB Offset and Gain Yo...

Page 44: ...s more vividly expressed when you select a high value When you select a low value the image appears more full bodied but shading for the dark areas is harder to distinguish In the Gain setting the bright areas become whiter and shading is lost when you select a high value When you select a low value shading for the bright areas is more vividly expressed f Press or to exit the menus Adjusting the H...

Page 45: ...just the Saturation setting To adjust the overall color brightness of the color adjust the Brightness setting g Press or to exit the menus Adjusting the Gamma You can correct differences in projected image colors that occur between different image sources by adjusting the Gamma setting a Turn on the projector and display an image b Press the button on the remote control c Select the Image menu and...

Page 46: ... dark areas of images become brighter but the color saturation for lighter areas may become weaker f If you want to make finer adjustments select Custom and press g Press the left or right arrow buttons to select the color tone you want to adjust on the gamma adjustment graph Then press the up or down arrow button to adjust the value and press h Press or to exit the menus ...

Page 47: ...your projector s light source a Turn on the projector and display an image b Press the button on the remote control c Select the Image menu and press d Select Light Output and press e Press the left and right arrow buttons to select the brightness f Press or to exit the menus ...

Page 48: ... your current Image menu settings with saved settings Save Memory lets you save your current Image menu settings to memory 10 memories with different names are available a A memory name that has already been used is indicated by a blue mark Saving over a previously saved memory overwrites the settings with your current settings Erase Memory lets you erase the selected memory settings Rename Memory...

Page 49: ...the Bluetooth audio devices separately a Turn on the projector and start a video b To lower or raise the volume press the or button on the control panel or remote control A volume gauge appears on the screen Caution Do not start a playback at a high volume setting Sudden loud noises may cause hearing loss Always lower the volume before powering off so that you can power on and then gradually incre...

Page 50: ...ontrol c Select the Settings menu and press d Select Sound Sound Mode and press e Select your sound mode and press f Press or to exit the menus g g Related Links Available Sound Modes p 50 Available Sound Modes You can set the projector to use these sound modes depending on the input source you are using Sound mode Description Standard Outputs the audio using normal sound quality Vocal Best for he...

Page 51: ...tures Follow the instructions in these sections to use your projector s adjustment features g g Related Links HDMI Link Features p 52 Shutting Off the Image and Sound Temporarily A V Mute p 54 Projector Security Features p 55 ...

Page 52: ...hat is available for HDMI Link and control the selected device using the HDMI Link features a You must also configure the connected device See the documentation supplied with the device for more information Some connected devices or functions of those devices may not operate properly even if they meet the HDMI CEC standard See the documentation supplied with the device for more information Use a c...

Page 53: ... linked device on when the projector is turned on Select Device PJ or Bidirectional to turn the projector on when the linked device is turned on Power Off Link lets you control whether linked devices are turned off when the projector is turned off a Power Off Link only works when the connected device s CEC power link function is enabled Note that depending on the status of the connected device for...

Page 54: ... image and sound Any sound or video action continues to run however so you cannot resume projection at the point that you stopped it a Press the button on the remote control The light source turns off and the projected image and sound are interrupted b To turn the image and sound back on press again ...

Page 55: ...ct Child Lock To turn the projector on you must press the power button for longer than three seconds a Child Lock does not prevent the projector from turning on when the power cord is connected if the Direct Power On setting is set to On s Settings Operation Direct Power On To lock all of the projector s buttons select Control Panel Lock Full Lock To lock all buttons except the power button select...

Page 56: ... Cable You can use the security slot on the projector to attach a Kensington Microsaver Security system as a theft deterrent a For more details on the Microsaver Security System see http www kensington com g g Related Links Projector Parts Front Top p 9 ...

Page 57: ...menu system and change projector settings g g Related Links Using the Projector s Menus p 58 Using the Displayed Keyboard p 59 Image Quality Settings Image Menu p 60 Projector Feature Settings Settings Menu p 61 Projector Information Display Info Menu p 64 Projector Reset Options Reset Menu p 66 ...

Page 58: ...ess the up or down arrow buttons to move through the menus listed on the left The settings for each menu are displayed on the right c To change settings in the displayed menu press d Press the up or down arrow button to move through the settings e Change the settings using the buttons listed on the bottom of the menu screens f To return all the menu settings to their default values select Reset g ...

Page 59: ...r case Each time you select the SYM1 2 key the symbols enclosed by the frame change b After entering the text select Finish on the keyboard to confirm your entries Select Cancel to cancel entering text g g Related Links Available Text Using the Displayed Keyboard p 59 Available Text Using the Displayed Keyboard You can enter the following text when using the displayed keyboard Text type Details Nu...

Page 60: ...o magenta tones in the image White Balance Color Temp Sets the color temperature according to the color mode you selected Higher values tint the image blue and lower values tint the image red Customized Adjusts the individual R red G green and B blue components of the offset and gain RGBCMY Adjusts the hue saturation and brightness of each color R red G green B blue C cyan M magenta Y yellow indiv...

Page 61: ...ect image shape and alignment using an on screen display Zoom Adjusts the image size Projection Selects the way the projector faces the screen so the image is oriented correctly OSD Rotation Rotates the menu display 90 High Altitude Mode Regulates the projector s operating temperature at altitudes above 1500 m Display Welcome Guide Shows the Welcome Guide that presents product features and tips on...

Page 62: ...andby mode when the power is off to prevent children from turning on the projector Control Panel Lock Select Full Lock to lock all buttons or Partial Lock to lock all buttons except the power button Setting Options Description USB Power in Standby For some countries and regions Set to On to power the streaming media player connected to the projector even if the projector is in standby mode when th...

Page 63: ...Projector Feature Settings Settings Menu 63 Controlling the Volume with the Volume Buttons p 49 Changing the Sound Mode p 50 ...

Page 64: ...ces by viewing the Projector Info menu in the projector s Info menu Information item Description Total Op Time Displays the number of hours the projector has been used in its operating life Operation Hours Displays the number of hours the projector has been used since it was turned on Source Displays the name of the port to which the current input source is connected Input Signal Displays the inpu...

Page 65: ...Projector Information Display Info Menu 65 Information item Description Product Name Displays the projector s product name Serial Number Displays the projector s serial number ...

Page 66: ...fault values using the Reset menu Setting Options Description Reset Memory Resets the name and settings of a saved memory Reset All Config Resets most of the projector settings to their default values You cannot reset the following settings using the Reset All Config option Zoom Memory Language ...

Page 67: ...tor Follow the instructions in these sections to maintain your projector g g Related Links Projector Maintenance p 68 Cleaning the Projection Window p 69 Cleaning the Projector Case p 70 Air Filter and Vent Maintenance p 71 ...

Page 68: ...y parts you should replace are the air filter and remote control batteries If any other part needs replacing contact Epson or an authorized Epson servicer Warning Before cleaning any part of the projector turn it off and unplug the power cord Never open any cover on the projector except as specifically explained in this manual Dangerous electrical voltages in the projector can injure you severely ...

Page 69: ...s gently wipe the projection window with lens cleaning paper Warning Do not use a lens cleaner that contains flammable gas The high heat generated by the projector may cause a fire Attention Do not use glass cleaner or any harsh materials to clean the projection window and do not subject the projection window to any impacts otherwise it could be damaged ...

Page 70: ... a soft dry lint free cloth To remove stubborn dirt use a soft cloth moistened with water and mild soap Do not spray liquid directly on the projector Attention Do not use wax alcohol benzene paint thinner or other chemicals to clean the projector case These can damage the case Do not use canned air or the gases may leave a flammable residue ...

Page 71: ...he projector s air filter or vents if they get dusty or if you see a message telling you to clean them a Turn off the projector and unplug the power cord b Gently remove the dust using a small vacuum designed for computers or a very soft brush such as a paintbrush a You can remove the air filter so that you can clean both sides Do not rinse the air filter in water or use any detergent or solvent t...

Page 72: ...ut of the projector a Dispose of used air filters according to local regulations Filter frame ABS Filter Polyurethane foam e Place the new air filter in the projector as shown and push gently until it clicks into place f Close the air filter cover g g Related Links Replacement Parts p 86 ...

Page 73: ...Related Links Projection Problems p 74 Projector Indicator Status p 75 Solving Projector Power On or Power Off Problems p 77 Solving Image Problems p 78 Solving Missing or Low Audio Problems p 81 Solving Bluetooth Problems p 82 Solving Remote Control Operation Problems p 83 Solving HDMI Link Problems p 84 ...

Page 74: ...it and then plug it back in and turn it on If this does not solve the problem check the following The indicators on the projector may indicate the problem The solutions in this manual can help you solve many problems If none of these solutions help contact Epson for technical support ...

Page 75: ... Flashing blue Laser Off Temp Off Warming up or shutting down When warming up wait about 30 seconds for an image to appear All buttons are disabled during warm up and shutting down Power Lit blue Status Off Laser Off Temp Off Standby or sleep mode When you press the power button projection starts Power Flashing blue Status Off Laser Off Temp Off Preparing to enter USB Power in Standby mode Power L...

Page 76: ...the projector and contact Epson for help Power Flashing blue Status Indicator status varies Laser Flashing orange Temp Indicator status varies Laser warning Turn the projector off unplug it and contact Epson for help Power Off Status Flashing blue Laser Lit orange Temp Off Laser has a problem Turn the projector off unplug it and contact Epson for help Power Off Status Flashing blue Laser Off Temp ...

Page 77: ...ntrol panel for seven seconds To release Child Lock hold down the power button on the control panel for three seconds c Disconnect the cord and contact Epson for help g g Related Links Projector Security Features p 55 Solving Projector Shutdown Problems If the projector s light source turns off unexpectedly try the following steps until the problem is solved a Projectors may have entered sleep mod...

Page 78: ...Check the status of your video source If you are projecting from a streaming media player make sure it is powered by the power supply USB cable on the projector Turn on the connected streaming media player or video source and press the play button to start a video if necessary Make sure the connected device meets the HDMI CEC standard See the documentation supplied with the device for more informa...

Page 79: ...ution or select a resolution that matches the projector s native resolution g g Related Links Image Quality Settings Image Menu p 60 Focusing the Image Using the Focus Lever p 36 Cleaning the Projection Window p 69 Fixing Partial Image Problems If only a partial computer image is displayed try the following steps until the problem is solved a If you zoomed into or out of the image using the Zoom s...

Page 80: ...ted Links Image Quality Settings Image Menu p 60 Adjusting an Image with Incorrect Brightness or Colors If the projected image is too dark or bright or the colors are incorrect try the following steps until the problem is solved a Press the button on the remote control to try different color modes for the image and environment b Check your video source settings c Adjust the available settings in t...

Page 81: ...g settings on your video equipment Check your streaming media player or video source to make sure the volume is turned up and the audio output is set for the correct source Set the connected device to PCM output When you are connecting the projector to a Mac using an HDMI cable make sure your Mac supports audio through the HDMI port e If you connect using Bluetooth try the following solutions Chec...

Page 82: ... audio device supports copyright protection SCMS T and A2DP b Select Search Bluetooth Device in the projector s Settings menu when you connect a Bluetooth audio device for the first time or change to another Bluetooth audio device s Settings Sound Bluetooth Search Bluetooth Device g g Related Links Projector Feature Settings Settings Menu p 61 ...

Page 83: ...e remote control is stuck down causing it to enter sleep mode Release the button to wake the remote control up c If the image is projected from the projector make sure you are operating the remote control within the reception angle and range of the projector d Make sure the projector is not warming up or shutting down e Strong fluorescent lighting direct sunlight or infrared device signals may be ...

Page 84: ...tions list If the device does not appear in the Device Connections list it does not meet the HDMI CEC standards Connect a different device s Settings Operation HDMI Link Device Connections d Check that all cables required for HDMI Link are securely connected e Make sure the connected devices are turned on and in standby status See the documentation supplied with the device for more information f I...

Page 85: ... g g Related Links Optional Accessories and Replacement Parts p 86 Screen Size and Projection Distance p 87 Supported Monitor Display Resolutions p 89 Projector Specifications p 90 External Dimensions p 91 List of Safety Symbols and Instructions p 92 Laser Safety Information p 94 Glossary p 96 Notices p 97 ...

Page 86: ...thout notice and availability may vary depending on the country of purchase g g Related Links Mounts p 86 Replacement Parts p 86 Mounts Ceiling Mount Floor Stand ELPMB60W ELPMB60B Use when installing the projector on a ceiling a wall or a floor Lighting Track Mount ELPMB61W ELPMB61B Use when installing the projector on a lighting track a Special expertise is required to suspend the projector from ...

Page 87: ... to Maximum Tele 30 65 40 65 88 4 40 86 54 88 119 5 50 108 67 111 150 6 16 10 screen size A B Minimum Wide to Maximum Tele 60 129 81 134 181 7 80 172 108 180 243 10 90 194 121 203 274 11 100 215 135 226 305 12 120 258 162 272 368 15 130 280 175 295 399 16 150 323 202 341 461 18 4 3 screen size A B Minimum Wide to Maximum Tele 30 61 46 74 100 4 40 81 61 100 136 6 50 102 76 126 171 7 60 122 91 152 2...

Page 88: ...A B Minimum Wide to Maximum Tele 30 66 37 67 91 2 40 89 50 91 123 2 50 111 62 114 154 3 60 133 75 138 186 3 70 155 87 162 218 4 80 177 100 185 250 5 90 199 112 209 282 5 100 221 125 233 314 6 110 244 137 256 346 6 120 266 149 280 378 7 130 288 162 304 410 7 ...

Page 89: ...utions 89 Signal Refresh rate Hz Resolution dots VGA 60 640 480 SDTV 480i 480p 59 94 720 480 SDTV 576i 576p 50 720 576 HDTV 720p 50 59 94 60 1280 720 HDTV 1080i 50 59 94 60 1920 1080 HDTV 1080p 23 98 24 29 97 30 50 59 94 60 1920 1080 ...

Page 90: ...er consumption 100 to 120 V area Operating power consumption 178 W Power consumption 220 to 240 V area Operating power consumption 172 W Standby power consumption 0 4 W Operating altitude Altitude 0 to 3 000 m Operating temperature Altitude of 0 to 2 286 m 5 to 35 C No condensation Altitude of 2 287 to 3 000 m 5 to 30 C Humidity of 20 to 80 No condensation Storage temperature 10 to 60 C Humidity o...

Page 91: ...External Dimensions 91 A Center of lens B Distance from center of lens to suspension bracket fixing point The unit in these illustrations is mm ...

Page 92: ...ntify the positive and negative connections the polarity on a piece of equipment to which a d c power supply may be connected No Symbol mark Approved standards Description I The same as No 8 J IEC60417 No 5001B Battery general On battery powered equipment To identify a device for instance a cover for the battery compartment or the connector terminals K IEC60417 No 5002 Positioning of cell To ident...

Page 93: ...O3864 IEC60825 1 Caution laser radiation To indicate the equipment has a laser radiation part W ISO 3864 Disassembly prohibition To indicate a risk of injury such as electric shock if the equipment is disassembled X IEC60417 No 5266 Standby partial standby To indicate that part of the equipment is in the ready status Y ISO3864 IEC60417 No 5057 Caution movable parts To indicate that you must keep a...

Page 94: ...ing of it Dispose according to your local or national laws and regulations a The projector uses a laser as the light source The laser has the following characteristics Depending on the surroundings the brightness of the light source may decline The brightness declines a lot when the temperature gets too high The brightness of the light source declines the longer it is used You can change the relat...

Page 95: ...s 2 laser product that complies with the IEC EN60825 1 2007 international standard for lasers Follow these safety instructions when using the projector Complies with FDA performance standards for laser products except for deviations pursuant to Laser Notice No 50 dated June 24 2007 ...

Page 96: ...ighest quality possible It also provides an encryption function for the digital signal HDTV An abbreviation for High Definition Television that refers to high definition systems which satisfy the following conditions Vertical resolution of 720p or 1080i or greater p Progressive i Interlace Screen aspect ratio of 16 9 Interlace Transmits information needed to create one screen by sending every othe...

Page 97: ...ules Operation is subject to the following two conditions 1 This device may not cause harmful interference and 2 this device must accept any interference received including interference that may cause undesired operation This equipment has been tested and found to comply with the limits for a Class B digital device pursuant to Part 15 of the FCC Rules These limits are designed to provide reasonabl...

Page 98: ...a PowerPoint and the Windows logo are trademarks or registered trademarks of Microsoft Corporation in the United States and or other countries HDMI and High Definition Multimedia Interface are the trademarks or registered trademarks of HDMI Licensing LLC The Bluetooth word mark and logo are registered trademarks of Bluetooth SIG Inc and the Seiko Epson Corporation uses these marks under license Ot...

Page 99: ...es costs or expenses incurred by the purchaser or third parties as a result of accident misuse or abuse of this product or unauthorized modifications repairs or alterations to this product or excluding the U S failure to strictly comply with Seiko Epson Corporation s operating and maintenance instructions Seiko Epson Corporation shall not be liable against any damages or problems arising from the ...

Reviews: