background image

ActionLaser II

There are three 

ways to install 

chip sets on this board.

0.5MB chip sets in blocks A, B, C, and 

D

A 2.0MB chip set in block A, and 0.5MB chip sets in blocks B, C,
and D

2.0MB chip sets in blocks A and B, and 0.5MB chips sets in blocks
C and D

After you have bought the chip sets and decided where to install

them, follow the steps below

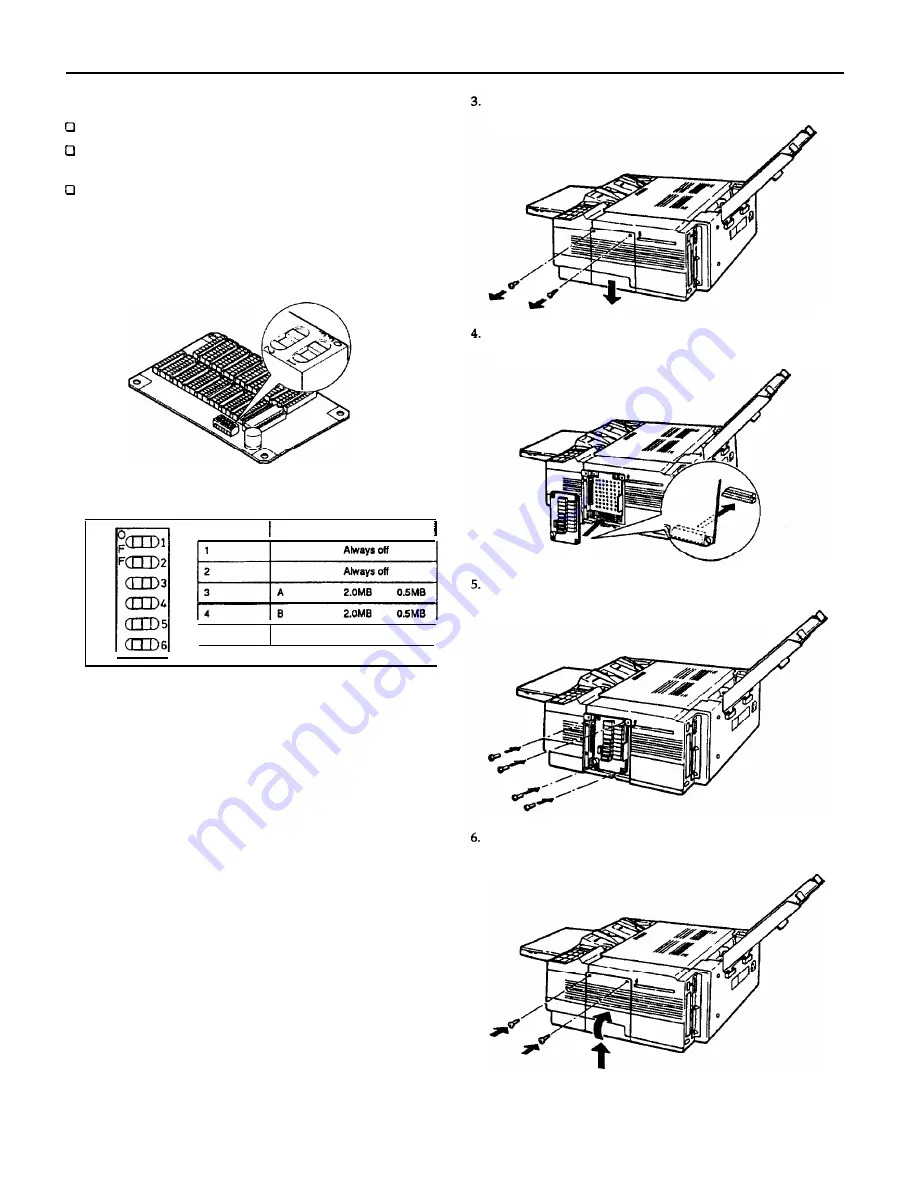
1. Locate the DIP switches on the memory board and make sure that

switches 1 and 2 are off, as shown below.

2. Set the remaining DIP switches on the memory board according

to the following table:

I

DIP Switch

 Block

ON

OFF 

5

c

2.0MB

0.5MB

6

I D

2.0MB

0.5MB

Installing the board

To install 

the 

memory expansion board, you need a cross-head

screwdriver.

WARNING: Do not remove any screws other than 

the 

brass-colored

screws specified in the following steps. 

High 

voltages are present

inside the printer when the power is on. Do not attempt to install 

the

memory board unless the printer is turned off and the power cord is
unplugged. 

Also, try not to touch any contacts on the 

circuit board of

the printer because many of the components can be destroyed by the

static electricity in your body.

1. Unplug 

the 

power cable 

from 

the printer,

2. Disconnect all interface cables from the rear of printer.

Remove the two brasscolored retaining screws and 

the 

memory

board cover located on the right side of the printer.

Insert the optional memory board 

(with 

memory chips installed)

into the printer. Make sure the connectors fit 

together securely.

Secure the board using the four screws attached to the memory
board.

Place 

the memory 

board cover over the memory board as shown

below. Then, secure the cover using the brass-colored screws.

ALII-6

9/17/91

Laser Printers

Summary of Contents for ActionLaser ActionLaser II

Page 1: ...B Bold I Portrait L Landscape The Italic Bold and Landscape effects are created internally Optional fonts provided with font cartridges Download fonts Paper and paper delivery Paper specifications Types Plain paper Special papers Printer Specifications Printing Printing method Resolution Laser beam scanning and dry electrophotographic process 300 x 300 dpi Printing speed Up to 6 pages per minute f...

Page 2: ...20 days 5 to 95 Shelf life 18 months after production Typical life is up to 5000 pages under the following conditions Letter size paper continuous printing and 5 print ratio Atmospheric pressure No less than 740 millibar about the same as 2500 m or 8200 ft altitude The number of pages you can print with a toner cartridge varies depending on the type of printing If you print dense text exceeding th...

Page 3: ...nnector The printer s serial interface can use DTR Data Terminal Ready signal levels and XON XOFF communication protocols either separately or in combination XON XOFF protocol When the vacant area for data in the input buffer drops to 128 bytes the printer outputs an XOFF code indicating that the printer cannot receive more data Once the vacant area for data in the buffer recovers to 256 bytes the...

Page 4: ...options select any printer model that uses the HP Printer Command Language PCL Do not select PCL 5 Epson LQ and FX emulation modes Anacom Peripherals Enter your program s printer selection menu and choose the first printer available from the list of printers below They are listed in order of preference Everex When your printer is in LQ mode select one of the following from your program s printer s...

Page 5: ...cartridge faces left as shown below 5 Press firmly until the cartridge locks into place CAUTION If the message REMOVE CARD appears on the display you inserted the cartridge when the printer was on line or when the printer s memory contained data If you see this message remove the cartridge press CONTINUE then return to step 1 6 If the power is on press ON LINE to set the printer on line If the pow...

Page 6: ... brass colored screws specified in the following steps High voltages are present inside the printer when the power is on Do not attempt to install the memory board unless the printer is turned off and the power cord is unplugged Also try not to touch any contacts on the circuit board of the printer because many of the components can be destroyed by the static electricity in your body 1 Unplug the ...

Page 7: ...re preceded by S error messages are preceded by E and warning messages are preceded by W In some cases the message you see on your display also shows the printer mode E ADD MEMORY FOR U I X This indicates that there is not enough memory in Channel X See Chapter 4 for instructions on changing the RX BUFFER SIZE or adjusting the memory distribution in the INDIVIDUAL setting or see Appendix A for add...

Page 8: ...ne If the FEED light is on press FEED to print out the remaining data E RESELECT TRAY The optional multi media feeder is not installed and the INPUT option is set to OPT or AUTO Install the optional multi media feeder and then press CONTINUE However if you decide not to use the optional multi media feeder simply press CONTINUE and paper is automatically selected from the standard paper cassette S ...

Page 9: ...ets and controls printing of complex pages SelecType Level 2 functions TEST PRINT MODE ASSIGN Prints two test patterns Chooses one of the emulation modes HP LaserJet IIP Epson LQ Epson FX or with the optional identity card installed Epson GL I F CONFIG RX BUFFER SIZE CH CH TIMEOUT AUTO CONT P CONFIG SAVE FACTORY RESET VERSION PAGE COUNTER STANDBY Configures the parallel and serial interfaces Choos...

Page 10: ...y with your software if you use a paper other than letter size and 0 you use manual feeding 0 you install the multi media feeder Cl you return to letter size printing after using another paper size The table below lists all the paper sizes on the SelecType menu Paper Dimension A4 210 x 297 mm A5 148 x 210 mm B5 182 x 257 mm LETTER 8 5 x 11 inches HALF LT Half letter 5 5 x 8 5 inches LEGAL 8 5 x 14...

Page 11: ...e select HP LaserJet series II If neither is available select HP LaserJet 2 If you are using a font cartridge ensure that the software is set up to support it Information Reference List Engineering Change Notices None Product Support Bulletins None Technical Information Bulletins None Related Documentation TM ACTLASII ActionLaser II Service Manual PL ACTLASII ActionLaser II Parts Price List SPKACT...

Reviews: