36
B. INTENSIFIER TUBE REPLACEMENT MANUAL
The intensifier tube can be removed or installed without disassembling the unit’s wired housing. Re
-
moving or installing the intensifier tube only requires the removal of the eyepiece. The airtight seal
will be broken, and the final assembly must be purged with nitrogen to eliminate moisture within the
monocular.
B.1 INITIAL SETUP
A. Test Facility
Clean station in the electronic repair service area.
B. Tools
None
C. Materials/Parts
Intensifier Tube
Cotton-tipped applicators
Isopropyl alcohol
WARNING:
The intensifier’s phosphor screen contains toxic materials!
— If an intensifier tube breaks, be extremely careful to avoid inhaling the phosphor screen
material. DO NOT allow the material to come in contact with the mouth, eyes, or open wounds
on the skin.
— If the phosphor screen material contacts your skin, wash it off immediately with soap and
water.
— If you inhale or swallow any phosphor screen material, drink a lot of water, induce vomiting,
and
seek medical attention as soon as possible
.
NOTE:
Before replacing the intensifier tube, confirm that it is out of the warranty period.
B.2 PROCEDURE OF INTENSIFIER TUBE REPLACEMENT
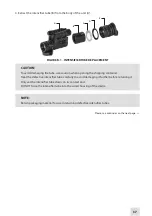
1. Unscrew the eyepiece (E) from the unit body (A).
2. Unscrew the lock ring (D) from the unit body (A).
3. Extract the light guide (C) from the unit body (A).
CAUTION:
Handle the intensifier tube gently to prevent damage.
Treat any supposedly defective tubes as though they are in good condition so they are not
damaged when returned to be reused.
Gently remove the intensifier tube from within the wired housing.
Slowly pull the tube out of the housing in a straight line.
If the intensifier tube is not defective, wrap it in lens paper to protect it and store it in a clean,
dry location.


