www.enware.com.au
Call 1300 369 273
9
Fixing With Pan Screws:
Determine if using pan screws would be appropriate
according to the quality and strength of the floor material, and
the site risk assessment, taking into account the thickness
of floor surface and mortar bed, the distance to structural
concrete slab, and the impact to waterproofing membrane.
Ensure the pan screws can be fixed onto floor material with
adequate structural integrity and strength. If pan screws
are not long enough or they cannot be fixed onto floor
with adequate strength, use floor mounting bracket with
appropriate fixings. (Floor mounting bracket IFO98016 sold
separately.)
Installing the Pan:
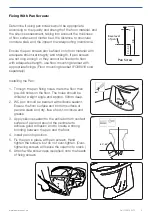
1. Through the pan fixing holes, mark the floor then
pre-drill holes on the floor. The holes should be
drilled at a slight angle and approx. 50mm deep.
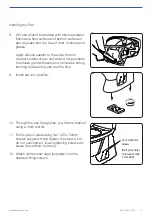
2. WC pan should be bedded with silicone sealant.
Ensure the floor surface and bottom surface of
pan are clean and dry, free of dust, moisture and
grease.
3. Apply silicone sealant to the entire bottom contact
surface of pan and around the perimeter to
achieve good adhesion and to create a strong
bonding between the pan and the floor.
4. Install pan into position.
5. Fix the pan in place with pan screws. Hand
tighten the screws, but do not over-tighten. (Over-
tightening screws will cause the ceramic to crack.)
6. Attach white screw caps (supplied) onto the heads
of fixing screws.
30 - 40
98
Base level
of pan
4
Pan Screw
50
60°-65°

