background image

www.enware.com.au 

Call 1300 369 273     13  

fresh odour cleaning tablets

This WC is prepared for Fresh WC function, 
with a hygienic dosing of a tablet through the 
flush button. The tablet is placed inside the 
Cover Screw Rod by opening the flush button 
and releasing the tablet in the blue Cover Screw 
Rod, as illustrated.
The tablet produces a fresh odour and cleaning 
effect on the whole bowl and colour.

installation - accessories

Install Toilet Seat and Support Arms (Optional)

Install toilet seat according to toilet seat instructions.
If installing support arms, note that the support arms need to be fixed with the seat at the 
same time. Refer to IFO98125 support arms installation instructions for more details.

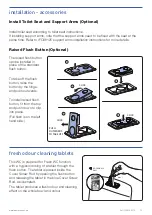
Raised Flush Button (Optional)

IFO FRESH WC

ONLY

Max. 1

4

CLICK

CLICK

PUSH 

OUTWARDS 

TO TAKE OFF

5

CLICK

The raised flush button 
can be installed in 
place of the standard 
flush button. 

To take off the flush 
button, raise the 
button by the hinge, 
and push outwards.

To install raised flush 
button, fit from the top 
and push down to clip 
into place. 
(Full flush is on the left 
hand side.)

Summary of Contents for IFO SPIRA WC

Page 1: ...ware com au Installation and Maintenance Instructions IFO SPIRA WC The more stars the more water efficient WATER RATING www waterrating gov au 3 3litres average flush 4 4 L per full flush 3 1 L per ha...

Page 2: ...m au contents Page Product Description 3 Contents 4 Installation 5 Floor Mounting Method 7 Installation Accessories 10 Access to Cistern Internal Components 14 Maintenance 16 Cleaning 17 Troubleshooti...

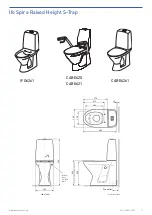
Page 3: ...369 273 3 Ifo Spira Raised Height S Trap IFO6261 CARE620 CARE621 155 105 FRONT VIEW Bottom Inlet 1 2 BSP Male See WC Set Out 650 355 340 415 470 355 460 900 Pan outlet 250 15 480 to top of seat Pressa...

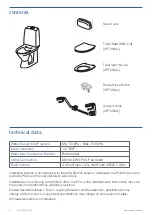
Page 4: ...ongoing Research and Development specifications may change without notice 2 Component specifications may change on some export models All measurements are in millimetres contents IFO733 39 Water Suppl...

Page 5: ...rious applications is shown below 1428 1 Set Out Disabled In accordance with AS 1428 1 2021 Performance Based Solution Institutional Health Set Out Set out typical for hospitals which allows for subst...

Page 6: ...system With arm support system Minimum Set Out The minimum to still allow air circulation behind the WC pan 45 Corner Set Up 285 MINIMUM 285 MINIMUM Finished Wall Finished Wall 175 MINIMUM 175 MINIMUM...

Page 7: ...cording to the quality and strength of the floor material and the site risk assessment If there are no support arms or there is no possibility of using support arms in future use Silicone sealant fixi...

Page 8: ...arms the toilet pan must be fixed to the floor using stainless steel pan screws or a floor fixing bracket Fixing the toilet pan with only silicone sealant is not an adequate method of fixing Ensure th...

Page 9: ...racket IFO98016 sold separately Installing the Pan 1 Through the pan fixing holes mark the floor then pre drill holes on the floor The holes should be drilled at a slight angle and approx 50mm deep 2...

Page 10: ...e bracket yet 3 Where marked install 4 threaded rods onto structural concrete slab or floor Ensure threaded rods are long enough so that it protrudes at least 50mm from the finished floor 4 Apply wate...

Page 11: ...t to the entire bottom contact surface of pan and around the perimeter to achieve good adhesion and to create a strong bonding between the pan and the floor 9 Install pan into position 10 Through the...

Page 12: ...eft that can let any moisture to get through inside the base of the pan Water Inlet Connection Flush the water supply line to ensure the line is clear and connect water supply to the inlet connection...

Page 13: ...eat and Support Arms Optional Install toilet seat according to toilet seat instructions If installing support arms note that the support arms need to be fixed with the seat at the same time Refer to I...

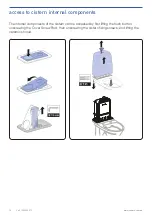
Page 14: ...au access to cistern internal components The internal components of the cistern can be accessed by first lifting the flush button unscrewing the Cover Screw Rod then unscrewing the cistern fixing scr...

Page 15: ...the inlet valve first lift the complete cistern up off the pan Release the inlet hose from cistern by pulling down and out Release the catch of the inlet valve on cistern and lift up the inlet valve a...

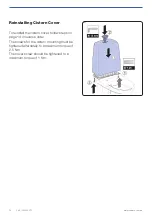
Page 16: ...ng Cistern Cover To reinstall the cistern cover follow steps on page 14 in reverse order The screws for the cistern mounting must be tightened alternately to a maximum torque of 2 5 Nm The cover screw...

Page 17: ...it of its original qualities Strong acids such as hydrochloric acid or sulphuric acid strong alkaline such as caustic soda and cleaning powders or pastes must not be used Running WC units should be r...

Page 18: ...foam seal IFO97230 12 Spreader Spira IFO98512 13 Loosenut Extension 1 2 BSP for inlet connection IFOS 009 1 2 3 4 13 Description Sales Code 14 Pan screws x 4 white screw caps x 4 white blind cover pl...

Page 19: ...any alleged defect in the product coming to your attention provide us with proof of your purchase of the product and have completed the Online Product Service and Warranty Form available on website w...

Page 20: ...ADDRESS 9 Endeavour Rd Caringbah NSW 2229 Australia POSTAL ADDRESS P O Box 2545 Taren Point NSW 2229 Australia 1300 369 273 AUS WWW ENWARE COM AU INFO ENWARE COM AU ABN 23 003 988 314...

Page 21: ...893 model toilets only Support arms only Toilet and toilet seat not included I00272_Jan 22 enware com au 1300 369 273 info enware com au Enware Australia advises 1 Due to ongoing Research and Developm...

Page 22: ...pplied with the Arm Supports to fix the toilet seat and Arm Supports to the WC pan Metal support washers provided must be used Failure to do so may result in premature failure of toilet seat hinge fix...

Page 23: ...www enware com au Call 1300 369 273 3 5 mm Toilet roll holder T20 Torx Support Arm Friction Adjustment Toilet Roll Holder Assembly Diassembly...

Page 24: ...e assembly take out switch from the right hand side then install on the left hand side spare parts Toilet roll holder for IFO98125 each IFO96348 Replacement armrest handle grey IFO96350 Replacement nu...

Reviews: