background image

4. Using the nShield Trusted Verification
Device

Item

Description

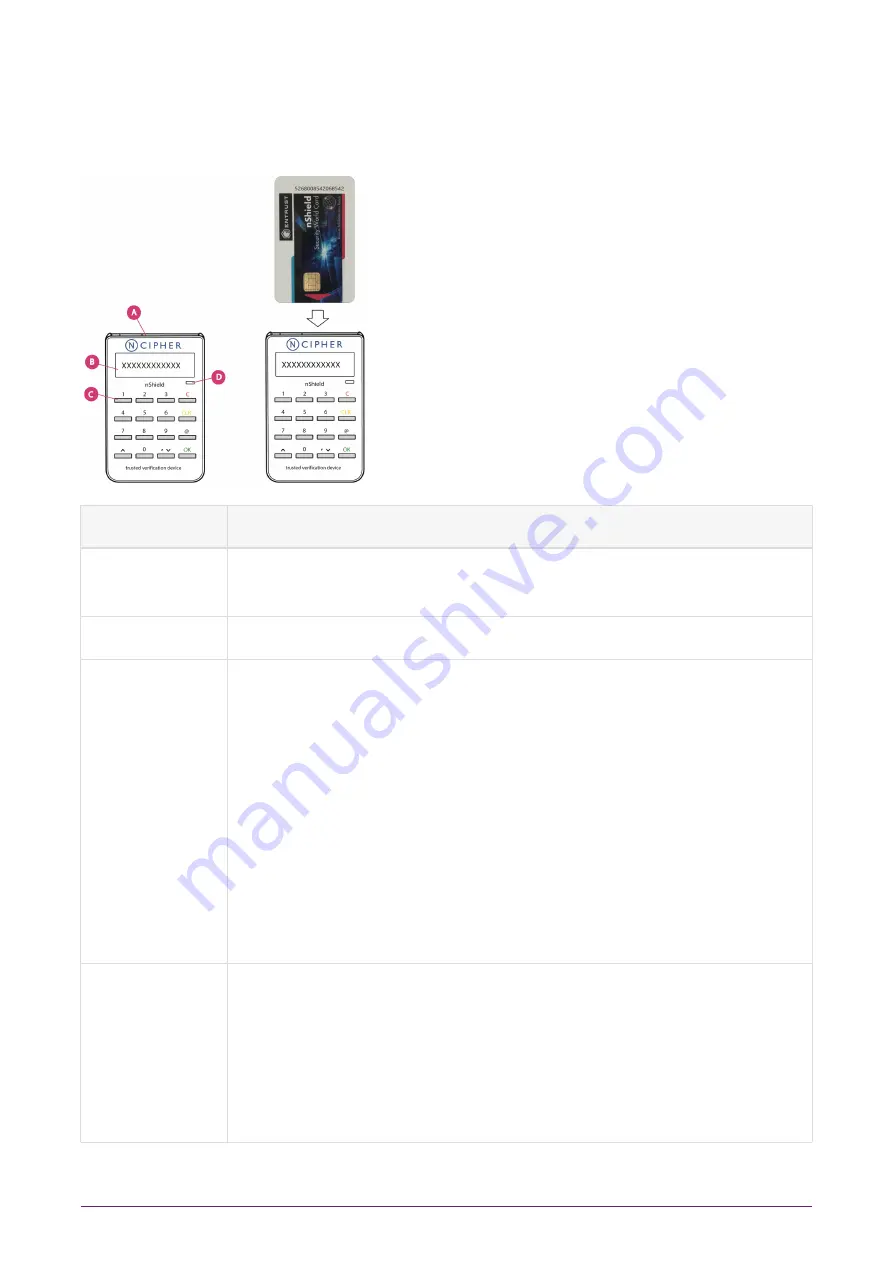
A: Card slot

For inserting a smart card into the TVD, the chip on the card should

face the user and inserted first into the card slot.

B: Display

Displays the ESN of the HSM.

C: Keypad

• 0-9, CLR, 

˄

 and 

˅

: Not used

• C: Used for canceling the current smart card verification

• @: Can be used to show the firmware version and the name of the

reader (status LED flashes at the same time)

Note:

 Do not press the @ key when there is a smart card in the

card slot because the time taken to display this information can

cause the secure connection between smart card and HSM to be

broken.

• OK: Used to confirm the smart card verification and abort

messages

D: Status LED

The status LED will flash when the TVD:

• Is connected to a USB port

• Requires the user to confirm a decision. For example, if the C

button is pressed during a smart card verification the LED will

flash and you will be asked to confirm the abort by pressing OK.

nShield® Trusted Verification Device Installation Guide

7 of 9

Summary of Contents for nShield

Page 1: ...nShield Trusted Verification Device Installation Guide 12 80 17 Nov 2021...

Page 2: ...bracket 5 3 2 Software installation 5 3 3 Connecting an nShield TVD 5 3 4 Disconnecting and reconnecting the nShield TVD 6 3 5 Troubleshooting 6 4 Using the nShield Trusted Verification Device 7 5 Dim...

Page 3: ...uthentication between the smart card and the HSM The user is prompted to confirm the Electronic Serial Number ESN of the HSM being displayed on the nShield TVD Each time a smart card is inserted a new...

Page 4: ...ng rendered void To help maintain security 1 Always inspect the USB cable and the nShield TVD before use 2 Make sure that the two nCipher tamper seals on the nShield TVD are undamaged before using the...

Page 5: ...the groove in the base of the metal stand if required 3 2 Software installation For software installation instructions see the Remote Administration Client User Guide which is available on the instal...

Page 6: ...Shield TVD After use you can disconnect the nShield TVD from the computer s USB port and then reconnect it when you next need to use it Do not disconnect the nShield TVD or remove the smart card when...

Page 7: ...s at the same time Note Do not press the key when there is a smart card in the card slot because the time taken to display this information can cause the secure connection between smart card and HSM t...

Page 8: ...SMs are deployed is configured properly and is regularly examined as part of a comprehensive risk mitigation program to assess both logical and physical threats Applications running in the environment...

Page 9: ...nShield Trusted Verification Device Installation Guide 9 of 9...

Reviews: