background image

SecureStack B2 Installation Guide A-1

A

Specifications

This


appendix


provides


information


about


the


following:

Enterasys Networks


reserves


the


right


to


change


the


specifications


at


any


time


without


notice.

B2G124-48P/B2H124-48P Switch Specifications

Table A

1


provides


the


I/O


ports,


processors


and


memory,


physical,


and


environmental


specifications


for


the


B2G124

48P


and


B2H124

48P.

For information about...

Refer to page...

B2G124-48P/B2H124-48P Switch Specifications

A-1

Mini-GBIC Input/Output Specifications

A-3

Gigabit Ethernet Specifications

A-4

Console Port Pinout Assignments

A-7

Regulatory Compliance

A-7

Table A-1 Switch Specifications

Item

Specification

B2G124-48P

RJ45


ports 1 through 48

Forty-eight, 10BASE-T/100BASE-TX/1000BASE-T compliant 
ports with auto-sensing and auto-negotiation via RJ45 
connectors. These ports also support 802.3af PoE connections.

SFP ports 45 through 48

Four slots that support optional Mini-GBICs 1000BASE-FX 
fiber-optic connections and 1000BASE-T copper connections.
When an SFP transceiver (Mini-GBIC) is installed in ports 45 
through 48 establishes a link, the associated fixed front panel 
RJ45 10BASE-T/100BASE-TX/1000BASE-T port is disabled.

Summary of Contents for SecureStack B2 B2G124-48P

Page 1: ...Enterasys SecureStack B2 PoE Gigabit and Fast Ethernet Switches Hardware Installation Guide B2G124 48P B2H124 48P P N 9034100 05 ...

Page 2: ......

Page 3: ... Inc 50 Minuteman Road Andover MA 01810 2008 Enterasys Networks Inc All rights reserved Part Number 9034100 05 February 2008 ENTERASYS ENTERASYS NETWORKS ENTERASYS MATRIX ENTERASYS SECURESTACK LANVIEW NETSIGHT WEBVIEW and any logos associated therewith are trademarks or registered trademarks of Enterasys Networks Inc in the United States and other countries All other product names mentioned in thi...

Page 4: ...ss A limits for radio noise emissions from digital apparatus set out in the Radio Interference Regulations of the Canadian Department of Communications Le présent appareil numérique n émet pas de bruits radioélectriques dépassant les limites applicables aux appareils numériques de la class A prescrites dans le Règlement sur le brouillage radioélectrique édicté par le ministère des Communications d...

Page 5: ...T WEEE NOTICE In accordance with Directive 2002 96 EC of the European Parliament on waste electrical and electronic equipment WEEE 1 The symbol above indicates that separate collection of electrical and electronic equipment is required and that this product was placed on the European market after August 13 2005 the date of enforcement for Directive 2002 96 EC 2 When this product has reached the en...

Page 6: ...ls in the parts is above the relevant threshold of the SJ T 11363 2006 standard ᇍ䫔ଂП᮹ⱘ᠔ଂѻક ᴀ㸼ᰒ ߃ կᑨ䫒ⱘ ᄤֵᙃѻકৃ㛑ࣙ 䖭ѯ 䋼DŽ ᛣ ᠔ଂѻકЁৃ㛑Ӯгৃ㛑ϡӮ ᠔ ᠔ ⱘ䚼ӊDŽ This table shows where these substances may be found in the supply chain of Enterasys electronic information products as of the date of sale of the enclosed product Note that some of the component types listed above may or may not be a part of the enclosed p...

Page 7: ...er adjustment Class 1 Laser transceivers comply with the following safety standards 21 CFR 1040 10 and 1040 11 U S Department of Health and Human Services FDA IEC Publication 825 International Electrotechnical Commission CENELEC EN 60825 European Committee for Electrotechnical Standardization When operating within their performance limitations laser transceiver output meets the Class 1 accessible ...

Page 8: ...exus House Newbury Business Park London Road Newbury Berkshire RG14 2PZ England Conformance to Directive s Product Standards EC Directive 89 336 EEC EN 55022 EN 61000 3 2 EN 61000 3 3 EN 55024 EC Directive 73 23 EEC EN 60950 EN 60825 Equipment Type Environment Networking Equipment for use in a Commercial or Light Industrial Environment Enterasys Networks Inc declares that the equipment packaged wi...

Page 9: ...ROVISIONS THE LICENSE THE DISCLAIMER OF WARRANTY AND THE LIMITATION OF LIABILITY IF YOU DO NOT AGREE TO THE TERMS OF THIS AGREEMENT OR ARE NOT AUTHORIZED TO ENTER INTO THIS AGREEMENT ENTERASYS IS UNWILLING TO LICENSE THE PROGRAM TO YOU AND YOU AGREE TO RETURN THE UNOPENED PRODUCT TO ENTERASYS OR YOUR DEALER IF ANY WITHIN TEN 10 DAYS FOLLOWING THE DATE OF RECEIPT FOR A FULL REFUND IF YOU HAVE ANY Q...

Page 10: ... identified on the U S Commerce Control List or iii if the direct product of the technology is a complete plant or any major component of a plant export to Country Groups D 1 or E 2 the direct product of the plant or a major component thereof if such foreign produced direct product is subject to national security controls as identified on the U S Commerce Control List or is subject to State Depart...

Page 11: ...edge and agree that any breach of Sections 2 4 or 9 of this Agreement by You may cause Enterasys irreparable damage for which recovery of money damages would be inadequate and that Enterasys may be entitled to seek timely injunctive relief to protect Enterasys rights under this Agreement in addition to any and all remedies available at law 11 ASSIGNMENT You may not assign transfer or sublicense th...

Page 12: ...x ...

Page 13: ...ss A limits for radio noise emissions from digital apparatus set out in the Radio Interference Regulations of the Canadian Department of Communications Le présent appareil numérique n émet pas de bruits radioélectriques dépassant les limites applicables aux appareils numériques de la class A prescrites dans le Règlement sur le brouillage radioélectrique édicté par le ministère des Communications d...

Page 14: ...T WEEE NOTICE In accordance with Directive 2002 96 EC of the European Parliament on waste electrical and electronic equipment WEEE 1 The symbol above indicates that separate collection of electrical and electronic equipment is required and that this product was placed on the European market after August 13 2005 the date of enforcement for Directive 2002 96 EC 2 When this product has reached the en...

Page 15: ...ls in the parts is above the relevant threshold of the SJ T 11363 2006 standard ᇍ䫔ଂП᮹ⱘ᠔ଂѻક ᴀ㸼ᰒ ߃ կᑨ䫒ⱘ ᄤֵᙃѻકৃ㛑ࣙ 䖭ѯ 䋼DŽ ᛣ ᠔ଂѻકЁৃ㛑Ӯгৃ㛑ϡӮ ᠔ ᠔ ⱘ䚼ӊDŽ This table shows where these substances may be found in the supply chain of Enterasys electronic information products as of the date of sale of the enclosed product Note that some of the component types listed above may or may not be a part of the enclosed p...

Page 16: ...er adjustment Class 1 Laser transceivers comply with the following safety standards 21 CFR 1040 10 and 1040 11 U S Department of Health and Human Services FDA IEC Publication 825 International Electrotechnical Commission CENELEC EN 60825 European Committee for Electrotechnical Standardization When operating within their performance limitations laser transceiver output meets the Class 1 accessible ...

Page 17: ...exus House Newbury Business Park London Road Newbury Berkshire RG14 2PZ England Conformance to Directive s Product Standards EC Directive 89 336 EEC EN 55022 EN 61000 3 2 EN 61000 3 3 EN 55024 EC Directive 73 23 EEC EN 60950 EN 60825 Equipment Type Environment Networking Equipment for use in a Commercial or Light Industrial Environment Enterasys Networks Inc declares that the equipment packaged wi...

Page 18: ...ROVISIONS THE LICENSE THE DISCLAIMER OF WARRANTY AND THE LIMITATION OF LIABILITY IF YOU DO NOT AGREE TO THE TERMS OF THIS AGREEMENT OR ARE NOT AUTHORIZED TO ENTER INTO THIS AGREEMENT ENTERASYS IS UNWILLING TO LICENSE THE PROGRAM TO YOU AND YOU AGREE TO RETURN THE UNOPENED PRODUCT TO ENTERASYS OR YOUR DEALER IF ANY WITHIN TEN 10 DAYS FOLLOWING THE DATE OF RECEIPT FOR A FULL REFUND IF YOU HAVE ANY Q...

Page 19: ... identified on the U S Commerce Control List or iii if the direct product of the technology is a complete plant or any major component of a plant export to Country Groups D 1 or E 2 the direct product of the plant or a major component thereof if such foreign produced direct product is subject to national security controls as identified on the U S Commerce Control List or is subject to State Depart...

Page 20: ...edge and agree that any breach of Sections 2 4 or 9 of this Agreement by You may cause Enterasys irreparable damage for which recovery of money damages would be inadequate and that Enterasys may be entitled to seek timely injunctive relief to protect Enterasys rights under this Agreement in addition to any and all remedies available at law 11 ASSIGNMENT You may not assign transfer or sublicense th...

Page 21: ...x ...

Page 22: ...g CLI Commands 1 7 Standards Compatibility 1 7 LANVIEW Diagnostic LEDs 1 8 Getting Help 1 8 Chapter 2 Network Requirements 10BASE TX Network 2 2 100BASE TX Network 2 2 1000BASE FX Network 2 2 1000BASE T Network 2 3 Chapter 3 Hardware Installation Considerations Prior to Installation 3 2 Required Tools 3 2 Unpacking the Switch 3 2 Installing Optional Mini GBICs 3 3 Installing the Switch on a Flat S...

Page 23: ...1 Connecting UTP Cables 3 21 Connecting Fiber Optic Cables to MT RJ Ports 3 25 Connecting Fiber Optic Cables to LC Ports 3 27 Completing the Installation 3 30 Chapter 4 Troubleshooting Using LANVIEW 4 1 Troubleshooting Checklist 4 7 Using the Reset Switch 4 9 Appendix A Specifications B2G124 48P B2H124 48P Switch Specifications A 1 Mini GBIC Input Output Specifications A 3 Gigabit Ethernet Specifi...

Page 24: ...RJ45 Pinouts for 10 100 1000BASE TX 3 24 3 19 Eight Wire Straight Through Cable RJ45 Pinouts for 10 100 1000BASE TX 3 24 3 20 Cable Connection to MT RJ Multimode Fiber Optic Connectors 3 26 3 21 Cable Connection to LC Fiber Optic Connectors 3 29 4 22 B2G124 48P LANVIEW LEDs 4 2 4 23 B2H124 48P LANVIEW LEDs 4 3 4 24 Reset Switch 4 9 A 1 Console Port Pinout Assignments A 7 Tables 1 1 Powered Device ...

Page 25: ...xiv ...

Page 26: ...ing and setting up the stackable switches Note In this guide the following terms are used Switch refers to both B2G124 48P and B2H124 48P unless otherwise noted MGBIC Mini Gigabit Interface Card refers to optional small form pluggable SFP interface modules that plug into the fixed front panel MGBIC slots PoE refers to Power over Ethernet IEEE 802 3af Important Notice Depending on the firmware vers...

Page 27: ...tp www enterasys com support manuals Unlike the SecureStack B2 Configuration Guide click on Overview Guides at the manuals web site to find the Cabling Guide For Refer to An overview of the switch features and how to obtain technical support Chapter 1 Introduction Network requirements that must be met before installing the switch Chapter 2 Network Requirements Instructions to install the switch on...

Page 28: ...rical Hazard Warns against an action that could result in personal injury or death due to an electrical hazard Riesgo Electrico Advierte contra una acción que pudiera resultar en lesión corporal o la muerte debido a un riesgo eléctrico Elektrischer Gefahrenhinweis Warnung vor sämtlichen Handlungen die zu Verletzung von Personen oder Todesfällen hervorgerufen durch elektrische Spannung führen könne...

Page 29: ...Conventions Used in This Guide xviii About This Guide ...

Page 30: ... firmware version used in the switch some features described in this document may not be supported Refer to the Release Notes shipped with the switch to determine which features are supported For information about Refer to page Overview 1 2 PoE Power over Ethernet Support 1 5 Connectivity 1 6 Management 1 6 Standards Compatibility 1 7 LANVIEW Diagnostic LEDs 1 8 Getting Help 1 8 ...

Page 31: ...ces SFP slots that provide you with the option of installing Small Form Pluggable SFP Mini GBICs for 1000BASE SX LX fiber optic connections and 1000BASE T copper connections Rear panel connectors for high speed connections in a stack configuration Rear panel Redundant Power Supply connector used to connect to a SecureStack Redundant Power Supply C2RPS POE The switch connects to the SecureStack C2R...

Page 32: ...nt Power Supply C2RPS POE The switch connects to the C2RPS POE using a C2RPS POE Cable 1 DB9 RS232 console port connector 6 Mini GBIC port status LEDs 2 System status LEDs 7 Two ports for stack connections 3 Forty eight RJ45 10 100 1000 Mbps PoE ports 8 Password Reset switch 4 RJ45 port status LEDS 9 AC power input connector 5 Four slots for SFP interface modules Mini GBICs 10 RPS connector for C2...

Page 33: ...aución La fuente de poder C2RPS POE no es compatible con switches SecureStack C2 que no cumplan con el estándar PoE No intente conectar el cable de corriente de esta fuente de poder C2RPS POE a ningún switch SecureStack C2 que no tenga el sufijo P en el nombre del modelo Ejemplo C2G124 24 De lo contrario el dispositivo puede dañarse 1 DB9 RS232 console port connector 6 Mini GBIC port status LEDs 2...

Page 34: ...cable are isolated with transformers blocking any DC or common mode voltage on the signal pair PoE exploits this fact by using two twisted pairs as the two conductors to supply a direct current One pair carries the power supply current and the other pair provides a path for the return current While several proprietary legacy implementations of PoE have been deployed by LAN equipment vendors in 200...

Page 35: ... refer to MGBIC LC01 MGBIC MT01 Specifications 1000BASE SX on page A 4 MGBIC LC03 Provides one 1000BASE SX compliant LC fiber optic multimode port with a standard LC duplex connector For optical and operating range specifications refer to MGBIC LC03 Specifications 1000BASE SX on page A 4 MGBIC LC09 Provides one 1000BASE LX compliant LC fiber optic single mode port with a standard LC connector For ...

Page 36: ...mmand set information and how to configure the module refer to the SecureStack B2 Configuration Guide Standards Compatibility The 1000BASE T ports are compliant with the following standards and operations IEEE 802 3 IEEE 802 3u IEEE 802 3ab Full Duplex operation The SFP ports are compliant with the following standards and operations IEEE 802 3z IEEE 802 3x Flow Control support for Full Duplex mode...

Page 37: ...erial and revision numbers of all involved Enterasys Networks products in the network A description of your network environment such as layout cable type and so forth Network load and frame size at the time of trouble if known The device history for example have you returned the device before is this a recurring problem and so forth Any previous Return Material Authorization RMA numbers World Wide...

Page 38: ...twork 2 2 1000BASE FX Network 2 2 1000BASE T Network 2 3 Note The network installation must meet the requirements described in this chapter to ensure satisfactory performance of this equipment Failure to do so will produce poor network performance Note The SecureStack B2 Configuration Guide and the Cabling Guide referred to in the following sections can be found on the Enterasys Networks World Wid...

Page 39: ...er connection as described in 1000BASE T Network on page 2 3 MGBIC LC01 for a 1000BASE SX compliant LC fiber optic multimode connection MGBIC LC03 for a 1000BASE SX standard LC duplex style connector multimode connection MGBIC LC09 for a 1000BASE LX compliant LC fiber optic single mode connection MGBIC MT01 for a 1000BASE SX compliant MT RJ fiber optic multimode connection MGBIC 08 for a 1000BASE ...

Page 40: ...connecting a 1000BASE T segment to one of the RJ45 fixed ports use Category 5 UTP cabling or better The device at the other end of the twisted pair segment must meet IEEE 802 3 2002 1000BASE T Gigabit Ethernet network requirements for the devices to operate at 1000 Mbps Note The B2H124 48P can support 1000BASE T copper connections through MGBIC 02s installed in the MGBIC port slots ...

Page 41: ...1000BASE T Network 2 4 Network Requirements ...

Page 42: ...eis Installationen sollten nur durch ausgebildetes und qualifiziertes Personal vorgenommen werden Important Notice Read the Release Notes shipped with the switch to check for any exceptions to the supported features and operation documented in this guide For information about Refer to page Considerations Prior to Installation 3 2 Required Tools 3 2 Unpacking the Switch 3 2 Installing Optional Mini...

Page 43: ... 1 Open the box and remove the packing material protecting the switch 2 Verify that the contents of the carton contains the items listed in Table 3 3 3 Remove the tape seal on the non conductive bag to remove the switch 4 Perform a visual inspection of the switch for any signs of physical damage Contact Enterasys Networks if there are any signs of damage Refer to Getting Help on page 1 8 for detai...

Page 44: ...slot 3 Push the Mini GBIC into the port slot until the Mini GBIC clicks and locks into place Warning Do not use optical instruments to view laser output The use of optical instruments to view laser output increases eye hazard Advertencia No utilizar instrumentos opticos para ver el laser El uso de instrumentos opticos para ver el laser incrementa el riesgo de perdida de la vision Warnhinweis Benut...

Page 45: ...e 5 Protective dust cover 3 7 pin edge connector insertion side 6 Release tab 1 Mini GBIC MGBIC LC01 LC03 or LC09 4 Port slot 2 Mini GBIC top side 5 Protective dust cover 3 7 pin edge connector insertion side 6 Release tab C2G124 24 Console 45 46 47 48 47 B2G124 48P 43 44 45 46 47 48 45 46 47 48 Ä Á À Â Ã Å C2G124 24 Console 45 46 47 48 47 B2G124 48P 43 44 45 46 47 48 45 46 47 48 Å Ä Á À Â Ã ...

Page 46: ...revent the switch from sliding on a flat surface Installing the rubber feet is optional if you are installing the switch in a rack To install the rubber feet proceed to Installing the Rubber Feet below For instructions to rack mount the switch proceed to Rack Mounting the Switch on page 3 8 Caution Do NOT remove a Mini GBIC from a slot without releasing the locking tab located at the front of the ...

Page 47: ...ottom Rubber Feet Placement 4 Remove the protective strip from the back of one rubber foot and position it on a marked location and press firmly into place Repeat this procedure to install the remaining three rubber feet 5 After installing the rubber feet return the switch to its upright position 1 Bottom of chassis as seen when chassis is resting on its back 3 Rubber feet with adhesive backing fo...

Page 48: ...edundant power system If you are installing several switches in a stack proceed to Connecting High Speed Stacking Cables on page 3 10 If the switch is being installed as a standalone switch proceed to Connecting AC and PoE Power on page 3 14 for power connection instructions Caution To ensure proper ventilation and prevent overheating leave a minimum clearance space of 5 1 cm 2 0 in at the left ri...

Page 49: ...e location A temperature of between 5 C 41 F and 40 C 104 F must be maintained at the installation site with fluctuations of less than 10 C 18 F per hour 1 Approximately 152 cm 5 ft from power source 3 44 5 cm 17 52 in for proper ventilation 2 4 45 cm 1 75 in per switch Vertical clearance depends on number of switches stacked 4 41 9 cm 16 5 in for proper ventilation Console 1 2 45 CPU UP RPS MGR D...

Page 50: ...equipment damage may result Advertencia Antes de instalar el chassis en un rack asegurarse que el rack puede soportar el los dispositivo s sin comprometer la estabilidad del mismo De otra forma puede suceder algun tipo de daño personal o del equipo Warnhinweis Schützen Sie sich vor Verletzungen und Geräteschaden überzeugen Sie sich vor der Installation des Chassis in das Rack von dessen Stabilität...

Page 51: ...STACK DOWN and STACK UP connectors are used in the installation The high speed stacking cable 1 connections are from the STACK DOWN connector 2 of one switch to the STACK UP 3 connector of the next switch up in the stack A high speed stacking cable connection from the STACK DOWN 4 connector of the switch at the top of the stack to the STACK UP 5 connector at the bottom of the stack completes the r...

Page 52: ... uplink to a network backbone for a stacked group of up to eight B2 switches 1 High speed stacking cable 4 STACK DOWN connector at top of stack 2 STACK DOWN connector 5 STACK UP connector at bottom of stack 3 STACK UP connector Redundant Power Supply DC Line 50V 7 5A MAX 12V 10 5A MAX AC LINE 100 240 VAC 50 60 Hz 7 5 A MAX MAC ADDRESS SERIAL NO STACK UP STACK DOWN Redundant Power Supply DC Line 50...

Page 53: ...ected from the stack The Console port on the manager switch remains active for out of band local switch management but the Console port on each member switch is deactivated This enables you to set the IP address and system password using a single Console port Now each switch can be configured locally using only the manager s Console port or in band using a remote device and the CLI set of commands...

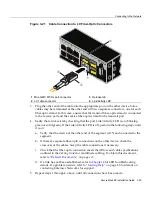
Page 54: ... unit ID assignment according to the physical position in a stack When you power up each switch and allow it to become fully operational before applying power to the next switch the first one becomes the Manager and all the next switches will join that stack regardless of Priority Firmware Revision or MAC Address The switches are assigned unit IDs in the order that you power on each switch 2 Optio...

Page 55: ...roceed as follows 1 Plug the power cord into the switch AC power connector 2 Plug the other end of the power cord into a dedicated grounded AC outlet not shown The type of power outlet and power cord are country dependent Important Considerations About Using Clear Config in a Stack When using the clear config command as described in the SecureStack B2 Configuration Guide to clear configuration par...

Page 56: ...the switch is a stack Manager it can take up to 3 minutes or more to start up depending on the number of Member switches in the stack 1 AC power cord 2 AC power connector 3 Connector for external redundant power supply Note If the CPU LED illuminates solid red there was a critical failure For more information about the LED indications and troubleshooting refer to Chapter 4 If you need additional h...

Page 57: ...the stack Manager The Manager LED on each Member switch will be off The hierarchy of the switches that will function as backup Manager is also determined in case the current Manager malfunctions is powered down or is disconnected from the stack The Console port on each Member switch is deactivated Only the Console port on the Manager switch is active for out of band configuration to set the IP add...

Page 58: ...ible PC running a VT series emulation software package Using a DTE modem DB9 female to DB25 female cable you can connect products equipped with a DB9 DTE male console port to a VT series terminal or VT type terminals running emulation programs for the VT series Using a DTE modem DB9 female to DB25 male cable you can connect products equipped with a DB9 DTE male console port to a Hayes compatible m...

Page 59: ...rasys switch If there is a switch designated as the Manager connect to its Console port 2 Plug the DB9 female connector at the other end of cable into the communications port on the PC 3 Turn on the PC and configure your VT emulation package with the following parameters When these parameters are set the Startup screen will display Proceed to Connecting to the Network on page 3 21 1 Pin 2 Received...

Page 60: ... a switch designated as the Manager connect to its Console port 2 Plug the DB25 female connector at the other end of the cable into the port labeled COMM on the VT terminal 3 Turn on the terminal and access the Setup Directory Set the following parameters on your terminal When these parameters are set the Startup screen will display Proceed to Connecting to the Network on page 3 21 1 DB9 female ca...

Page 61: ...B25 male connector at the other end of the cable into the modem communications port 3 Turn on the modem and make sure the remote modem is ON 4 With your PC connected to the remote modem configure your VT emulation package with the following parameters When these parameters are set the Startup screen will display If the switches are in a stacked configuration proceed to Connecting to the Network on...

Page 62: ...se ports such as a bridge repeater or router use a crossover cable To connect twisted pair segments to the switch refer to Figure 3 15 and proceed as follows 1 Ensure that the device to be connected at the other end of the segment is powered ON 2 Connect the twisted pair segment to the switch by inserting the RJ45 connector on the twisted pair segment into the desired RJ45 port for example Port 8 ...

Page 63: ...gh cable is used to connect between switches or hub devices and an end user computer Refer to Figure 3 16 and Figure 3 17 for four wire RJ45 connections Refer to Figure 3 18 and Figure 3 19 for eight wire RJ45 connections d Ensure that the twisted pair connection meets the dB loss and cable specifications outlined in the Cabling Guide Refer to Related Documents on page xvi for information on obtai...

Page 64: ...SE TX 1 RJ45 switch port 3 RJ45 to RJ45 crossover cable 2 Other device port 4 RX RX and TX TX connections These connections must share a common color pair 1 RJ45 switch port 3 RJ45 to RJ45 straight through cable 2 Other device port 4 RX RX and TX TX connections These connections must share a common color pair TX TX RX RX 2 1 3 6 TX TX 2 1 3 6 RX RX À Á Â Ã TX TX RX RX 2 1 3 6 TX TX 2 1 3 6 RX RX À...

Page 65: ...Pinouts for 10 100 1000BASE TX 1 RJ45 device port 3 RJ45 to RJ45 crossover cable 2 Other device port 1 RJ45 device port 3 RJ45 to RJ45 straight through cable 2 Other device port 2 1 3 6 4 5 7 8 TX1 TX2 RX4 RX1 TX4 RX3 TX3 RX2 TX2 TX1 RX3 RX2 TX3 RX4 TX4 RX1 2 1 3 6 4 5 7 8 Á À Â TX1 TX2 RX4 RX1 TX4 RX3 TX3 RX2 2 1 3 6 4 5 7 8 TX2 TX1 RX3 RX2 TX3 RX4 TX4 RX1 2 1 3 6 4 5 7 8 À Â Á ...

Page 66: ...ptical instruments to view laser output The use of optical instruments to view laser output increases eye hazard Advertencia No utilizar instrumentos opticos para ver el laser El uso de instrumentos opticos para ver el laser incrementa el riesgo de perdida de la vision Warnhinweis Benutzen sie keinesfalls optische Hilfmittel um die Funktion des Lasers zu überprüfen es könnte ihr Augenlicht gefährd...

Page 67: ...D is on blinking green or solid green If the Link Activity LED is off perform the following steps until it is on a Verify that the device at the other end of the segment is ON and connected to the segment b If there are separate fiber optic connections on the other device check the crossover of the cables Swap the cable connections if necessary c Check that the fiber optic connection meets the dB ...

Page 68: ...X The transmit strand from a device port connects to the receive port of a fiber optic Gigabit Ethernet device at the other end of the segment The receive strand of the applicable LC port connects to the transmit port of the fiber optic Gigabit Ethernet device Enterasys recommends labeling fiber optic cables to indicate receive and transmit ends Many cables are pre labeled providing matching label...

Page 69: ... duster to blow the surfaces clean A fiber port cleaning swab saturated with optical grade isopropyl alcohol may also be used to clean the ends Precaución No toque los extremos de los cables de fibra óptica y evite su contacto con el polvo la suciedad o con cualquier otro contaminante Si los extremos de los cables se ensucian es posible que la transmisión de datos se vea afectada Si nota que los e...

Page 70: ...he device at the other end of the segment is ON and connected to the segment b If there are separate fiber optic connections on the other device check the crossover of the cables Swap the cable connections if necessary c Check that the fiber optic connection meets the dB loss and cable specifications outlined in the Cabling Guide for multimode cabling To obtain this document refer to Related Docum...

Page 71: ...a new password and perform more involved management configurations on the switch One of many capabilities is to reconfigure the stack reassigning the Manager function to another switch and configuring the order of Member switches that will take over the stack management functions in case the operating Manager is powered down malfunctions or is removed from the stack 4 After the initial configurati...

Page 72: ... location of LANVIEW LEDs on the B2G124 48P and B2H124 48P refer to Figure 4 22 and Figure 4 23 respectively These LEDs allow you to quickly observe network status for diagnosing switch and network problems For information about Refer to page Using LANVIEW 4 1 Troubleshooting Checklist 4 7 Using the Reset Switch 4 9 Caution There is a risk of explosion if the battery is replaced with an incorrect ...

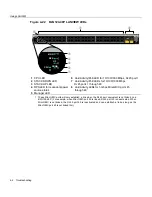
Page 73: ... only establish a link when the RJ45 port equivalent is not linked on a B2G124 48P For example when Mini GBIC port 45 is linked RJ45 port 45 is deactivated When Mini GBIC is not linked the RJ45 port 45 is reactivated and can establish a link as long as the Mini GBIC port 45 is not linked first 5 Manager LED Console 1 2 45 CPU UP RPS MGR DOWN 46 47 48 47 48 B2G124 48P 1 2 3 4 5 6 7 8 9 10 11 12 13 ...

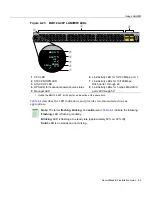
Page 74: ...i GBIC 5 Manager LED ports 49 through 521 1 Unlike the B2G124 48P all 52 ports can be active at the same time Note The terms flashing blinking and solid used in Table 4 4 indicate the following Flashing LED is flashing randomly Blinking LED is flashing at a steady rate approximately 50 on 50 off Solid LED is on steady and not pulsing Console 1 2 49 CPU UP RPS MGR DOWN 50 51 52 47 48 B2H124 48P 1 2...

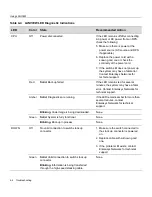
Page 75: ...mains red for several minutes the system may have a fatal error Contact Enterasys Networks for technical support Amber Solid Diagnostics are running If the LED remains amber for more than several minutes contact Enterasys Networks for technical support Blinking Code image is being downloaded None Green Solid System is fully functional None Blinking Boot up in process None DOWN Off No valid connect...

Page 76: ...ne RPS Off Connected C2RPS POE supply not in use Internal power supply failed None If a C2RPS POE RPS is connected to the switch it should be providing power To determine if there is a problem perform the following 1 Ensure the RPS is powered on 2 Ensure that the AC power cord to the RPS is plugged in correctly and that there is power at the AC power source 3 Replace the power cord with a known go...

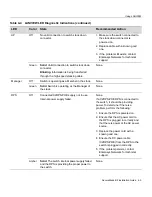
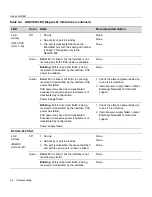
Page 77: ...device to see if it is defective 2 Internal power supply failed contact Enterasys Networks for technical support Blinking Port is linked and traffic is being received or transmitted by the interface PoE power has failed PoE power may have been deactivated because of excessive power requirement or deactivated by configuration Power supply failed 1 Check the attached powered device to see if it is d...

Page 78: ... LEDs are OFF Loss of power Ensure that the switch was installed properly according to the installation instructions in Chapter 3 Ensure that the power cords are connected properly to an active power source that meets the AC input specifications for this switch Ensure that the AC power cord is not damaged Replace the power cord with a known good one No local management startup screen Incorrect ter...

Page 79: ...terasys Networks for technical support Port s goes into standby for no apparent reason Loop condition detected Verify that Spanning Tree is enabled Refer to the SecureStack B2 Configuration Guide for the instructions to set the type of STA Review the network design and delete unnecessary loops If the problem continues contact Enterasys Networks for technical support User parameters IP address devi...

Page 80: ...ated through CLI only 2 Logon to device management You can now logon to the switch through the Console port and assign a new password using the command line interface CLI 3 To access switch management from your local PC terminal or modem connection refer to the SecureStack B2 Configuration Guide for instructions on how to log in and enter a new password The guide is available at http www enterasys...

Page 81: ...Using the Reset Switch 4 10 Troubleshooting ...

Page 82: ...ut Specifications A 3 Gigabit Ethernet Specifications A 4 Console Port Pinout Assignments A 7 Regulatory Compliance A 7 Table A 1 Switch Specifications Item Specification B2G124 48P RJ45 ports 1 through 48 Forty eight 10BASE T 100BASE TX 1000BASE T compliant ports with auto sensing and auto negotiation via RJ45 connectors These ports also support 802 3af PoE connections SFP ports 45 through 48 Fou...

Page 83: ... MHz processor Dynamic Random Access Memory DRAM 256 MB FLASH Memory 32 MB Physical Dimensions 4 4 H x 44 1 W x 36 85 D cm 1 7 H x 17 4 W x 14 5 D in Approximate Weight B2G124 48P B2H124 48P Gross 8 19 kg 18 1 lb shipping carton containing one module Net 6 94 kg 15 3 lb one module without packaging Gross 7 75 kg 17 1 lb shipping carton containing one module Net 6 50 kg 14 3 lb one module without p...

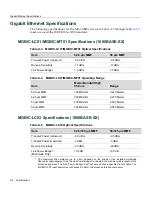
Page 84: ...nsing Table A 1 Switch Specifications continued Item Specification Table A 2 Mini GBIC Input Output Port Specifications Item Specification MGBIC LC01 Provides one LC fiber optic multimode port that is compliant with the 1000BASE SX standard LC connector MGBIC LC03 Provides one LC fiber optic multimode port that is compliant with the 1000BASE SX standard LC connector MGBIC LC09 Provides one LC fibe...

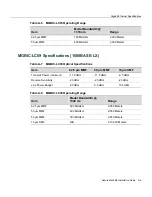
Page 85: ...andwidth 850 nm Range 62 5 µm MMF 160 MHz km 2 220 Meters 62 5 µm MMF 200 MHz km 2 275 Meters 50 µm MMF 400 MHz km 2 500 Meters 50 µm MMF 500 MHz km 2 550 Meters Table A 5 MGBIC LC03 Optical Specifications Item 62 5 125 µm MMF 50 125 µm MMF Transmit Power minimum 9 5 dBm 9 5 dBm Transmit Power maximum 3 dBm 3 dBm Receive Sensitivity 20 dBm 20 dBm Link Power Budget1 Multimode Only 1 The maximum dri...

Page 86: ...km 2 000 Meters Table A 7 MGBIC LC09 Optical Specifications Item 62 5 µm MMF 50 µm MMF 10 µm SMF Transmit Power minimum 11 5 dBm 11 5 dBm 9 5 dBm Receive Sensitivity 20 dBm 20 dBm 20 dBm Link Power Budget 8 5 dBm 8 5 dBm 10 5 dBm Table A 8 MGBIC LC09 Operating Range Item Modal Bandwidth 1300 nm Range 62 5 µm MMF 500 MHz km 2 550 Meters 50 µm MMF 400 MHz km 2 550 Meters 50 µm MMF 500 MHz km 2 550 M...

Page 87: ...mum cable length of the attached segment The Link Power Budget must not exceed those specified in this table The MGBIC 08 input power must not exceed 3 dBm Otherwise saturation could occur 23 dB 28 dB typical Table A 10 MGBIC 08 Operating Range Item 1550 nm Range 9 or 10 µm SMF N A 70 000 Meters Table A 11 MGBIC 02 Specifications Item Specification Supported Cable Type Maximum Length Copper Catego...

Page 88: ...tromagnetic compatibility EMC requirements listed in Table A 12 1 Pin 2 Received Data input 3 Pin 5 Signal Ground 2 Pin 3 Transmitted Data output All other pins not connected  À Á 5 1 9 6 Table A 12 Compliance Standards Regulatory Compliance Standards Safety UL 60950 CSA C22 2 No 60950 73 23 EEC EN 60950 and IEC 60950 The Mini GBICs that support laser connections also meet the EN 60825 and 21 CFR...

Page 89: ...Regulatory Compliance A 8 Specifications ...

Page 90: ...ork 3 21 Connectivity introduction to 1 6 Console port pinout assignments A 7 D Document conventions xvii E Electromagnetic Compatibility EMC requirements A 7 Enterasys contacting 1 8 F Fiber budget A 3 Front panel 1 3 1 4 H High Speed Stack connections introduction to 1 4 High speed stacking cables installation of 3 10 I Installation connecting to the network 3 21 high speed stacking cables 3 10 ...

Page 91: ...uals xvi Reset switch use of 4 9 RPS Input Specifications A 3 S Safety requirements A 7 Specifications A 1 B2G124 48P A 1 B2H124 48P A 2 MGBIC 02 A 6 MGBIC 08 A 6 MGBIC LC01 A 4 MGBIC LC03 A 4 MGBIC LC09 A 5 MGBIC MT01 A 4 Mini GBIC input outputs A 3 RPS input A 3 Specifications MGBIC LC01 optical A 6 Stack initialization Manager switch selection 3 16 Stack Manager automatic selection of 3 16 Stac...

Reviews: