


- 12 -
State
Description
LED Status
Standby
Power-on, but no gun plug-in
Flashing green, 2S on 2S off
Ready to charge
Gun plug-in, but not start charging yet
Flashing yellow, 2S on 2S off
In charging
Gun plug-in, and start charging by RFID
Breathing green, on/off gradually
Stop charging
Charging stop, but gun is still plug-in
Solid green
Fault
Error happens
Solid red
4. Observe the screen display and the symbol on the top right corner. The screen should display as the
following picture.
3 Charging Operation
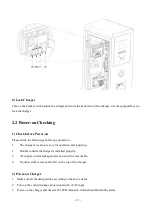
3.1 Connect Charger to EV
Park EV near to the charger, take out the charging cable from EV, and plug its guns respectively into the
socket of the charger and the EV. After plug-in, please check the gun is correctly and tightly connected. With
appropriate connection, the charger LED indicator will change to flashing yellow light, which indicates that
the charger is ready for charging.
3.2 Start Charging & Stop Charging
After the charger is connected to EV and ready for charging, scan the RFID card for once on the identification
area of front panel, then the charging starts. When the charging starts, the gun will be locked on the charger
socket. The charger screen will display the running information on the screen, such as charged electricity,
charged time, voltage, current and power.


