background image

LED Zone Controller 0-10V Installation Guide  

© 2017 EnOcean GmbH    V2.0 


Page  2 


1.


Planning  

Take a moment to plan for the module’s successful 
operation and optimal communication with other system 
components. 

n


Always use a qualified installer 

n


Install in an appropriate location 

n


Take care not to damage the radio antenna, the orange 
wire that runs in a groove on the outside of the module 
that runs in a groove on the outside of the module 

n


Consider the construction materials in the space and 
obstacles that may interfere with RF signals


2.


Installing 

Read and understand instructions completely before 
starting.  
1.


Turn off power at the circuit breaker or fuse and test that 
power is off before wiring the device. 
NOTE: Use a non-metal electrical enclosure for best 
wireless communication performance.  

2.


Identify the wiring connection at the installation site to 
coordinate with the following wiring diagram. 


3.


Connect the wires to the LED driver according to the 
wiring diagram shown above. Position the module so 
that the setup interface and antenna face forward (out).  
TIP: If the RF reception is poor, elongate the antenna as 
shown in figure A. 

4.


Restore power to the circuit. 

5.


Use the setup interface to link devices and configure  
settings (refer to the “Linking” & “Configuration” 
sections).  
WARNING: Move the module away from any power line 
before using the local setup interface. 
 

3.


Device Configuration 

The LED controller can be configured in two ways: 

n


By user input to the local setup interface 
This approach is used for basic setup tasks 

n


Remotely using the remote commissioning interface 
This approach is used for advanced configuration tasks 


Local User Interface 

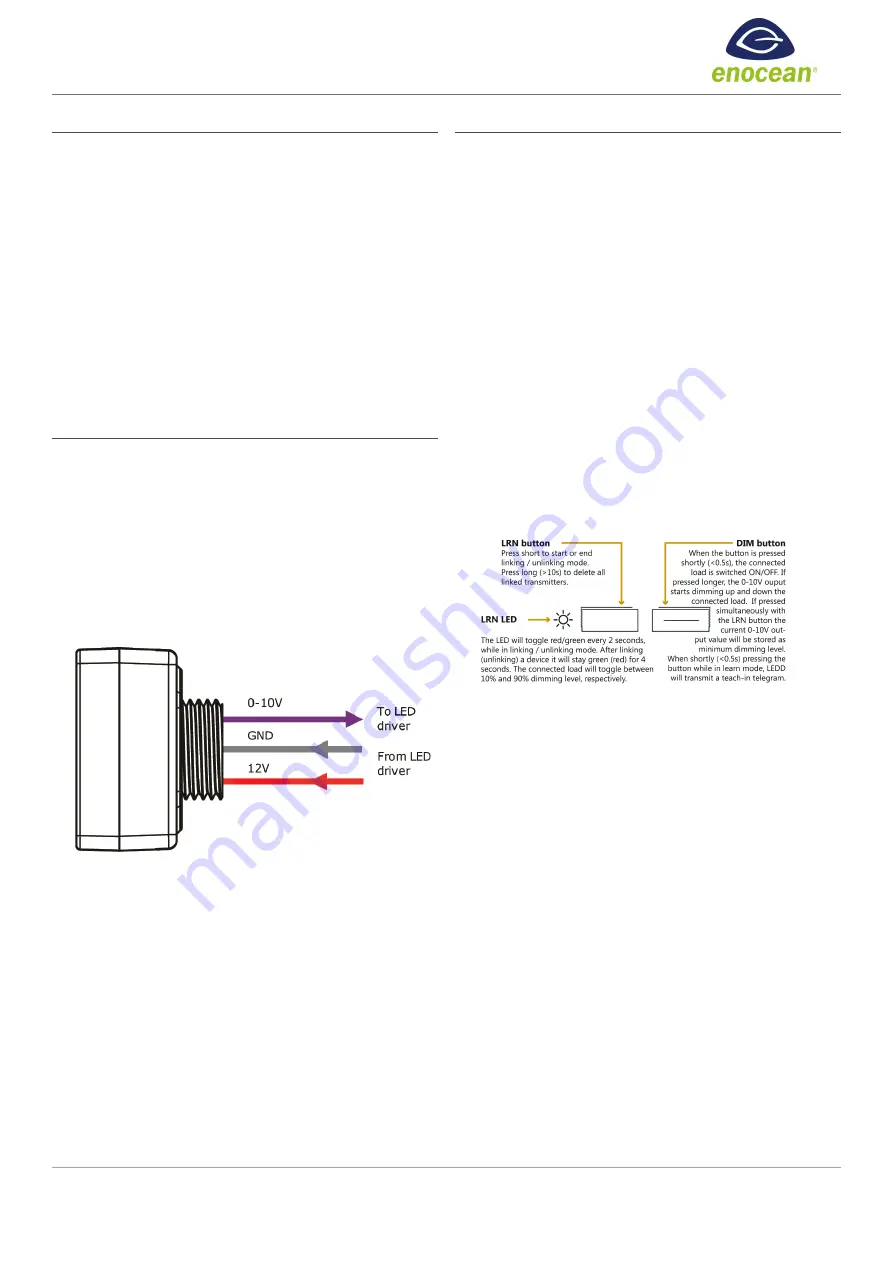
The local setup interface consists of two buttons - LRN and 
DIM - and a 2-color LED (green, red).  
The two buttons can be used to link and unlink transmitters, 
to dim up and down manually and to set the minimum 
dimming value.  
To use the local setup interface, hold the module so both 
thumbs can click the buttons without obscuring the LED. 


Remote Commissioning Interface 

The LED controller provides a wireless remote 
commissioning interface for all commissioning tasks.  
This interface allows configuring all device parameters 
wirelessly using a laptop computer equipped with 

Navigan 

Wireless Commissioner

 (NWC 300U), consisting of a USB 

stick and software.  
Parameters that are configurable using the Navigan Wireless 
Commissioner NWC 300U are marked in italic throughout 
this document. 


Summary of Contents for LEDD

Page 1: ...ntrollers n Installs inside or mounts to electrical box using threaded connector n Supports wireless remote commissioning to link devices and set parameters Specifications typ values Power Supply 11 0 V 13 2 V DC Supply Current typ 16 mA 12VDC supply no sourcing 38 mA 12VDC supply 10V 20mA sourcing Power Consumption 200 mW 12 V DC excluding 0 10V sourcing power 460 mW 12 V DC at maximum 0 10V sour...

Page 2: ...enna as shown in figure A 4 Restore power to the circuit 5 Use the setup interface to link devices and configure settings refer to the Linking Configuration sections WARNING Move the module away from any power line before using the local setup interface 3 Device Configuration The LED controller can be configured in two ways n By user input to the local setup interface This approach is used for bas...

Page 3: ...e will stop after 30 seconds if no LRN telegram is received 2 For the transmitter to be linked do one of the following according to the type of device A Sensor click the designated link button B Rocker Pad click the I button top button marked on the switch plastic or I symbol on the back of the switch 3 times quickly 3 If the device has been linked successfully the LRN LED will display solid green...

Page 4: ...rtly press DIM and LRN button simultaneously to store this value 5 Operating modes The LED Controller supports the following operation modes based on different types of connected devices Mode Default Action Title 24 Compliance Switches only Manual DIM or ON OFF No Occupancy sensors only Auto ON Auto OFF default Auto OFF after 15 minutes No Occupancy sensors and switches Manual DIM or ON Auto OFF C...

Page 5: ...tion for a period defined by OccAutoOffTimer default 15min then light is set to OccAutoOffLevel default 0 Auto OFF function Ramp up SensorRampUpSpeed speed for Auto ON and ramp down SensorRampDownSpeed speed for Auto OFF are configurable default 20 per second Occupancy Sensors and Switches Light can be switched ON OFF manually function as described above Time based automatic switch OFF as defined ...

Page 6: ...meter to 0 will cause all messages to be repeated Note 2 level repeating function and repeating of all messages RepeatLinkedDevicesOnly OFF should only be used if really needed Otherwise the system function can be compromised by collisions of telegrams Status messages The LED controller will transmit a status message EEP D2 40 00 after change of its output state or after StatusMessageTimer has ela...

Page 7: ...y or light level sensor 2 point mode 20 s 0 No ramp immediate Parameter Description Default Notes Rocker Switch Parameters RockerSwitch OnSpeed Ramp up speed when rocker input request light switch ON 20 s 0 No ramp immediate RockerSwitch OffSpeed Ramp down speed when rocker input request light switch OFF 20 s 0 No ramp immediate RockerDim UpSpeed Ramp up speed when rocker input request light dim U...

Page 8: ...usMessage Timer Defines how often status messages are transmitted seconds 0 off 0xFFFF only event based 0xFFFF RepeaterFunction Defines the repeater level of the device OFF 1 Level 2 Level OFF disabled RepeatLinked DevicesOnly Configures the repeater to only repeat telegrams from devices linked to it ON enabled Enable DebugMessages Enable or disable debug messages OFF disabled EnableLink Checker E...

Reviews: