background image

ennoLogic Thermal Imaging Camera eT450C - User Manual 


15 


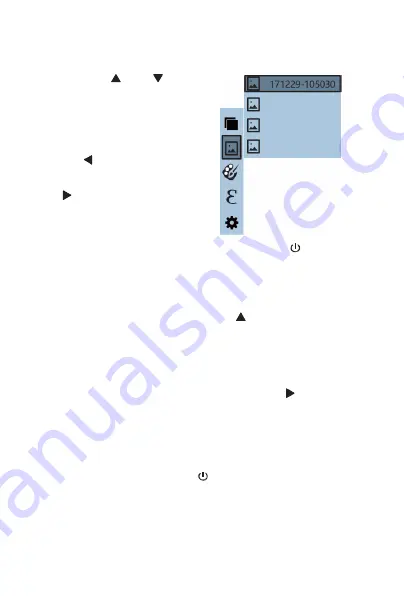
Press the “ 

 ”or “  ” button 

to choose an image. Then press 
the  “SELECT/ENTER”  button 
to view the selected image. 
To browse all the images, press 

the  “ 

 ”  button  to  view  the 

previous image, and press the  

“ 

”  button  to  view  the  next 

image. 
Press  the  “  SELECT/ENTER  ” 

button to return to the list of images. Press the “    /MENU” 
button to exit this mode. 

Delete Images 

While viewing an image, press the “   ” button. The screen 
will  display  the  prompt  “Delete  photo?”  with  the 
preselected  answer  “Yes”.  If  you  want  to  delete  the  image 
press the “SELECT/ENTER” button to confirm. 
 
If you don’t want to delete the image use the " 

" button to 

select “No” and press “SELECT/ENTER”. 
 
When  all  images  have  been  deleted,  “No  Image”  will  be 
displayed. Press the “SELECT/ENTER” button to return to 

the list of images. Press the “    / MENU” button to exit this 
mode. 


171229-105030


171229-105031


171229-105032


171229-105033


Summary of Contents for eT450C

Page 1: ...Thermal Imaging Camera eT450C User Manual...

Page 2: ...Version 1 1 Revised 3 21 2020 2020 ennoLogic All rights reserved https ennologic com...

Page 3: ...nstrument Description 7 Main User Elements 7 LCD Display 9 Keypad 10 How to Use Your Thermal Imaging Camera 11 Operating Instructions 11 Menu Description 14 Image Alignment 14 Images 14 Color Palette...

Page 4: ...ng hottest All objects emit some level of infrared radiation This camera measures temperature by sensing infrared radiation which is outside the visible light spectrum and making it visible as an imag...

Page 5: ...rcuits and fires Do not attempt to remove the built in Lithium battery Tampering with the battery may result in dangerous leakage or explosion Unplug the power adapter when it s not in use or when the...

Page 6: ...o avoid the potential risks of short circuit and fire Use only the provided USB power adapter to charge the camera s battery Use of other power supply accessories may cause overheating electric shock...

Page 7: ...ment and periodically charge the battery This will extend the life of the built in Lithium Ion battery Important Note Limited Liability Cascadia Innovations is the exclusive distributor of all ennoLog...

Page 8: ...ed performance allows for instant detection and diagnosis of problems in operating machinery with no need to power down or interrupt operation Application examples include Search and resuce such as fi...

Page 9: ...camera provides an instant thermal snapshot of the entire field of view This saves time by making it easy to identify potential problems at a glance Use the center point cursor to quickly pinpoint any...

Page 10: ...ther tasks Examples of these features in addition to those listed above include adjustable emissivity for increased measurement accuracy five user selectable color palettes adjustable opacity of visib...

Page 11: ...ennoLogic Thermal Imaging Camera eT450C User Manual 8 Figure 2...

Page 12: ...o bottom Center point temperature cursor this white cursor is always located in the center of the screen and its corresponding temperature is displayed in the top left corner Highest temperature curso...

Page 13: ...ging Camera eT450C User Manual 10 Lowest temperature cursor this green cursor always appears at the coldest spot of the displayed thermal image Its corresponding temperature is displayed at the bottom...

Page 14: ...tal powering on of the camera could result in a drained battery Please note that there will be no indication on the screen during the long press of the power button Hold the power button for at least...

Page 15: ...sity on top of the visible image This makes it easier to intrepet the thermal image provides more detailed information and improves analysis of heat distribution To adjust the opacity press the or but...

Page 16: ...a computer via USB Open the protective cover for the Micro USB port on the top of the camera see Figure 2 Then use the included USB cable to connect the camera to your computer Your computer will init...

Page 17: ...allows you to compensate for the parallax between the visible and infrared cameras Press the MENU button to enter the main menu and select Image alignment Press the SELECT ENTER button to enter the i...

Page 18: ...NU button to exit this mode Delete Images While viewing an image press the button The screen will display the prompt Delete photo with the preselected answer Yes If you want to delete the image press...

Page 19: ...for specific applications and should be chosen as needed Choosing the right color palette will enhance the display of details of the target object Color palettes such as rainbow spectrum iron oxide re...

Page 20: ...f a material is the ability of its surface to emit thermal radiation More accurately it is the ratio of the energy radiated from a material s surface to that radiated from a perfect emitter black body...

Page 21: ...ty of the object Emissivity of a material surface is difficult to estimate since it depends on its texture color and temperature A good default setting is 0 95 The emissivity of this camera can be adj...

Page 22: ...ct the digit to be changed press the buttons to change the value After the desired emissivity value has been entered press SELECT ENTER to confirm Then press the MENU button to apply the new value and...

Page 23: ...ble white 0 95 Mortar 0 87 Paper white 0 68 Plastic 0 84 0 95 Quartz Glass 0 93 Rubber black 0 95 Sand 0 90 Skin human 0 98 Snow 0 80 Soil 0 92 0 95 Steel oxidized 0 75 Steel polished 0 07 Tape electr...

Page 24: ...low gives an overview of the available settings and their possible values Settings Auto shutdown Intensity Language Unit Set time Spot WiFi Auto shutdown 5min 20min none Intensity Low Medium High Lang...

Page 25: ...press the button to enter the intensity setting list The intensity display brightness can be set to Low Medium or High Language After selecting Language press the button to enter the languages list Av...

Page 26: ...uttons to select Year Month Day Hour Minute or Second Press SELECT ENTER to enter the edit mode Press the buttons to select the digit to be changed press the buttons to change the value After the desi...

Page 27: ...t Temperature Cursor After selecting Spot press the button to make your selection to enable or disable the Highest Lowest Temperature cursors Press to select Off or On Press SELECT ENTER to confirm th...

Page 28: ...al xxxx xxxx are the last four digits of the MAC Connect to the camera with your computer or mobile device Then open a web browser and access the camera through the IP address 192 168 230 1 type http...

Page 29: ...ennoLogic Thermal Imaging Camera eT450C User Manual 26...

Page 30: ...Stream to return to the live stream of the camera Please note that any operation in your web browser will not reset the auto shutdown clock of the camera only a button press on the camera will do tha...

Page 31: ...included USB power adapter and cable through the Micro USB port in the top of the camera After the battery has been fully recharged disconnect the USB cable from the charger and unplug the USB charge...

Page 32: ...reen use only professional optical cleaning cloths Lens Maintenance To prevent damage to the infrared lens The infrared lens has a sensitive anti reflective coating Clean with caution and very little...

Page 33: ...0 07 Frame rate of thermal images 9 frames per second Focus mode Fixed Wavelength coverage 8 14 m Emissivity Adjustable 0 01 to 1 00 Color palette Rainbow iron oxide red cool color white heat black he...

Page 34: ...age temp unit time format date time high low temperature cursors Wifi Language English Chinese Italian German Auto Shutdown Selectable 5 minutes 20 minutes No auto shutdown disabled Operating temperat...

Page 35: ...ennoLogic Thermal Imaging Camera eT450C User Manual 32...

Page 36: ...ennoLogic com PO Box 25207 Eugene OR 97402...

Reviews: