background image

Congratulations on your purchase of the DaVinci HD Magnifier with 
OCR.  Enhanced Vision products are designed to give you the highest 
quality and convenience available. The DaVinci product can enable 
people with low vision to read, write, see objects at any distance and 
have text read to them. 

The unique design of this product provides the ultimate in flexibility 
and offers a large range of magnification with multiple viewing 
options that make reading easier than ever. The DaVinci is a fully 
integrated solution, offering the advantage of a built-in HD LCD 
screen and OCR. Prior to using this system, please carefully read  
and follow the instructions provided within this booklet. A thorough 
understanding of the functionality will allow you to fully benefit from 
the flexibility and great features of this device.

If you have any questions, please contact the eye care professional  
or the supplier from whom you have acquired the unit.

Summary of Contents for DaVinci HD OCR

Page 1: ...User Manual ...

Page 2: ... offers a large range of magnification with multiple viewing options that make reading easier than ever The DaVinci is a fully integrated solution offering the advantage of a built in HD LCD screen and OCR Prior to using this system please carefully read and follow the instructions provided within this booklet A thorough understanding of the functionality will allow you to fully benefit from the f...

Page 3: ...rference will not occur in a particular installation If this equipment does cause harmful interference to radio or television reception which can be determined by turning the equipment off and on the user is encouraged to try to correct the interference by one or more of the following measures Reorient or relocate the receiving antenna Increase the separation between the equipment and receiver Con...

Page 4: ...12 15 Button Definition 16 Adjusting Magnification 17 Changing the Viewing Mode 18 20 Adjusting Brightness White Balance 21 Using Adjusting Markers 22 23 Volume Adjustment VGA Toggle 24 OCR Text To Speech Mode 25 27 Saving Recalling Deleting Images 28 29 Screen Saver 30 Language Settings 31 32 Troubleshooting 33 DaVinci Specifications 34 35 Warranty Information 36 ...

Page 5: ...bility of the DaVinci for a patient s individual condition Please follow these safety precautions Use the DaVinci on a stable level surface such as a solid desk or table according to its intended design specifications Avoid placing the DaVinci on an unstable table cart or stand It may fall causing serious damage to the unit or bodily injury to the user Use the DaVinci indoors only it should NOT be...

Page 6: ...ctor cables Caring for the DaVinci Always turn the power OFF on the DaVinci when the system is not in use Always turn the power OFF before cleaning the DaVinci Clean the DaVinci with a soft dry cloth or an electrostatic dusting wipe DO NOT use liquid cleaners on its plastic surfaces Clean the camera lens and Close up Lens as needed with the lens cloth provided within the DaVinci s packaging See fi...

Page 7: ...d can only be plugged into a grounding type power outlet If necessary contact an electrician to replace your power outlet with a grounding type power outlet Do not use the DaVinci in near or around water The DaVinci is not designed to offer protection against contact with liquids of any kind Do not use the DaVinci near flammable liquids At least once per week clean the DaVinci with a soft dry clot...

Page 8: ...ci is subjected to a strong radio frequency field electro static discharge or transient electrical noise An electro static discharge caused by static electricity may cause the screen to go blank If this happens disconnect the AC power from the electrical outlet wait 30 seconds and connect the AC power again Compliance Warnings Electromagnetic compatibility The use of accessories and cables other t...

Page 9: ... 3 To offer additional protection during an electrical storm a surge protector may also be used and is recommended Connect the other end of the power supply to the DaVinci where it is labeled 19VDC The DaVinci will automatically power on the first time it is connected to an available electrical outlet Pressing the Power button on the front right side of the DaVinci See Figure 4 for less than 5 sec...

Page 10: ...Lock used to lock arm from sliding horizontally 7 LED Lamp Accessories included 8 3 5mm jack for Headphones 9 Control Console allows the user to control the DaVinci functions Must be plugged in to use and have access to the menu items for OCR Text To Speech 10 Power Supply 11 Power Cable 12 Lens Cloth permits cleaning of the LCD display and lenses Accessories NOT included 13 X Y Table X Y table an...

Page 11: ...11 DaVinci Package Contents 1 2 7 5 4 11 9 12 13 6 3 8 10 ...

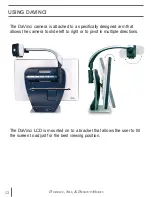
Page 12: ...ttached to a specifically designed arm that allows the camera to slide left to right or to pivot in multiple directions USING DAVINCI The DaVinci LCD is mounted on to a bracket that allows the user to tilt the screen to adjust for the best viewing position ...

Page 13: ...creen when changing to this viewing angle Be sure to open the Close up Lens for Distance Viewing figure 1 This Distance mode enables magnification for objects 5 feet away In this mode although the camera can view objects at an infinite distance the recommended distance from camera to the distant object is within 5 30 feet to achieve maximum magnification benefit figure 1 ...

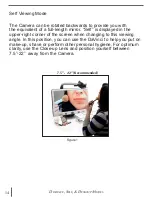
Page 14: ... mirror Self is displayed in the upper right corner of the screen when changing to this viewing angle In this position you can use the DaVinci to help you put on make up shave or perform other personal hygiene For optimum clarity use the Close up Lens and position yourself between 7 5 22 away from the Camera Figure 1 7 5 22 Recommended ...

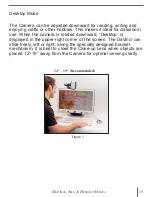
Page 15: ...deal for classroom use When the camera is rotated downward Desktop is displayed in the upper right corner of the screen The DaVinci can slide freely left or right along the specially designed bracket mechanism It is best to close the Close up Lens when objects are placed 12 19 away from the Camera for optimal viewing clarity Figure 1 12 19 Recommended ...

Page 16: ...16 Button Definition BUTTON DEFINITIONS ...

Page 17: ...ont Panel until you reach your desired magnification Turning the wheel clockwise will increase magnification and turning the wheel counter clockwise will decrease magnification 2 The Zoom Level will appear in the upper right corner of your monitor when you are increasing or decreasing magnification Max Zoom will appear at the maximum magnification and Min Zoom will appear at the minimum magnificat...

Page 18: ... select modes can be modified to any of the 28 color select options by following the instructions provided on page 19 Adjusting Viewing Modes 1 You can choose a viewing mode by pressing the Mode button on the Front Panel or Control Console 2 Each push will allow you to cycle through all seven viewing modes Color Select Mode Menu Pressing and holding the mode button for about 3 seconds on the Front...

Page 19: ... color combinations To change this mode to any of the 28 available follow the instructions on page 19 Color Select 2 In factory default this mode provides a black background with yellow text To change this mode to any of the 28 available follow the instructions on page 19 Color Select 3 In factory default this mode provides a yellow background with blue text To change this mode to any of the 28 av...

Page 20: ...Vinci to enter the Menu 2 Turn the zoom wheel clockwise until Color Mode Selection is highlighted 3 Press the Find button to select the Color Mode Selection sub menu 4 Turn the zoom wheel until the desired Color Select Mode is highlighted 5 Press the Find button to select or deselect the highlighted color mode 6 Once 5 Color Select Modes have been selected no other color modes can be selected To c...

Page 21: ...he lighting used in a room The DaVinci White Balance selection allows you to achieve optimum clarity 1 Press the Mode and Find button located on the Front Panel or Control Console of the DaVinci to enter the Menu 2 Turn the zoom wheel clockwise until System Configuration is highlighted 3 Press the Find button to select the System Configuration sub menu 4 Choose between Auto Normal Warm or Cold by ...

Page 22: ...r Line Marker Windowing Adjusting Line Markers and Windowing Column Marker Cannot be adjusted To adjust the position of the Marker 1 Press the Mode and Find button located on the Front Panel or Control Console of the DaVinci to enter the Menu 2 Turn the zoom wheel until Marker Position is selected Then press the Find button to select 3 When this option is selected it will be highlighted RED When t...

Page 23: ...ble window System Configuration Settings Beep Voice Prompt Clock Screen Saver and Save Recall System Configuration 1 Press the Mode and Find button located on the Front Panel or Control Console of the DaVinci to enter the Menu 2 Turn the zoom wheel clockwise until System Configuration is highlighted 3 Press the Find button to select the System Configuration sub menu To select an option turn the zo...

Page 24: ...er buttons on the Control Console simultaneously To toggle from the computer image back to the camera image press the Find button on the Front Panel or Control Console of the DaVinci When using the DaVinci Display as a computer monitor the controls for the camera e g Zoom Mode Marker will not work for the computer image Using the DaVinci LCD as a computer monitor is similar to attaching a typical ...

Page 25: ...sired column in the middle of the screen Using the Column Marker will help in locating the column the DaVinci will read aloud see page 22 Turning the Deskew option on will allow for a larger margin of error for a document that is not perfectly straight see page 27 1 Press the button on the Control Console This will take a snapshot of the document and process it for OCR 2 After the DaVinci has comp...

Page 26: ...us sentence press the or on the Control Console Jump to first Last sentence of the Document Press and hold the or for 2 seconds Pause Play Pressing the on the Control Console will pause the DaVinci By pressing the again the unit will continue reading Using Headphones with the DaVinci On the left hand side of the DaVinci LCD monitor there is an available 3 5mm input jack for use of standard headpho...

Page 27: ...rompt in a Male or Female Voice Deskew When on the DaVinci will automatically adjust a document when not set straight under the camera Progress Bar Enables Disables the visibility of a progress bar when the DaVinci is processing a document to Text To Speech OCR Text to Speech Mode ...

Page 28: ...ll name that image by the month day year time and mode it was saved at In CCTV mode if you save the image consecutively within a minute the previous image saved will be overwritten In OCR mode if you save the image consecutively within a minute the DaVinci will display Already Saved Recalling a Saved Image 1 Press and hold the RECALL button on the DaVinci Control Console for 2 Seconds 2 The DaVinc...

Page 29: ...inci Control Console on the desired image file 3 A sub menu will appear next to the selected image allowing you to CANCEL or DELETE 4 Use the Zoom Wheel on the DaVinci Front Panel or DaVinci Control Console to select CANCEL or DELETE 5 Pressing the FIND button on DaVinci Front Panel or DaVinci Control Console while CANCEL is highlighted will bring you back to the Image Recall menu Pressing the FIN...

Page 30: ... is no activity for 10 minutes Any movement under the camera changing the camera position or pressing any button on the DaVinci or DaVinci Control Console will revert the DaVinci back to its previous state It is possible to manually display the screen saver by pressing the Pause Play button and the Save button at the same time Screen Saver ...

Page 31: ...enu To select an option turn the zoom wheel to highlight the desired language Press the Find button to select that option A black box next to that option indicates that that option is ON Setting the Auto Language The DaVinci is capable of reading text aloud in multiple languages When Auto Language is OFF the DaVinci will only read aloud text written in the same language that is set in the Primary ...

Page 32: ...The Product Information will display the technical information of the DaVinci and also allows the user to restore the DaVinci back to its factory settings 1 Press the Mode and Find button located on the Front Panel or Control Console of the DaVinci to enter the Menu 2 Turn the zoom wheel clockwise until Product Information is highlighted 3 Press the Find button to display the Product Information s...

Page 33: ...English and Auto Language is set to OFF The images seem to be out of focus Make sure the LED Lamp on the DaVinci Camera is ON Making sure there sufficient ambient lighting will assist in creating a better image Make sure the Close up Lens is free of any fingerprints or debris The DaVinci is will not power on Make sure the connection from the DaVinci is securely connected to a working outlet Resett...

Page 34: ...nge without prior notice Magnification range 24 LCD 2x minimum to 80x maximum 24 Field of View Reading Mode 6 75mm 1 4 min 257mm 9 63 max 24 Working Distance Reading Mode 18 inches Default Color Modes Color black white high contrast positive negative and 3 digital color selects black background with green text black background with yellow text and yellow background with blue text Power Supply Inpu...

Page 35: ... Type of Protection Class 1 Degree of Protection Type B Mode of Operation Continuous Operating temperature range 0 40 C 32 104 F Storage transport temperature range 0 60 C 32 140 F Warranty 2 years Product specifications subject to change without notice ...

Page 36: ...s that are scratched or damaged due to normal use e Damage due to operation of the DaVinci with equipment not supplied by Enhanced Vision You must provide proof of purchase bearing the date of purchase in order to receive warranty service Anyone using this product does so knowingly assuming certain risks due to the need to utilize vision enhancement devices A 2 year extended warranty option is ava...

Page 37: ...n 3 5 or 4 3 LCD screen the Pebble s Freeze Frame feature allows you to capture any still image and adjust magnification Up to 28 differ ent viewing modes allow you to choose alternate color combinations based on your personal prefer ence Pebble can be powered using standard rechargeable batteries included Magnification 2X 10X Pebble mini s ultra compact design makes it the ideal hand held magnifi...

Page 38: ...s at any distance Compatible with popular magnification software and the latest Windows operating systems Transformer s unique design is perfect for work home or school Weighs less than 3 pounds Battery operated up to 4 hours 28 custom color select modes Magnification 2 4X to 30X based on 17 screen Merlin HD Merlin HD s camera technology produces an even truer more natural image Easily read books ...

Page 39: ...D Magnification 2X 82X 24 LCD Amigo Amigo is a truly portable desktop magnifier and is the lightest weight it its class Optimal viewing is achieved with a tilting 6 5 inch viewing screen Amigo is battery operated and can be taken anywhere Magnification 3 5X 14X digital Contact Information US Office Phone 714 465 3400 Fax 714 374 1821 UK Office Phone 44 0 115 9442317 Fax 44 0 115 9440720 DE Office ...

Page 40: ...our new test to speech feature DaVinci will read any printed text aloud with just the push of a button For more information please visit www enhancedvision com www enhancedvision com 800 440 9476 US Office toll free 714 465 3400 US Office 44 0 115 9442317 UK Office Tel 49 0 6078 911772 DE Office Fax 49 0 6078 911774 DE Office Part MAN 1500 00 X1 Nov 2012 Copyright 2009 by Enhanced Vision All right...

Reviews: