


174
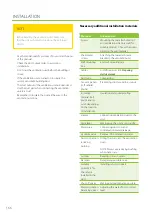
Valve and actuator open counter-clockwise and close
clockwise. The figure shows the valve and actuator in the
fully open position. Also, shown is the allowed direction of
the liquid flow.
To install:
a. Install the cooling coil horizontally in the supply air duct
(in case of a duct coil).
b. Isolate a separate loop for the cooling coil.
•
Make sure to include the one-way valve.
•
Follow the principal chart at the end of this
manual.
c. Connect the condense water outlet.
d. Install the 3-way valve and the actuator in the ground
collector’s piping. The actuator controls the brine flow
to the cooling coil as needed.
e. Isolate the pipes carefully with vapour proof insulation
to prevent condensation on the outside of the pipes in
warm and semi-warm spaces.
f. Prepare / connect the wiring between the ventilation
unit, the geothermal pump and the actuator.
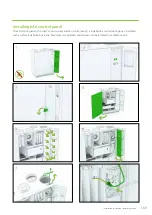
3. Open the unit’s maintenance hatch and make sure that
•
the unit is clean from the inside
•
there are no unwanted objects inside the
filters are in place and
•
the condensate drain works.
4. Close the hatch carefully.
5. Prepare / connect wiring between the ventilation unit,
the geothermal pump and the actuator, as shown in
the connection diagram at the end of this manual.
Summary of Contents for Pelican eAir
Page 8: ...8 Kanavaliitännät ulkoilma poistoilma jäteilma tuloilma ...
Page 20: ...20 13 15 11 14 Lisävaruste 1 2 min 12 9 10 ...
Page 49: ...49 Ammattilaisen asennusohje ...
Page 52: ...52 Pelican eAir Installationsanvisningar för ventilationsaggregat Svenska ...
Page 58: ...58 Kanalanslutningar uteluft frånluft avluft tilluft ...
Page 70: ...70 13 15 11 14 Extra tillbehör 1 2 min 12 9 10 ...
Page 99: ...99 Installationsanvisningar för yrkesfolk ...
Page 102: ...102 Installeringsinstruksjoner for ventilasjonsenheten Norsk Pelican eAir ...
Page 108: ...108 Kanalanslutningar uteluft avtrekksluft avkastluft tilluft ...
Page 120: ...120 13 15 11 14 Ekstrautstyr 1 2 min 12 9 10 ...
Page 149: ...149 Installasjonsinstrukser for fagfolk ...
Page 152: ...152 Pelican eAir Installation instructions for the ventilation unit English ...
Page 158: ...158 Duct connections outdoor air extract air exhaust air supply air ...
Page 170: ...170 13 15 11 14 Extra 1 2 min 12 9 10 ...
Page 199: ...199 Installation instructions for professionals ...
Page 205: ...205 ...
Page 206: ...206 Enervent Zehnder Oy Kipinätie 1 FI 06150 PORVOO Tel 358 207 528 800 enervent enervent com ...
Page 207: ...207 ...
Page 211: ...211 Enervent Zehnder Oy Kipinätie 1 FI 06150 PORVOO Tel 358 207 528 800 enervent enervent com ...
Page 220: ...220 eAir CG liitännät eAir CG anslutningar eAir CG koblinger eAir CG connections ...
Page 223: ...223 ...


