background image

3.7  Connections

•   Connecting to the RS-485/-422


The dome camera can be controlled remotely by an external device or control system, such as a control keyboard, using RS-485 half-duplex, RS-4 full  


duplex or simplex serial communications signals. Connect Marked Tx+, Tx- to Tx+(Rx+) and Tx-(Rx-) of the RS-485 control system.


If control system is RS-4, connect Rx+(Tx+), Rx+ (Tx-) and Rx+, Rx- of the dome camera to Rx+, Rx- and Tx+, Tx- of the control device respectively.

•  Connecting Video out connector


Connect the video out (BNC) connector to the monitor or video input.

•  Connecting Alarms
 

AL1 to 8 (Alarm In)


You can use external devices to signal the dome camera to react on events. Mechanical or electrical switches can be wired to the AL (Alarm In) and GND  


(Ground) connectors. See Chapter 3 - Program and Operation for configuring alarm input.


GND (Ground)

  NOTE:  All the connectors marked GND are common.


Connect the ground side of the Alarm input and/or alarm output to the GND connector.


NC(NO)1 TO 4 (Normal Close or Normal Open: Alarm Out)


The dome camera can activate external devices such as buzzers or lights. Connect the device to the NC(NO) (Alarm Out) and COM (Common) connectors.  


See Chapter 3 - Program and Operation for configuring alarm output.

•  Connecting the Power


Connect the power of 4VAC 850mA to the dome camera.


Use certified / Listed Class  power supply transformer only. 

3.8  Getting Started

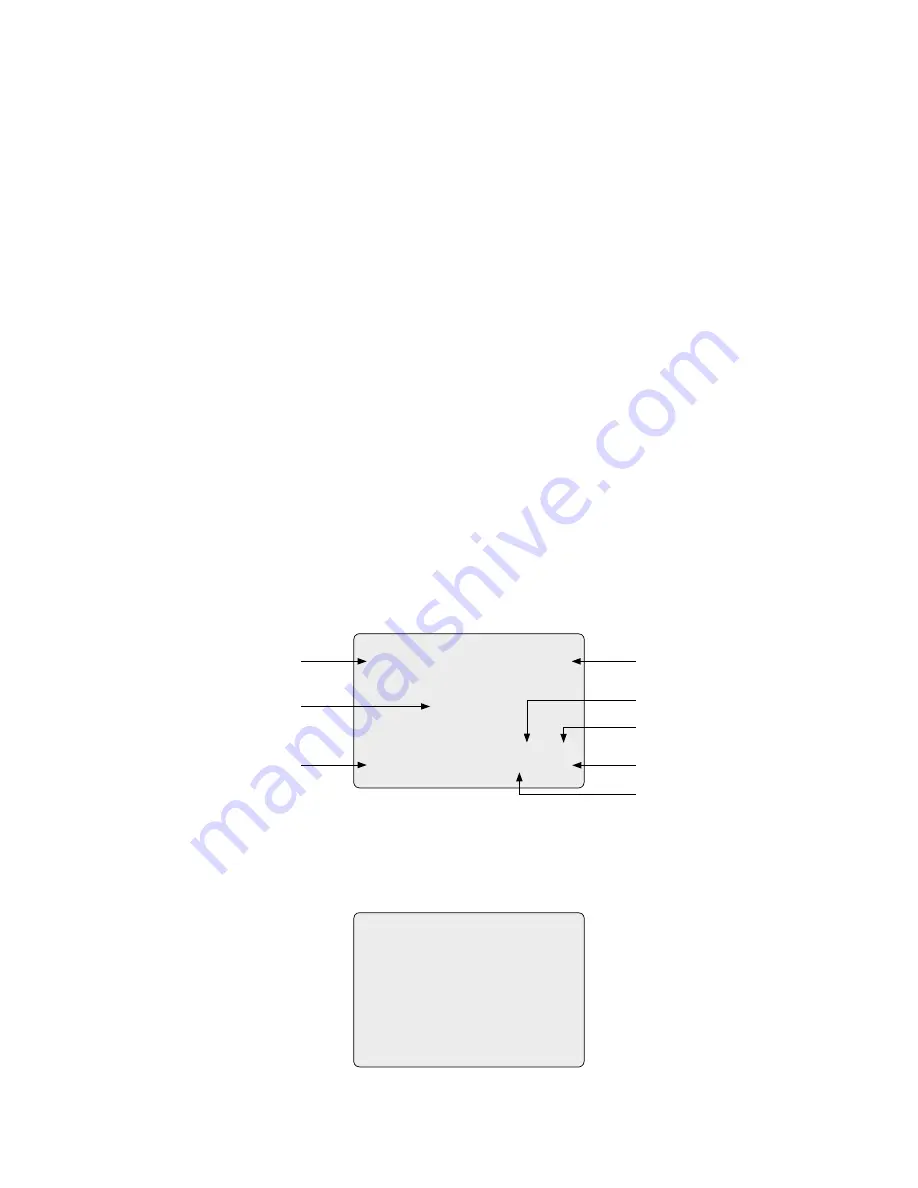
Once installed apply power to the dome camera. The dome camera will start a configuration sequence.

  (AREA TITLE) 


(AF   AE) 

  (FUNC TITLE)


(CTRL KEY TO MOVE) 


SAVE AND EXIT (ESC TO CANCEL)

(ALARM MESSAGE) 


(DOME ID...) 


(ANGLE...)

00 


AF   AE

EMPTY DATA


DOMEID:000 

ALARM: 


W->360.0,090.0

ALARM DISPLAY

VIEW DIRECTION

OSD Position

STATUS of  
FOCUS and AE

CAMERA TITLE

CAMERA ID

PAN & TILT ANGLE

PRESET TITLE 
AREA TITLE 
FUNCTION 
UNDER RUNNING

INFORMATION DISPLAY

The dome can move the OSD position in the OSD position setup.

OSD Position Setup

Summary of Contents for EDC-3371

Page 1: ... Installation and Operating Manual Fastrax III 1 4 Day Night High Speed Dome Camera EDC 3222 ...

Page 2: ...lection 12 4 2 Accessing On Screen Menu Utility 12 4 3 How to control On Screen Menu Utility 12 4 4 Auto Scan Shortcut Scan 13 4 5 Preset Shortcut PRST 14 4 6 Shortcut of Preset Program 15 4 7 Tour Shortcut TOUR 16 4 8 Pattern Shortcut PTRN 17 4 9 Alarm 18 4 10 Area Title 19 4 11 Privacy Zone 19 4 12 Camera Menu 20 4 13 Dome Setup 23 4 14 Function Run 29 4 15 Motion Setup 30 5 Troubleshooting 31 6...

Page 3: ... laying the cable in such a way that the cable does not act as a gutter During assembly care must be taken to ensure that existing seals are correctly inserted and are not displaced as a result of assembly You must not continue to use damaged seals NOTE This is a class A digital device This digital device can cause harmful interference in a residential area in this case the user may be required to...

Page 4: ...tside caution should be taken to avoid vibration and shaking of Fastrax dome due to windload or shock of passing heavy vehicles If pole is not stable enough it may cause malfunction in accurate tilt positioning up to 255 multiplexers Alarm Input up to 8 Sensor Siren Flashing light Alarm Output up to 4 up to 99 DVRs up to 254 cameras including 64 alarm modes push push remove camera window bubble ri...

Page 5: ... on both body and base of the camera Different version will not support alarm input and output The dome camera is for use in surface mounting applications and the mounting surface should be capable of supporting loads up to 4 5kg The dome camera s base should be attached to a structural object such as a hard wood wall stud or ceiling rafter that supports the weight of the dome camera Figure 3 Inst...

Page 6: ...m should be installed according to Figures 4 through 9 Power 24VAC STP AWG 24 Sensor Alarm input up to 8 Siren Light Alarm output up to 4 BNC Alarm output 1 2 Alarm input 1 4 Power 24VAC Dome1 Dome1 Alarm output 3 4 Alarm input 5 8 Monitor RS 485 Half Duplex mode RX TX RX TX RS 422 Simplex mode RX RX Duplex mode RX TX RX TX RX RX Rear Master Keyboard controller J Box Dome RS485 DOME1 RX TX RS485 D...

Page 7: ...unication terminated by setting the appropriate DIP switch Without proper termination there is potential for control signal errors Total length of the cable for communication should not exceed 1 2km SW1 1 2 Terminated ON ON Not terminated OFF OFF Figure 6 Setting Dome Camera Termination SW1 Termination switches SW2 Fail Safe Network Addresses ID and protocol selection switches 1 2 ON SW1 ...

Page 8: ...mmunication Cable for communication Termination ON 1 2km 3 4 Fail safe Network When you control the dome by the other device not own keyboard some error may be existed in the serial communication The reason is caused by the other device without the fail safe network At this time you solve the problem to set this DIP switch to ON of the nearest dome from the other device only SW2 1 2 ON PULL UP PUL...

Page 9: ...ess more than 999 you should connect the service provider Example Port 1 Dome 1 Port 2 Dome 2 Port 16 Dome 16 If more than 16 dome cameras are installed using two or more multiplexers ID of the dome camera should be ID of MUX x No of camera IN e g multiplexer ID n Camera IN m then ID of Dome 16x n 1 m Refer to Figures 4 5 for setting the dome camera address ID and protocol selection Figure 9 Setti...

Page 10: ...PAL NTSC NTSC PAL D3 S4 3 Reserved D4 S4 4 RS 422 RS 485 RS 422 RS 485 D5 D6 D7 D12 Protocol S5 1 S5 2 S5 3 S6 4 Off Off Off Off F2 F2E Pelco D Pelco P Default Off Off On Off F2 F2E Off On Off Off Sensormatic RS 422 Off On On Off Pelco D Pelco P On Off Off Off Vicon On Off On Off Ernitec On On Off Off Reserved On On On Off F2 Off Off Off On Philips Bosch Off Off On On Reserved Off On Off On Dynaco...

Page 11: ...e connectors marked GND are common Connect the ground side of the Alarm input and or alarm output to the GND connector NC NO 1 TO 4 Normal Close or Normal Open Alarm Out The dome camera can activate external devices such as buzzers or lights Connect the device to the NC NO Alarm Out and COM Common connectors See Chapter 3 Program and Operation for configuring alarm output Connecting the Power Conn...

Page 12: ...NU key on the keyboard controller the following On screen menu utility will appear 4 3 How to control On Screen Menu Utility Button Function MENU Call on On screen menu utility Joystick up or down Navigate through the menu items Joystick left or right or IRIS OPEN Go into the sub menu items Joystick left or right or Zoom handle twist or Tele Wide Change value Enter the editing title mode CTRL Joys...

Page 13: ...Or move down to the character table and press CTRL or IRIS OPEN at the desired character then the cursor position moves to the next position automatically Push the Joystick left or right at the ALL DELETE field to delete all characters Push the Joystick left or right at the EXIT field to finish title edit menu TITLE EDIT MENU A01 A B C D E F G H I J K L M N O P Q R S T U V W X Y Z 0 1 2 3 4 5 6 7 ...

Page 14: ...t press CTRL key at the end angle position Save and exit from the menu Press SCAN key on the angle field to display with the small OSD Then the screen will show as below AUTO SCAN AREA SETUP CTRL KEY NUMBER01 START END EXIT ESC TO EXIT The setting procedure is the same as above NOTE 09 AUTO PAN mode Endless panning 4 5 Preset Shortcut PRST If you need to view specific places routinely you should p...

Page 15: ... the Joystick to the right Press ESC to exit the Preset menu without saving NOTE Press the HOME key at programmed preset position to delete a programmed preset view The position which is marked with already has the preset view assigned To review the stored preset press PRST key on the The camera will show the stored preset scene PRESET AREA SETUP CTRL KEY NUMBER 001 PAN TILT 000 0 000 0 EXIT ESC T...

Page 16: ...ark will be displayed 7 Repeat Step 2 through 5 for each desired position Each title will be displayed on top of the line 8 To edit the title follow the procedure of the auto scan above to edit titles 9 Select Save and Exit and push the Joystick to the right Press ESC to exit the program without saving You can expand the tour sequence by calling other programmed tours NOTE The speed applies in the...

Page 17: ... 000 a pattern has already been recorded Patterns can be overwritten 3 Press and hold down the CTRL key while controlling the camera direction and zoom with the Joystick The dome will be automatically recorded until you release the CTRL key Or Press IRIS OPEN then the CTRL displays Move the position and the zoom position Press IRIS CLOSE then the CTRL disappears 4 Select Save and Exit and push the...

Page 18: ...with the dome Example When you connect the relay output of the dome to the heater connector of the outdoor housing the relay output can operate during the setting time only RELAY OUT SETUP OUT1 ALARM OUT2 1 MIN OUT3 ALARM OUT4 5 MIN EXIT ESC TO EXIT ALARM The relay output is operated during an alarm operation or by the short key of our keyboard 1 5 MIN minute The relay output is operated during th...

Page 19: ... the CTRL displays Move the desired position Press IRIS Close then the CTRL disappears To adjust at the 0 1 degree interval twist the Joystick at the pan field and the tilt field 5 Select SWAP Set to ON to exchange the start angle and the end angle 6 Select Save and Exit and push the Joystick to the right or press IRIS Open Press ESC or IRIS Close to exit the program without saving 4 11 Privacy Zo...

Page 20: ...VACY AREA MENU CTRL KEY CONTROL NUMBER 001 354 8 344 8 CAMERA SETUP FOCUS CONTROL WB CONTROL AE CONTROL DNR CONTROL LINE LOCK CONTROL SHARPNESS 05 RESOLUTION MID DIGITAL ZOOM OFF IMAGE FLIP OFF PRESET FREEZE OFF SAVE AND EXIT ESC TO CANCEL SHARPNESS The higher the value the more edges in the picture will be enhanced 0 15 RESOLUTION Select high resolution mode LOW MID HIGH Digital ZOOM OFF Zoom ran...

Page 21: ...he lifespan of the lens WB White Balance CONTROL WB SETUP MODE AWB R GAIN B GAIN SAVE AND EXIT ESC TO CANCEL MODE AWB WAWB INDOOR OUTDOOR MANUAL AWB Computes the white balance value output using colour informatIion from the entire screen automatically 2500 to 9500K WAWB Wide range auto white balance mode 1800 to 10 500K INDOOR Indoor white balance mode OUTDOOR Outdoor white balance mode MANUAL Man...

Page 22: ...cutoff filter of the camera and makes the camera sensitive to near infrared AUTO Camera goes in to B W mode at low light GLOBAL Controlled by the keyboard The operator can enable NIGHT SHOT for all dome cameras at the same time If the NIGHT SHOT mode is set to GLOBAL 999 ENTR will turn Off the NIGHT SHOT mode and 888 ENTR will turn On the NIGHT SHOT mode ON B W mode OFF Colour mode DNR CONTROL AE ...

Page 23: ...EM INFORMATION SAVE AND EXIT ESC TO CANCEL 4 13 Dome Setup LANGUAGE SETUP LANGUAGE English French German Italian Spanish Polish Portugal Select the language you want LINE LOCK CONTROL LINE LOCK SETUP MODE INTERNAL PHASE 000 SAVE AND EXIT ESC TO CANCEL MODE INTERNAL EXTERNAL PHASE Adjusts phase of picture with other cameras in EXTERNAL mode 0 319 ...

Page 24: ...t FUNCTION ENABLE and turn to ON or OFF by pushing the Joystick to the right or to the left OSD DISPLAY OSD DISPLAY SETUP CAMERA TITLE DOMEID VIEW DIRECTION OFF DOME OSD ON AREA TITLE OFF PRESET TITLE CONSTANT FOCUS EXPOSURE ON OSD POSITION SETUP SAVE AND EXIT ESC TO CANCEL CAMERA TITLE Up to 6 characters VIEW DIRECTION ON OFF ON sets current direction as N North and the coordinate angle to 000 OF...

Page 25: ... 100 110 120 Allows the image to flip digitally when the camera moves over the setting angle vertically AUTO When the camera reaches the floor directly above the moving object it will stop At that time release the Joystick handle instantly and pull it down again to run the auto flip function When you use the panning range we recommend using the flip mode to AUTO TILT OVER ANGLE This option is used...

Page 26: ... otherwise press the ESC key to exit without erasing The erased data includes all stored data auto scan presets and tours except origin offset The offset value is still valid after all data is erased The offset value can be zero with default set of Offset origin menu PRESET FOCUS DEFAULT FOCUS AUTO SAVE AND EXIT ESC TO CANCEL ERASE PROGRAMMED DATA AUTO SCAN ON PRESET ON TOUR ON PATTERN ON ALARM ON...

Page 27: ...L OK This feature is used to re calibrate the orientation of a selected dome camera Origin offset value is not affected by this function Offset is still valid after origin set SYSTEM MENU SYSTEM MENU MOTOR SETUP PASSWORD EDIT ORIGIN CHECK CALIBRATION ON PASSWORD ENABLE OFF MENU TIME OUT OFF BLINK CURSOR ON DOME ANSWER ON SAVE AND EXIT ESC TO CANCEL CALIBRATION ON Auto origin check OFF PASSWORD ENA...

Page 28: ...nd SLOW TILT MAXIMUM 19 90 second NORMAL PAN MAXIMUM 40 360 second NORMAL TILT MAXIMUM 40 200 second TURBO PAN MAXIMUM 200 380 second TURBO TILT MAXIMUM 90 300 second PASSWORD EDIT ORIGIN CHECK ARE YOU SURE CANCEL OK PASSWORD EDIT SETUP CTRL KEY INPUT PASSWORD PASSWORD A B C D E F G H I J K L M N O P Q R S T U V W X Y Z 0 1 2 3 4 5 6 7 8 9 SAVE AND EXIT ESC TO EXIT You can change the password with...

Page 29: ...and SCAN FUNCTION RUN SETUP CTRL KEY PRESET PATTERN TOUR SCAN HOME AUTO PAN RELAY OUT EXIT ESC TO EXIT 1 Select the desired Function by pushing Joystick Up or Down 2 Select the number by twist the Joystick in PRESET PATTERN TOUR and SCAN 3 Press CTRL or IRIS OPEN to execute NOTE To execute the function you should store the function PRESET PATTERN TOUR and SCAN first HOME Select the HOME menu and p...

Page 30: ...TITLE CAMERA SET DWELL SEC 12 3 4 5 6 7 8 9 0 12 3 4 5 6 7 8 9 0 00 02 04 06 NEXT PAGE SAVE AND EXIT ESC TO CANCEL PRESET CAMERA SETUP FOCUS AUTO MOTION OFF MOTION SETUP AE SETUP SAVE AND EXIT ESC TO EXIT MOTION SETUP SENSITIVITY 12 POSITION ALL DELAY 00SEC OUTPUT OFF HOLD TIME 03SEC EXIT ESC TO EXIT SENSITIVITY 1 10 POSITION ALL CENTER the center box displays motion detection area DELAY 00 05SEC ...

Page 31: ...nections Poor video quality Check that the BNC connectors are inserted properly Check the voltage level of the dome camera Check that 8 pin cable is connected to the Keyboard Check 8 pin cable for Keyboard is proprietary Cable for video is shielded Dome cameras lose their positions Reset the cameras using the Dome configuration menus Check that the dome cameras are inserted properly in the base Ch...

Page 32: ...tching multiple cameras to a single monitor If text appears slightly tinted on colour monitors disabling the line lock may prevent this problem Name Information Relates to the display the dome name the area where the dome is pointing the name of the preset or pattern that is running and alarm names The display of each type of name setting can be enabled or disabled When the display of camera or ar...

Page 33: ...uto mode 12 ON Digital Zoom ON According to digital zoom setting 12 OFF Digital Zoom OFF 13 ON Dome OSD ON 13 OFF Dome OSD OFF 14 ON Dome Area Title Display ON 14 OFF Dome Area Title Display OFF 15 ON View Direction ON 15 OFF View Direction OFF 100 ON Shutter speed auto 101 ON Shutter speed 1 4 PAL 1 3 sec 102 ON Shutter speed 1 2 sec 103 ON Shutter speed 1 sec 104 ON WDR ON 104 OFF WDR OFF 105 ON...

Page 34: ...cy Zone 8 Privacy zone masking 2 methods selectable Block video off GENERAL Certification CE EMC FCC CLASS A CSA ELECTRICAL Input Voltage 18 to 30VAC 24VAC nominal 24VDC Power Requirement 24VAC VDC 1A Power Consumption Maximum 20W Alarm Output 4 Normal relays 24VDC 1A max selectable NC NO Alarm Input 8 Normal dry contact selectable NC NO Control RS 485 422 baud rate 2400 38 4k bps default 9600bps ...

Page 35: ...sories The optional accessories currently available can be found on our Homepage www videor com ENVIRONMENT Operating temperature 0 C to 50 C Operating humidity 0 to 90 RH non condensing Storage temperature 20 C to 60 C ...

Page 36: ...rough specialised trade channels only VIDEOR E Hartig GmbH Carl Zeiss Straße 8 63322 Rödermark Germany Tel 49 0 6074 888 0 Fax 49 0 6074 888 100 www videor com Technical changes reserved Copyright by VIDEOR E Hartig GmbH 01 2011 9 Dimensional Drawings Dimensions mm 199 202 45 R2 3 R5 ...

Reviews: