background image

Proline 400 HART

Operation options

Hauser

23

6  

Operation options

6.1  

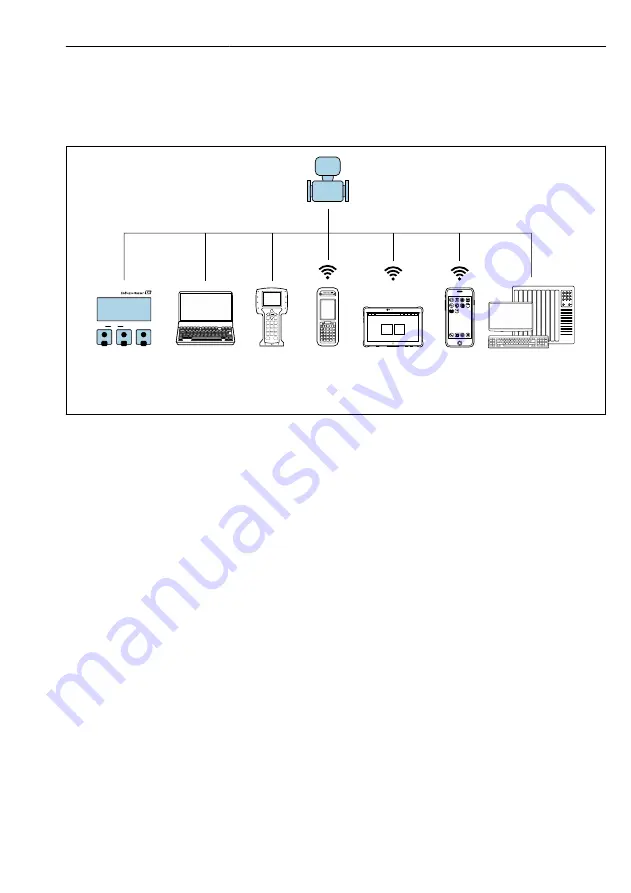
Overview of operation methods

1

7

2

E

+

-

ESC

6

4

5

3

  A0046477

1

Local operation via display module

2

Computer with Web browser (e.g. Internet Explorer) or with operating tool (e.g. FieldCare, DeviceCare,
AMS Device Manager, SIMATIC PDM)

3

Field Communicator 475

4

Field Xpert SFX350 or SFX370

5

Field Xpert SMT70

6

Mobile handheld terminal

7

Control system (e.g. PLC)

Summary of Contents for HART Proline 400

Page 1: ...T These instructions are Brief Operating Instructions they are not a substitute for the Operating Instructions pertaining to the device Brief Operating Instructions part 2 of 2 Transmitter Contain information about the transmitter Brief Operating Instructions part 1 of 2 Sensor 3 KA01510D 06 EN 01 21 71542316 2022 01 11 ...

Page 2: ...Proline 400 HART 2 Endress Hauser Order code Ext ord cd Ser no www endress com deviceviewer Endress Hauser Operations App XXXXXXXXXXXX XXXXX XXXXXX XXX XXXX XX Serial number 1 3 2 A0023555 ...

Page 3: ...device Incoming acceptance and product identification Storage and transport Installation Brief Operating Instructions Part 2 Transmitter The Transmitter Brief Operating Instructions are aimed at specialists with responsibility for commissioning configuring and parameterizing the measuring device until the first measured value Product description Installation Electrical connection Operation options...

Page 4: ...5 Electrical connection 12 5 1 Electrical safety 12 5 2 Connection conditions 12 5 3 Connecting the measuring device 15 5 4 Special connection instructions 19 5 5 Ensuring the degree of protection 21 5 6 Post connection check 22 6 Operation options 23 6 1 Overview of operation methods 23 6 2 Structure and function of the operating menu 24 6 3 Access to the operating menu via the Web browser 25 6 4...

Page 5: ...n procedures and other facts which do not result in personal injury 1 1 2 Symbols for certain types of information Symbol Meaning Symbol Meaning Permitted Procedures processes or actions that are permitted Preferred Procedures processes or actions that are preferred Forbidden Procedures processes or actions that are forbidden Tip Indicates additional information Reference to documentation A Refere...

Page 6: ...Local Area Network WLAN Communication via a wireless local network Prosonic Flow 400 Bluetooth Wireless data transmission between devices over a short distance Promag 800 Cellular radio Bidirectional data exchange via cellular network LED Light emitting diode is off LED Light emitting diode is on LED Light emitting diode is flashing 1 1 5 Tool symbols Symbol Meaning Symbol Meaning Torx screwdriver...

Page 7: ...accordingly on the nameplate To ensure that the measuring device remains in proper condition for the operation time Keep within the specified temperature range Only use the measuring device in full compliance with the data on the nameplate and the general conditions listed in the Operating Instructions and supplementary documentation Based on the nameplate check whether the ordered device is permi...

Page 8: ...e to operate It meets general safety standards and legal requirements It also complies with the EU directives listed in the device specific EU Declaration of Conformity Endress Hauser confirms this by affixing the CE mark to the device Furthermore the device meets the legal requirements of the applicable UK regulations Statutory Instruments These are listed in the UKCA Declaration of Conformity al...

Page 9: ...e sensors work as sound generators and sound receivers The sensors in a sensor pair are always arranged opposite one another and send receive the ultrasonic signals directly 1 traverse positioning Prosonic Flow W 400 The measuring system uses a method based on the time of flight difference Here the sensors work as sound generators and sound receivers Depending on the application and version the se...

Page 10: ...n increments of 90 4 1 2 Mounting the transmitter housing LWARNING Excessive tightening torque applied to the fixing screws Damage to the transmitter Tighten the fixing screws with the specified torques 1 Insert the display module and lock it when doing so 2 Close the housing cover 3 Tighten the fixing screws of the housing cover tightening torque for aluminum housing 2 5 Nm 1 8 lbf ft plastic hou...

Page 11: ...e transmitter housing Turning the display module Is the device undamaged visual inspection Turning the transmitter housing Is the fixing screw firmly tightened Is the connection compartment cover screwed on tightly Is the securing clamp firmly tightened Turning the display module Is the connection compartment cover screwed on tightly Is the securing clamp firmly tightened ...

Page 12: ...g tools Wire stripper When using stranded cables Crimper for wire end ferrule 5 2 2 Requirements for connecting cable The connecting cables provided by the customer must fulfill the following requirements Permitted temperature range The installation guidelines that apply in the country of installation must be observed The cables must be suitable for the minimum and maximum temperatures to be expec...

Page 13: ...ter Cable glands supplied For standard cable M20 1 5 with cable 6 to 12 mm 0 24 to 0 47 in For reinforced cable M20 1 5 with cable 9 5 to 16 mm 0 37 to 0 63 in Plug in spring terminals for wire cross sections 0 5 to 2 5 mm2 20 to 14 AWG 5 2 3 Terminal assignment Transmitter The sensor can be ordered with terminals Connection methods available Possible options for order code Electrical connection O...

Page 14: ...ive Status input 5 2 4 Preparing the measuring device Carry out the steps in the following order 1 Mount the sensor and transmitter 2 Sensor connection housing Connect sensor cable 3 Transmitter Connect sensor cable 4 Transmitter Connect signal cable and cable for supply voltage NOTICE Insufficient sealing of the housing Operational reliability of the measuring device could be compromised Use suit...

Page 15: ...ing concept of the plant Never mount or wire the measuring device while it is connected to the supply voltage Before the supply voltage is applied connect the protective ground to the measuring device 5 3 1 Connecting the sensor and transmitter LWARNING Risk of damaging electronic components Connect the sensor and transmitter to the same potential equalization Only connect the sensor to a transmit...

Page 16: ... push the cables through the slotted sealing insert 4 Mount the screw part in the center cable entry at the top and then guide both sensor cables through the entry Then fit the coupling nut with the sealing insert on the screw part and tighten Ensure that the sensor cables are positioned in the cut outs provided in the screw part 5 Connect sensor cable to channel 1 upstream 6 Connect sensor cable ...

Page 17: ...nnection Endress Hauser 17 11 LWARNING Housing degree of protection may be voided due to insufficient sealing of the housing Screw in the screw without using any lubricant Reverse the removal procedure to reassemble the transmitter ...

Page 18: ...ing cover fixing screw 1 Nm 0 7 lbf ft Cable entry 5 Nm 3 7 lbf ft Ground terminal 2 5 Nm 1 8 lbf ft When connecting the cable shield to the ground terminal observe the grounding concept of the facility 2 1 4 x T 20 1 2 L L L N 5 4 10 0 4 3 A0046769 2 Connecting the supply voltage and 0 20 mA 4 20 mA HART with additional outputs and inputs 1 Loosen the 4 fixing screws on the housing cover 2 Open t...

Page 19: ...insufficient sealing of the housing Screw in the screw without using any lubricant Tighten the 4 fixing screws on the housing cover 5 4 Special connection instructions 5 4 1 Connection examples Current output 4 to 20 mA HART 4 4 20 mA 5 2 1 3 6 A0029055 3 Connection example for 4 to 20 mA HART current output active 1 Automation system with current input e g PLC 2 Ground the cable shield at one end...

Page 20: ...ample for pulse frequency output passive 1 Automation system with pulse frequency input e g PLC 2 Power supply 3 Transmitter Observe input values Switch output 1 2 3 A0028760 5 Connection example for switch output passive 1 Automation system with switch input e g PLC 2 Power supply 3 Transmitter Observe input values ...

Page 21: ...all the requirements for the IP66 67 degree of protection Type 4X enclosure To guarantee IP66 67 degree of protection Type 4X enclosure carry out the following steps after the electrical connection 1 Check that the housing seals are clean and fitted correctly Dry clean or replace the seals if necessary 2 Tighten all housing screws and screw covers 3 Firmly tighten the cable glands 4 To ensure that...

Page 22: ...f protection 5 6 Post connection check Are cables or the device undamaged visual inspection Do the cables comply with the requirements 12 Do the cables have adequate strain relief Are all cable glands installed securely tightened and leak tight Cable run with water trap 21 Does the supply voltage match the specifications on the transmitter nameplate Is the terminal assignment correct 13 If supply ...

Page 23: ... ESC 6 4 5 3 A0046477 1 Local operation via display module 2 Computer with Web browser e g Internet Explorer or with operating tool e g FieldCare DeviceCare AMS Device Manager SIMATIC PDM 3 Field Communicator 475 4 Field Xpert SFX350 or SFX370 5 Field Xpert SMT70 6 Mobile handheld terminal 7 Control system e g PLC ...

Page 24: ...rators and maintenances Operator Maintenance task oriented function oriented Expert A0014058 EN 7 Schematic structure of the operating menu 6 2 2 Operating philosophy The individual parts of the operating menu are assigned to certain user roles operator maintenance etc Each user role contains typical tasks within the device lifecycle For detailed information on the operating philosophy see the Ope...

Page 25: ...ld terminal For additional information on the Web server refer to the Special Documentation for the device 6 3 2 Requirements Computer hardware Interface The computer must have an RJ45 interface Connection Standard Ethernet cable with RJ45 connector Screen Recommended size 12 depends on the screen resolution Computer software Recommended operating systems Microsoft Windows 7 or higher Microsoft Wi...

Page 26: ... 3 3 Establishing a connection Via service interface CDI RJ45 Preparing the measuring device Configuring the Internet protocol of the computer The following information refers to the default Ethernet settings of the device IP address of the device 192 168 1 212 factory setting 1 Switch on the measuring device 2 Connect to the computer using a cable 3 If a 2nd network card is not used close all the...

Page 27: ...N reception on the mobile terminal Establishing a connection from the mobile terminal to the measuring device 1 In the WLAN settings of the mobile terminal Select the measuring device using the SSID e g EH_Prosonic Flow_400_A802000 2 If necessary select the WPA2 encryption method 3 Enter the password serial number of the measuring device ex works e g L100A802000 LED on display module flashes it is...

Page 28: ...User interface 2 1 3 A0029418 1 Function row 2 Local display language 3 Navigation area Header The following information appears in the header Device name Device tag Device status with status signal Current measured values Function row Functions Meaning Measured values Displays the measured values of the device Menu Access to the operating menu from the measuring device The structure of the operat...

Page 29: ...g the connection to the measuring device Network settings e g IP address MAC address Device information e g serial number firmware version Logout End the operation and call up the login page Navigation area If a function is selected in the function bar the submenus of the function open in the navigation area The user can now navigate through the menu structure Working area Depending on the selecte...

Page 30: ...ing tool 6 3 7 Logging out Before logging out perform a data backup via the Data management function upload configuration from device if necessary 1 Select the Logout entry in the function row The home page with the Login box appears 2 Close the Web browser 3 If no longer needed Reset modified properties of the Internet protocol TCP IP 26 6 4 Access to the operating menu via the operating tool For...

Page 31: ...ion check checklist 22 8 2 Switching on the measuring device After a successful function check switch on the measuring device After a successful startup the local display switches automatically from the startup display to the operational display If nothing appears on the local display or a diagnostic message is displayed refer to the Operating Instructions for the device 3 8 3 Setting the operatin...

Page 32: ...th its submenus is used for fast commissioning of the measuring device The submenus contain all the parameters required for configuration such as parameters for measurement or communication For detailed information on the device parameters see the Description of Device Parameters 3 Submenu Configuration System Display diagnostic settings administration Sensor Measured values system units process p...

Page 33: ...alizer Diagnosis Diagnostics list event logbook device information simulation 9 Diagnostic information Faults detected by the self monitoring system of the measuring device are displayed as a diagnostic message in alternation with the operational display The message about remedial measures can be called up from the diagnostic message and contains important information on the fault ...

Page 34: ...tage Supply voltage A0029431 EN 9 Message about remedial measures 1 Diagnostic information 2 Short text 3 Service ID 4 Diagnostic behavior with diagnostic code 5 Operation time of occurrence 6 Remedial measures 1 The user is in the diagnostic message Press symbol The Diagnostic list submenu opens 2 Select the desired diagnostic event with or and press The message about the remedial measures opens ...

Page 35: ......

Page 36: ...www addresses endress com 71542316 71542316 ...

Reviews: