background image

1 Instructions for Use

Do not use this printer by methods or operations not described in this manual, otherwise it may result in accidental 

injury or property damage.

Do not place this printer near flammable materials, explosive materials or high heat sources. Please place this 

printer in a ventilated, cool and low-dust environment.

Do not place this printer in a vibrating or any other unstable environment, as the printing quality will be 

compromised when the printer shakes.

Please use the filament recommended by the manufacturer, otherwise the nozzle may be clogged or the printer 

may be damaged.

Do not touch the nozzle or hotbed while the printer is in operation, otherwise you may get burned.

After the printing process is complete, please use tools to clean up the filament on the nozzle while the nozzle is 

still hot. Do not touch the nozzle with your hands when cleaning, otherwise your hands may get burned.

Please regularly clean the printer body with a dry cloth while the power is off, and wipe off dust, sticky printing 

materials, and foreign objects on the guide rails.

This printer has a safety protection mechanism. Please do not manually move the nozzle or printing platform 

quickly while the printer is on, otherwise the printer will automatically power off for protection.

Users should abide by the laws and regulations of the corresponding country and region where the equipment is 

located (place of use) abide by professional ethics, and pay attention to safety obligations. The use of our 

products or equipment for any illegal purpose is strictly prohibited. Our company is not responsible for the relevant 

legal responsibilities of any violators.

1

2

3

4

5
6

7

8

9

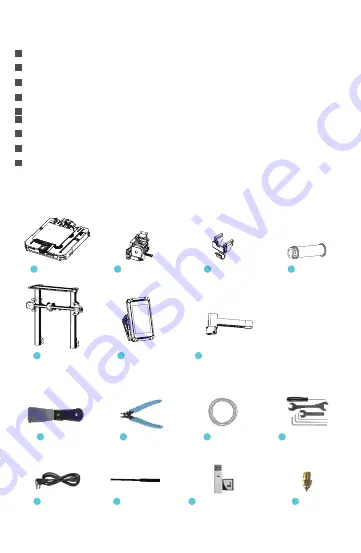
3 List of Accessory Kit Items

Wrench and 

Screwdriver x 1

Blade x 1 

8

Cutting Pliers x 1 

9

Filament x 1 

10

11

cord set x 1 

12

Nozzle Cleaner x 1 

13

Memory Card and 

Card Reader x 1 

14

Nozzle x 1

15

2 List of Main Parts

Chassis Module x 1 

Nozzle Kit x 1 

Wire Clamp x 1 

Filament tube x 1

Rack and Filament Detector x 1

 Screen x 1 

Gantry x 1 

1

5

6

7

2

3

4

Summary of Contents for Ender-3 S1 Pro

Page 1: ... User Manual Ender 3 S1 Pro To further improve your user experience you can find more about our devices via the following methods User manual Please find instructions and videos in the SD card provided with the printer ...

Page 2: ...lease regularly clean the printer body with a dry cloth while the power is off and wipe off dust sticky printing materials and foreign objects on the guide rails This printer has a safety protection mechanism Please do not manually move the nozzle or printing platform quickly while the printer is on otherwise the printer will automatically power off for protection Users should abide by the laws and r...

Page 3: ... Head Screw x 3 17 M3x6 Hexagon Socket Head Cap Screw x 5 18 Z Axis Motor Port Memory Card Slot 10 Pin Cable 30 Pin Cable Mainboard Fan Type C Port Filament Detection Port Z Axis Limit Port Touch Screen Port Knob Display Screen Port Hotbed DC 24 V Hotbed Thermal Port Fuse 24 Pin Cable Auto Leveling Port Heat Sink Fan Port Model Fan Port Nozzle Thermal Port Extrusion Motor Port Heating Tube Z Axis ...

Page 4: ...ule 180 to ensure that the profiles on both sides are level up and down Use two M5x45 hexagon socket round screws with spring washers to align the holes on the left side of the hole to pre lock and then tighten to fix D Rotate the base module 180 and tighten the screws on the right side A Place the nozzle module on the back of the extruder pre lock the nozzle with 4 M3x6 hexagon socket head cap scre...

Page 5: ...eaded end on the right end of the rack B Fit the front slot of the installed rack to the front slot of the profile and then press down to clamp the bottom of the profile 7 4 5 3 Install the screen Place the screen bracket to the side of the plastic that s on the right and tighten it with 3 M4x30 hexagon flat round head screws 6 17 ...

Page 6: ...ion for the power supply switch and mains before supply connection in order to avoid damage to the device If the mains between 200V and 240V please select the 230V for the power supply switch default is 230V If the mains between 100V and 120V please select the 115V for the power supply switch 6 Auto Leveling 1 Go to settings and tap leveling to enter the CR Touch leveling interface Tap start and w...

Page 7: ... the nozzle to the printing platform is about the thickness of a piece of A4 paper Return to the previous menu and the Z axis compensation value will be configured The CR Touch leveling will fail when the platform inclination is greater than 2 mm In this case please use assisted leveling instead The gap is about the thickness of a piece of A4 paper and there is a slight resistance when pulling the ...

Page 8: ...hole until it reaches the nozzle C Warm up the nozzle If the filament flows out of the nozzle when the temperature reaches the target value the filament is properly loaded 8 Loading the Filament Replacing the filament 1 When the printer is not printing A Heat the nozzle to 185 or higher wait for the filament in the nozzle to soften Then press and hold the extrusion handle to quickly extract the filament...

Page 9: ...install the software or install the Creality software via the memory card provided with the printer Creality Slicer 2 Go to Preferences Configure Creality Select language Next Finish to complete the configuration 3 Select the model of this printer ENDER 3 S1 Pro 4 Enter parameters Close ...

Page 10: ...ck the printer again following these steps When the printer is powered off 1 The nozzle is tightly connected and moves smoothly to the left and right 2 The X axis is horizontal and stable not wobbling up or down and it moves run smoothly up and down 3 The Y axis is tightly connected The platform does not shake and moves back and forth smoothly 4 The filament rack does not shake The rollers are smoot...

Page 11: ...mory Card Slot 6 Type C Port 7 Tool Kit 8 Display Screen 9 X Axis Belt Adjustment Device 10 Filament Detector 11 Rack 12 Z Axis Motor 13 Y Axis Limit Switch 14 Voltage Toggle Switch 15 Y Axis Motor 16 Coupling 18 LED Light 17 X Axis Motor Tap Print Select the file 18 17 16 15 14 13 12 9 11 10 1 3 2 8 7 4 5 6 ...

Page 12: ...ng Method FDM Modeling Technology Number of Nozzles Supported Slicing Software Input voltage Total Power Hotbed Temperature 300 C Yes Nozzle Temperature Resume Printing Function Yes Filament Detection Yes Auto Leveling Windows XP Vista 7 10 MAC Linux PC Operating Systems Printing Speed 220 mm x 220 mm x 270 mm Modeling Dimensions General Specifications PLA TPU PETG ABS STL OBJ AMF Up to 150 mm s re...

Reviews: