Enbrel SMARTCLIC APP-1000 User Manual Download Page 25

45

44

z

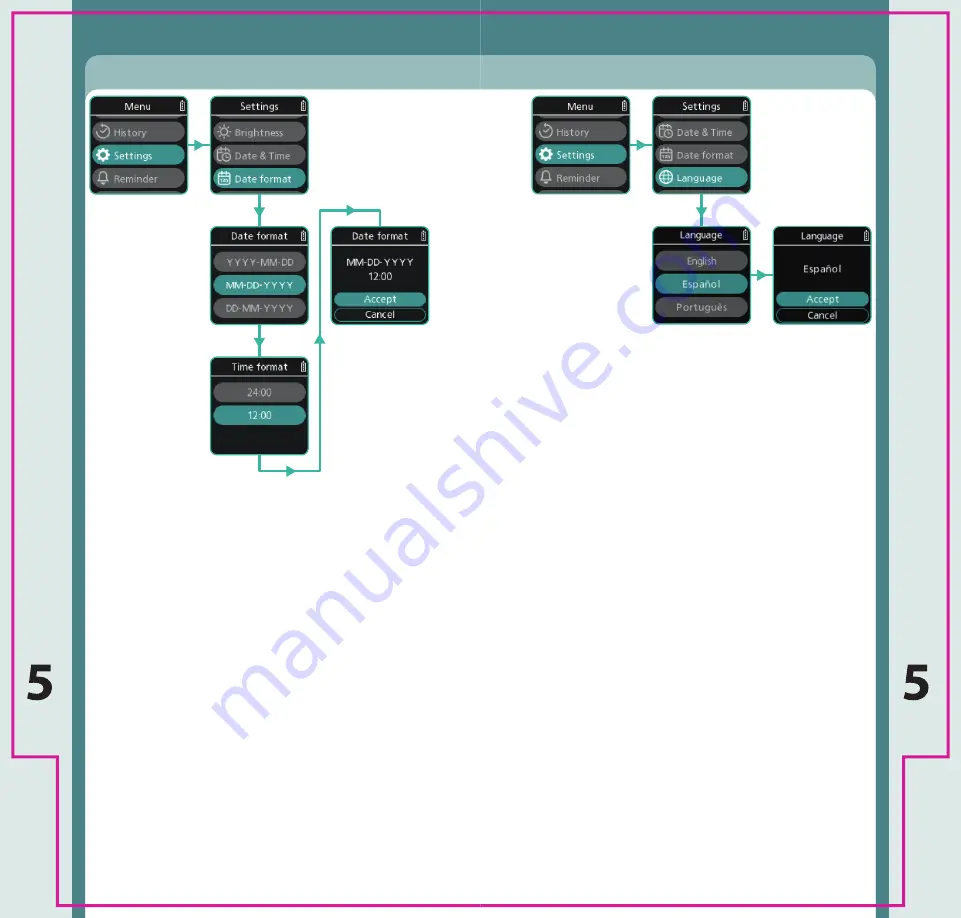
Select Language to change the language 

displayed on your Device.

z

Use the Menu up and Menu down buttons to 

scroll through the available languages.

z

Select the Language for your Device with a short 

press of the Injection button.

z

Confirm the Language by selecting “Accept”.

Note

: Selecting “Cancel” will take you back to the 

Settings menu.

Note

: You may not have the option to change 

the language.

Settings

Device Language

Settings

z

Select Date format to change the date and time 

format displayed on your Device.

z

Use the Menu up and Menu down buttons to 

scroll through the available options for Date 

format and Time format.

z

Select the Date and Time format for your Device

with a short press of the Injection button.

z

Confirm the Date and Time format by selecting 

“Accept”.

Note

: Selecting “Cancel” will take you back to the 

Settings menu.

Device Date Format

Summary of Contents for SMARTCLIC APP-1000

Page 1: ...ensure you get the best experience from your SMARTCLIC Injection Device Make sure you have read and understood this User Manual before using your SMARTCLIC Injection Device Unpack your SMARTCLIC Injec...

Page 2: ...n button to turn your SMARTCLIC Injection Device back on Note You can change these settings at any time by accessing your SMARTCLIC Injection Device settings See page 36 To complete setup Set Date and...

Page 3: ...tion 17 Training Cartridge Information 18 Holding Your Device 20 Using Your Training Cartridge 21 Chapter 4 Using your SMARTCLIC Injection Device 27 Giving Your Enbrel Injection 28 Chapter 5 Accessing...

Page 4: ...t your Cartridge z How to inject with your Cartridge z Storage and disposal of your Cartridge Enbrel Dose Dispenser Cartridge Instructions for Use illustration only Instructional Material 25 mg 0 5 ml...

Page 5: ...Necrosis Factor inhibitors in the DDC Patients are separately prescribed the DDC by healthcare professionals z If the operational life has been exceeded or the battery has exhausted or if you want to...

Page 6: ...vice z Do not inject through your clothes z If your Device heats up abnormally emits fumes or an abnormal smell or noise turn it off and stop using it z Do not use your Device in a concentrated oxygen...

Page 7: ...r Use and User Manual z Instruct your patient to notify you immediately if they use their Device erroneously forget to use it or otherwise feels the slightest abnormality in their Device or their own...

Page 8: ...ed z Do not clean the inside of your Device z Do not clean your Device with water z Do not immerse your Device in water z Do not clean your Device with household cleaner or soap Follow these storage i...

Page 9: ...spect your medicine 25 mg Cartridges have a shorter window Training Cartridge does not contain any medication z Needle 25 mg and 50 mg Cartridges contain a needle which is visible through a small wind...

Page 10: ...d after removing your Cartridge from your Device to avoid a needlestick injury z Avoid spilling liquid on your Cartridges or your Device Never rinse or put your Cartridges or your Device under water z...

Page 11: ...ridges are for single use Do not reuse your Cartridge with the needle cap removed or your used Cartridge Dispose of them straight away in a suitable sharps container as instructed by your healthcare p...

Page 12: ...ting on page 62 z Do not insert into your Device if your Training Cartridge is damaged abnormal or any part of the label has peeled away Do not dispose of your Training Cartridge in your household was...

Page 13: ...rting into your Device z Check the cap is grey z Check your Training Cartridge do not use if it is damaged any part of the label has peeled away Caution If you drop your Training Cartridge refer to Tr...

Page 14: ...choose an area in your abdomen upper thighs or the outer area of the upper arms caregiver only z Choose an injection site at least 3 cm from where you last injected and at least 5 cm away from your b...

Page 15: ...ess and hold the Injection button to begin your simulated injection when instructed by the Display Note You can release the Injection button after your simulated injection has started z Pull your Trai...

Page 16: ...27 26 Chapter 4 Using your SMARTCLIC Injection Device This page is intentionally left blank...

Page 17: ...ortable injection leave your Cartridge at room temperature for approximately 15 30 minutes away from direct sunlight Do not use any other methods to warm up your Cartridge z Check the expiration date...

Page 18: ...ast injected and at least 5 cm away from your belly button navel z Do not inject into bony areas or areas on your skin that are broken bruised red sore tender or hard Avoid injecting into areas with s...

Page 19: ...r Device during this time Do not insert your fingers inside your Device as the needle will be exposed during this time z If you notice a spot of blood at the injection site press a cotton ball or gauz...

Page 20: ...le in the inspection window If not you may not have received your full dose Contact your healthcare professional for advice z Do not reuse your Cartridge or reinsert it into your Device z Dispose of t...

Page 21: ...available options z Use a short press of the Injection button to enter the highlighted option z Use a short press of the Cancel Eject button to return to the Home Screen History 38 History Calendar 38...

Page 22: ...history in a calendar month format The tick represents previous completed injections The cross represents injection errors The bell represents scheduled injections in the future z Use the Menu up and...

Page 23: ...Speed to adjust the speed of your injection z Changing the injection speed may make your injection more comfortable Note You can only access the Injection Speed setting on your Device if there is no...

Page 24: ...jection button z Confirm the Date and Time by selecting Accept Note Selecting Cancel will take you back to the Settings menu Settings Device Date Time Settings z Select Brightness to adjust the bright...

Page 25: ...Settings menu Note You may not have the option to change the language Settings Device Language Settings z Select Date format to change the date and time format displayed on your Device z Use the Menu...

Page 26: ...n your phone or tablet and enable Bluetooth Turn to page 50 and follow the illustrated instructions Turn to page 48 and follow the illustrated instructions Turn to page 49 and follow the illustrated i...

Page 27: ...d on the App syncing starts automatically Refer to the App s instructions Note Selecting Cancel will take you back to the Connect menu z Select Options to automatically transfer your injection informa...

Page 28: ...ce will ask if you d like to forget the current pairing z If there is no smart device paired your Device will start the pairing sequence When it has finished all your Device data will be synced with t...

Page 29: ...n page 51 I ve paired by phone or tablet How do I sync to the App Select Sync with App The syncing process will begin straight away See Sync With App on page 48 How do I sync to the App if my phone or...

Page 30: ...5 54 z Select Power off from the menu options to turn your Device off z Use a short press of the Injection button to Power off your Device Chapter 6 Error Messages Miscellaneous Items Power off Device...

Page 31: ...jected Lift your Device and wait for your Cartridge to be ejected The needle may be exposed until Dispose is displayed after the error message disappears If the error reappears contact your healthcare...

Page 32: ...attempt to cool it down any other way The temperature of your Device is too cold for it to function Leave your Device at room temperature until it has warmed up to 5 C to 35 C 41 F to 95 F Do not atte...

Page 33: ...vice will eject your Cartridge Dispose of it right away You cannot use it again Insert a new Cartridge and try again Your Device has recognised your Cartridge as being inserted into your Device previo...

Page 34: ...ot working properly Check the problem with reference to the Error Messages If your Device fails to work properly even after taking action contact your healthcare professional Electronic Waste Disposal...

Page 35: ...te Contact your healthcare professional or pharmacist for advice on how to dispose of your Device Device Disposal Specifications Power source Internal power device 3 VDC Lithium battery included 1 2 d...

Page 36: ...s product IP22 Protection against access to hazardous parts with a finger and vertically falling water drops when equipment is tilted up to 15 Serial number Medical device Manufacturer and Date of Man...

Page 37: ...modify redistribute and sell modified and unmodified copies of the Font Software subject to the following conditions 1 Neither the Font Software nor any of its individual components in Original or Mo...

Page 38: ...levant Information Copyright 2014 Kenneth MacKay All rights reserved Redistribution and use in source and binary forms with or without modification are permitted provided that the following conditions...

Page 39: ...the performance of this equipment could result IMMUNITY to RF wireless communications equipment WARNING Use of this equipment adjacent to or stacked with other equipment should be avoided because it...

Page 40: ...ia Pty Ltd Level 17 151 Clarence Street Sydney NSW 2000 Australia Manufacturer Information Original Instructions PHC Corporation 2131 1 Minamigata Toon Ehime 791 0395 Japan Web https www phchd com glo...

Reviews: