


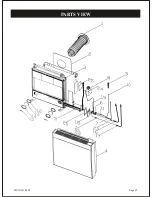

Page 16
TROUBLESHOOTING
SYMPTON 1: PILOT WILL NOT LIGHT
A. Gas is not turned on, or air is trapped in the gas line
B. Gas control, is not set to proper position
C. No spark from piezo
D. Clogged pilot injector
E. Gas regulator jammed due to high pressure
F. Broken or cracked piezo electrode or broken electrode
wire
SYMPTON 2: PILOT WILL NOT STAY LIT WHEN
KNOB IS RELEASED
A. Gas control knob not held down long enough
B. Pilot flame too weak
C. Thermocouple not functioning
:
the
air trapped in the gas supply may be bled easily at the
minimum rate screw. This is a brass screw located on top of
the gas control situated at 1 o´clock when looking down the
control knob. Unscrew the plug completely and pry out
with a small screw driver. Turn the heater control knob to
“pilot position” and press down until you smell the gas
escaping at that screw hole. NOTE: ALL OPEN FLAMES
IN AREA NEED TO BE EXTINGUISHED. After the odor
is noted, replace brass screw and tighten snugly. Wait 5
minutes for gas to dissipate. Relight heater.
: in MV 120 and
MV 130 units, it may be difficult to see the indicator for the
pilot/gas position. Note that it is a marking, found on
the lower side of the gas control, situated at 6 o´clock
when looking down the control.
In MV 145 units, there´s a slot marking in the front of the
ring around the dial marking the reference position.
: look through window for spark
when lighting the pilot. If there is no spark, trace the
insulated sparking wire to the electrode and be certain all
connections are tight.
: clean the pilot orifice. Natural gas
orifices are large enough that you can usually clean them by
blowing through them. The LP orifice is so small that the
best is to replace it. Never try to enlarge the hole, or use a
sharp hard object for cleaning.
: reset the
regulator.
: replace it.
:
allow
at
least 30 seconds. During initial lighting, or after long
periods of inactivity, the presence of air in the gas supply
pipe may ask for a longer hold.
: a weak pilot indicates dirt or an
insufficient gas supply. However, the pilot may be adjusted
by turning the small brass screw on the left hand front top of
the gas control top plate. Backing the screw out
counterclockwise increases the pilot flame. The pilot flame
should contact the thermocouple tip, but not excessively
long. (See Lighting Instructions).
: the thermocouple is a
standard 24 millivolt probe. Check its effectiveness by
removing it from the heater and attach a probe (alligator
clip) to the magnet contact bulb on the gas control end of the
thermocouple. Place the other probe (alligator clip) to the
cooper shield near the heat tip. Holding the tip in a flame
source, such as a candle flame, a good thermocouple should
read 23-30 millivolts. If this is not the case, replace the
thermocouple.
have gas person confirm gas
pressures.
replace it. (This is a very
unlikely occurrence).
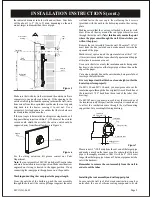
(larger vent pipe not
fitting snugly over outer flange). The inner vent pipe must
be 2” (50.8 mm) longer than the outer vent pipe in order to
maintain the necessary air supply for proper combustion. If
the inner and outer pipes are close to the same length, air
supply will not be adequate and the burners will not stay on.
Flames lifting off of the burner are symptomatic of
improper venting.
if
the thermostat sensor bulb at the bottom of the furnace is
too near an electric baseboard, the appliance will sense that
the room is warm enough and the burners will not come on.
: any dirt or debris
which accumulates in or over the outer vent cap will
interfere with the venting of the heater, and the burners will
not function. The heater must be adequately vented for
proper functioning.
for each stated problem (1-5), the causes are stated in the
order of likelihood of occurrence.
SYMPTON 3: MAIN BURNER WON´T LIGHT
A. Pilot is not lighted.
B. Thermostat turned too low or Gas control knob still on
“pilot” position.
C. Gas supply is inadequate:
D. Defective gas control valve:
SYMPTON 4: MAIN BURNER WON´T STAY LIT
A. Temperature dial turned too low.
B. Vent pipes not cut to proper length:
C. Gas supply is inadequate.
D. Thermostat sensor bulb near accessory heat source:
E. Outer vent cap is dirty or obstructed
SYMPTON 5: ROOMS WILL NOT MAINTAIN
TEMPERATURE
A. Thermostat turned too low or Gas control knob still on
“pilot” position.
B. Unit is too small to heat the space.
C. Gas supply is inadequate.
Note:
MV1XX-1-0603


