


5
• When changing parts of the multimeter (e.g. the battery or fuse)
use spare parts of the same type and specifications. Change
parts only when the multimeter is disconnected and turned off.
• Disconnect the testing conductors from the tested circuit before
opening the rear casing of the device.
• Do not alter or otherwise interfere with the internal circuitry
of the multimeter!
• Be extra careful when measuring voltages higher than 30 V AC
rms, 42 V peak or 60 V DC. Risk of injury by electric current!
• When using measuring tips, make sure you are holding them
behind the finger barriers.
• Do not perform measurements if the multimeter‘s casing is
removed or loose.
• Once the screen shows the low battery icon
, replace the
batteries. Otherwise, subsequent measurements may be in-
accurate. Incorrect measurements may then result in injuries
by electric current! Use alkaline batteries only; do not use
re-chargeable batteries.
Maintenance Instructions
Attention
Do not attempt to repair or modify the multimeter in any way if you
are not qualified to do so or do not have access to the necessary
calibration equipment. Make sure that water does not get into the
multimeter – prevents injury by electric current!
• Disconnect the measuring tips from the tested circuit before
opening the casing of the multimeter.
• Regularly clean the body of the multimeter with a moist cloth and
a mild detergent. Perform cleaning only when the multimeter is
disconnected and turned off.
• Do not use solvents or abrasive agents for cleaning!
• If you will not be using the multimeter for an extended period
of time, turn it off and remove the battery.
• Do not store the multimeter in places with high humidity and
temperature or in environments with strong magnetic fields!
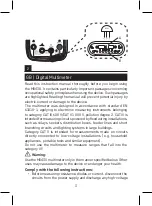
Summary of Contents for M0430
Page 2: ...2 1 2 3 9 4 8 5 10 7 6 1...
Page 114: ...114 CAT II IV M0430 1 000...
Page 115: ...115 30 V AC rms 42 60 DC...
Page 116: ...116 9 1604 6F22 AC DC AC DC...
Page 124: ...124 OL WH3303 DM633 10 AC 1 COM INPUT 2 3 1 1 1 2 1 1 COM INPUT Select 30...
Page 125: ...125 COM INPUT Select OL 1 1 M 2 OL COM INPUT Select OL 1 hFE 2 COM INPUT 2 3 NPN PNP...
Page 126: ...126 4 hFE 2 A B 1 Select C F 2 COM K INPUT 3 K 20 C 300 C 300 C 1 COM INPUT 2 3...
Page 181: ...181 BG M0430 EN 61010 1 CAT III 600 V CAT II 1 000 V 2 CAT III CAT II IV M0430...
Page 182: ...182 1 000 V...
Page 183: ...183 30 V 42 V 60 V...
Page 184: ...184 9 V 6F22 1604 C F 1 M0430 5...
Page 191: ...191 Relative Relative Hz Duty Hz Duty Hz Duty COM INPUT AUTO Range OL 600 V...
Page 193: ...193 1 1 A 1 mV 2 1 A 1 mV COM INPUT Select 30 COM INPUT Select OL 1 1 M...
Page 195: ...195 3 K 20 C 300 C 300 C 1 COM INPUT 2 3 600 F 10...
Page 196: ...196 1 COM INPUT 2 3 4 Hz Duty EMOS spol s r o Lipnick 2844 750 02 P erov...
Page 197: ...197...
Page 198: ...198...
Page 199: ...199...