4
|
ENGLISH
2.0 Explanation of the connections
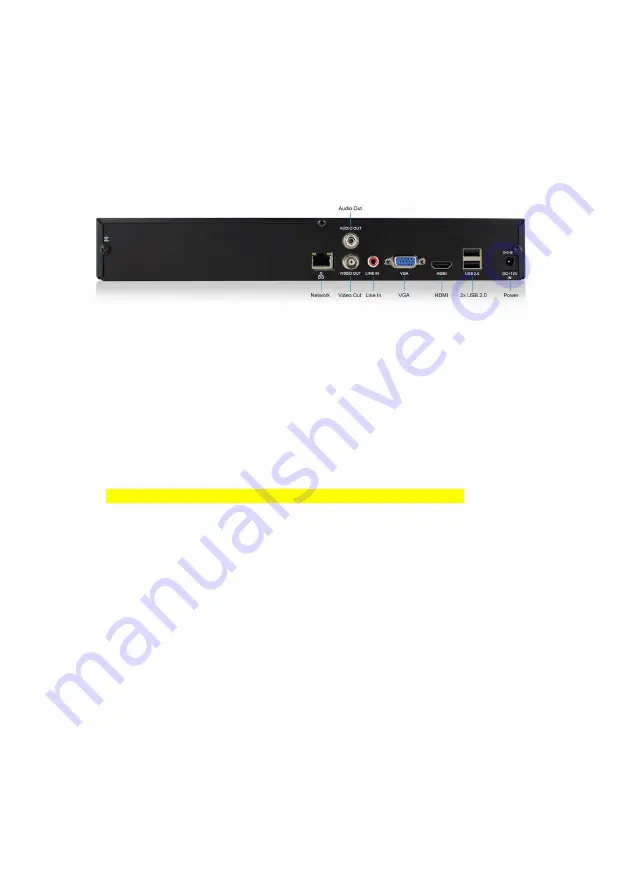
2.1 EM6304 4 Port network video recorder
1. Line-In: Can be used to connect a microphone to the Audio-In channel.
2. Audio-Out: Can be used to connect to an analogue receiver or powered speaker.
Video-Out: Can be used to connect a CVBS cable to receive the surveillance
recorder’s image(s).
3. VGA connection. Used to connect a VGA monitor or TV to view the Surveillance
recorders Video streams.
4. HDMI connection. Used to connect a HDMI monitor or TV to view the Surveillance
recorders Video streams (Recommended).
5. LAN connection.
6. 2x USB ports which can be used for USB drive, keyboard or mouse.
7. Power connector.
3.0 Using the surveillance recorder
During the following chapters we will explain how to setup the Network video recorder.
3.1 Connecting the surveillance recorder to your
television or monitor
1. Take the surveillance recorder out of the packaging.
2. Connect the surveillance recorder to a monitor/TV which has a VGA or HDMI
connection. Also, you can connect the surveillance recorder to a special security
monitor which has a BNC connection. If you connect the surveillance recorder to a
television which has a cinch connection, then you can use an optional BNC to
cinch converter. (You can also use the surveillance recorder without the use of a
monitor, then you can view the images of the surveillance recorder via your
network, using a computer).
Summary of Contents for EM6304
Page 1: ...EM6304 Full HD Network Video Recorder...
Page 13: ...13 ENGLISH 4 Click Basic and then select User 5 Click Add user...
Page 44: ...44 ENGLISH 4 Click Advance 5 Click the Settings field below Trigger...
Page 59: ...59 ENGLISH 20 Set the security settings like below picture...
Page 63: ...63 ENGLISH 4 Click Local Settings...
Page 70: ...70 ENGLISH 6 Press Add and then select add device...
Page 71: ...71 ENGLISH The following screen will appear...
Page 72: ...72 ENGLISH...


