background image


4


|

 FRANÇAIS

2.2 Procédure de mise en MARCHE/ARRÊT 

Connectez l'alimentation à votre premier appareil et seulement ensuite branchez-la 
sur la prise secteur. Pour allumer l'appareil, appuyez sur l'interrupteur d'alimentation 
afin de démarrer le système. Il faut environ 1-2 minutes pour que l'appareil soit en 
ligne mais la LED bleue du système (OS) indique quand le système est prêt. 
 
Pour éteindre l'appareil en toute sécurité, appuyez et maintenez le bouton 
d'alimentation pendant 3 secondes jusqu'à ce que la LED bleue du système (OS) 
commence à clignoter. Le système arrête alors tous les services et environ 20 
secondes plus tard, il se met hors tension. Si, pour une raison quelconque le système 
ne répond pas, appuyez et maintenez le bouton d'alimentation pendant 6 secondes 
pour forcer l'arrêt du système et couper l'alimentation. 


3.0 Préparation de l’EM4172 

3.1 Montage du(des) disque(s) dur(s) 

Le NAS est capable d'utiliser un ou deux disques durs simultanément. Utilisez les 
étapes suivantes pour monter le(s) disque(s) dur(s). 
 
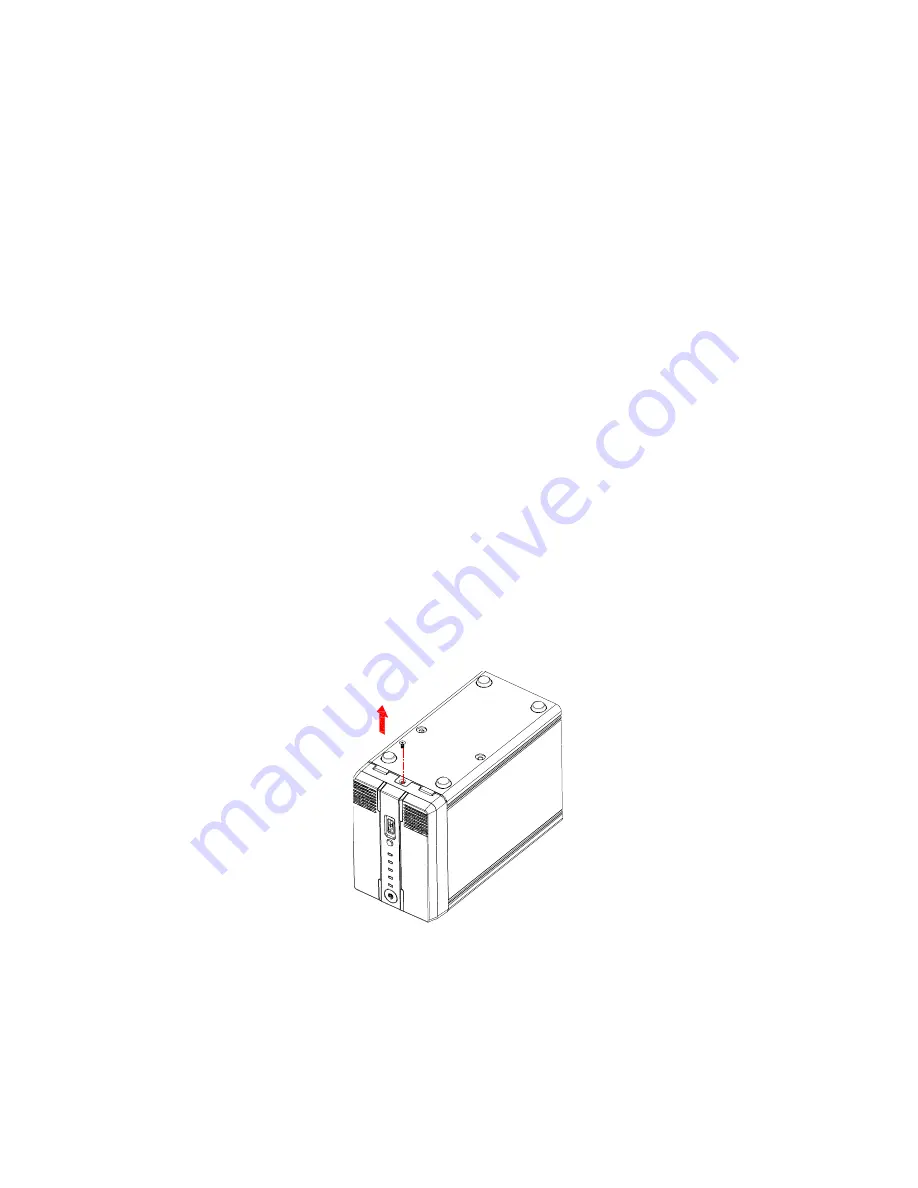
1.  Placez le NAS à l'envers. 
2.  Repérez la vis en partie inférieure de la face avant et enlevez-la. Référez-vous 

également à l'image ci-dessous : 


3.  Soulevez le panneau avant vers le haut et éloignez-le du boîtier. Référez-vous 

également à l'image ci-dessous : 

Summary of Contents for EM4172

Page 1: ...EM4172 myiSharing NAS ...

Page 2: ...EM4172 myiSharing NAS ...

Page 3: ...nstalleren op een Android product 10 8 2 De App installeren op een Apple product 10 8 3 De App instellen om verbinding te maken met de NAS 10 9 0 Op afstand de NAS benaderen 12 10 0 NAS registreren 13 11 0 Veelgestelde vragen en andere relevante informatie 13 12 0 Service en ondersteuning 13 13 0 Waarschuwingen en aandachtspunten 14 14 0 Garantievoorwaarden 14 15 0 Verklaring van Overeenstemming 1...

Page 4: ...er data overdracht Als deze rood brandt heeft de NAS een fout Brandt deze oranje dan betekent het dat er een USB stick is aangesloten Copy Kopieer knop Druk op deze knop om te beginnen met kopiëren vanaf een op de voorzijde aangesloten USB stick USB 2 0 host poort Achterzijde USB 2 0 host poort Gigabit LAN aansluiting DC 12V Aansluiting voor de stroomkabel Reset Reset knop Wordt gebruikt om de NAS...

Page 5: ...raat gaat zich nu uitschakelen dit duurt ongeveer 20 seconden Reageert het apparaat helemaal nergens op dan kun je het apparaat uitzetten door de power knop langer dan 6 seconden ingedrukt te houden 3 0 De EM4172 klaarmaken voor gebruik 3 1 De harde schijf of schijven monteren Je kunt één of twee schijven in de NAS monteren Gebruik de volgende stappen om de harde schijf of schijven te monteren 1 P...

Page 6: ... en duw de schijf vast Wil je een tweede schijf monteren herhaal dan de bovenstaande stappen Zie ook de volgende afbeelding 5 Wanneer je de harde schijf of schijven hebt gemonteerd dien je de behuizing weer dicht te maken Plaats het voorpaneel weer terug en draai de schroef aan de onderkant van het voorpaneel weer vast Je dient tevens de harde schijf of schijven vast te draaien met behulp van de h...

Page 7: ... de NAS aan 4 Sluit de stroomadapter op een stopcontact aan 5 Druk op de aan uit knop om de NAS te starten 5 0 Inloggen op de EM4172 Er zijn twee manieren om op de EM4172 in te loggen Beide manieren worden onderstaand uitgelegd 5 1 Inloggen met behulp van de software Bezoek www eminent online com vul als zoekterm EM4172 in de zoekbalk in en klik dan op de blauwe pijl om naar je product te zoeken Z...

Page 8: ... wordt getoond 5 2 Inloggen via de webbrowser 1 Installeer de software zoals in het vorige hoofdstuk is beschreven 2 Dubbelklik op het icoontje iSharingFinder dat tijdens de installatie op je bureaublad is geplaatst 3 Als het goed is wordt er een IP Adres getoond 4 Open de webbrowser van je computer 5 Vul het IP Adres van de NAS in de adresbalk van de webbrowser in en druk op de Enter toets van he...

Page 9: ...e gewenste harde schijf 4 Klik op Management 5 Kies hierna voor de optie Auto 6 Het onderstaand scherm verschijnt klik hier nogmaals op Auto 7 Klik hierna 2x op OK om te bevestigen dat de harde schijf in de NAS gewist wordt ...

Page 10: ...m die je vraagt hoe je de schijf of schijven wilt formatteren Zie ook de volgende afbeelding 4 De eerste optie is doorgaans de aanbevolen optie Klik op OK 5 Volg de stappen op het scherm om het formatteren te starten 6 Als het formatteren is voltooid verschijnt er een melding op het scherm zoals in de volgende afbeelding wordt getoond 7 Klik op OK 8 Het formatteren van de harde schijf of schijven ...

Page 11: ...rmee je de EM4172 kunt instellen 8 0 De NAS via Android of Apple device benaderen 8 1 De App installeren op een Android product Ga naar de Play Store op je Android telefoon of tablet en zoek naar myisharing Selecteer de App MyiSharing iSharing en kies installeren Nadat de installatie is afgerond kun je de App gebruiken 8 2 De App installeren op een Apple product Ga naar de App store op je Apple te...

Page 12: ...ERLANDS 2 Vul bij server het macadres registratienaam in 3 Bij gebruikersnaam en wachtwoord vul je de gebruikersnaam en wachtwoord in voor de NAS standaard gebuikersnaam en wachtwoord admin 4 Klik nu op LOGIN ...

Page 13: ... browser bijv IE Firefox Safari 2 Ga naar http isharing eminent online com 3 Voer het MAC adres van de NAS in het MAC adres is te vinden op de sticker aan de onderkant van de NAS 4 Wanneer gewenst kun je een vinkje zetten bij het hokje Onthouden 5 Klik nu op Zoeken 6 Hierna volgt het Login scherm 7 Vul hier gebruikersnaam en wachtwoord in standaard admin ...

Page 14: ...minent zal deze veelgestelde vragen regelmatig bijwerken zodat je bent voorzien van de meest recente informatie Bezoek de Eminent website voor meer informatie www eminent online com 12 0 Service en ondersteuning Deze handleiding is door de technische experts van Eminent met zorg opgesteld Mocht je desondanks problemen ervaren bij de installatie of in het gebruik van je Eminent product vul dan het ...

Page 15: ...Eminent handleidingen worden met de grootste zorgvuldigheid gemaakt Door nieuwe technische ontwikkelingen kán het echter gebeuren dat een geprinte handleiding niet meer de meest recente informatie bevat De online handleiding wordt altijd direct geupdate met de nieuwste informatie Mocht je een probleem ervaren met de geprinte handleiding check dan altijd eerst onze website www eminent online com wa...

Page 16: ...roon kennen dan het hoofdproduct vallen derhalve niet onder de Eminent garantieregeling De garantie vervalt tevens bij onjuist of oneigenlijk gebruik externe invloeden en of bij opening van de behuizing van het betreffende product door partijen anders dan Eminent ...

Page 17: ... van Overeenstemming met betrekking tot uw product opvragen door een e mailbericht te sturen naar info eminent online com U kunt ook een brief sturen naar Eminent Computer Supplies Postbus 276 6160 AG Geleen Nederland Vermeld bij uw aanvraag duidelijk Verklaring van Overeenstemming en het artikelnummer van het product waarvan u de Verklaring van Overeenstemming opvraagt EM4172 01 2013 ...

Page 18: ...EM4172 myiSharing NAS ...

Page 19: ... 1 Install the App on an Android device 10 8 2 Install the App on an Apple device 10 8 3 Setup the App to connect to your NAS 10 9 0 Local or remote login by Web browser 12 10 0 Change your NAS name 13 11 0 Frequently Asked Questions and other related information 13 12 0 Service and support 13 13 0 Warning and points of attention 14 14 0 Warranty conditions 15 15 0 Declaration of Conformity 15 1 0...

Page 20: ...nsported If this LED is red it means the NAS has an error If this LED is orange it means the front USB port has detected a USB memory stick Copy Copy button Press this button to start copying data from the USB device which is connected to the front USB port to the NAS USB 2 0 host port Back USB 2 0 host port Gigabit LAN connection DC 12V Connection for the power supply Reset Reset button Used to r...

Page 21: ...hing The system will then shut down all services and about 20 seconds later it will power down If for some reason the system is unresponsive press and hold the power switch for 6 seconds to forcefully shut down the system and cut off the power 3 0 Preparing the EM4172 3 1 Mounting the hard disk s The NAS is able to use one or two hard disks simultaneously Use the following steps to mount the hard ...

Page 22: ...lide the hard disk into its position If you want to mount an extra hard disk repeat the procedure above Also refer to the following image 5 Once you are done mounting the hard disk s you need to close the casing again Place the front panel back onto the casing and tighten the screw at the bottom of the front panel again Also tighten the supplied HDD screws to fix the mounted hard disk s Also refer...

Page 23: ... 5 0 Logging in to the NAS There are two ways to login to the NAS Both ways will be explained 5 1 Logging in by using the setup utility Visit www eminent online com fill out EM4172 in the search bar and click the blue arrow to search your product Also refer to the following image When your product has been found click Support At Drivers software EM4172 Software you can find the iSharing Finder whi...

Page 24: ...f correct an IP Address will be shown 4 Open your computer s web browser 5 Fill out the IP Address of the NAS in the address bar of the web browser and press the enter key on your keyboard 6 You will be prompted to enter a username and password Fill out as Username admin Fill out as Password admin 7 Press the Enter key on your keyboard after which the main page of the NAS is shown 6 0 Hard Drive S...

Page 25: ...management 5 Select the option Auto and press OK 6 At the next screen click Auto 7 Confirm the hard drive s will be erased by clicking 2x OK 6 2 Formatting the hard disk s 1 Click Disk Manager at the bottom of the page Also refer to the following image ...

Page 26: ... 4 Follow the steps shown on screen to start formatting the hard disk s 5 Once formatting the hard disk s has been completed a notification will be shown Also refer to the following image 6 Click OK 7 Formatting the hard disk s is now completed 7 0 Setting up the EM4172 by using the online advanced manual 1 Use the online advanced manual which instructs you to setup the EM4172 ...

Page 27: ...Apple device 8 1 Install the App on an Android device Open the Play Store on your Android device and search for myisharing Select the Myisharing iSharing App and press install Once the installation is finished you can use the App 8 2 Install the App on an Apple device Open the App Store on your Apple device and search for myisharing Select the Myisharing iSharing App and press install Once the ins...

Page 28: ...11 ENGLISH 2 Enter your NAS MAC address or NAS name in the server field 3 Enter your username and password default username password admin 4 Click LOGIN ...

Page 29: ...com 3 Your default home server name is the MAC address of your NAS drive You can find this number on the bottom label or on the retail packaging or the device itself 4 If preferred select the option Remember me 5 Click Enter 6 A login screen will follow 7 Login to your NAS The default username and password for the administrator is admin For security reasons we strongly recommend you to change the ...

Page 30: ... will update these pages frequently to assure you have the most recent information Visit www eminent online com for more information about your product 12 0 Service and support This users manual has been carefully written by Eminent s technical experts If you have problems installing or using the product please fill out the support form at the website www eminent online com support You can also co...

Page 31: ...uch devices could be prohibited Contact your local government for more information about this limitations Always follow up the instructions in the manual especially where it concerns devices which need to be assembled Warning In most cases this concerns an electronic device Wrong improper use may lead to severe injuries Repairing of the device should be done by qualified Eminent staff The warranty...

Page 32: ...irectly connected to the main product and or products of which without reasonable doubt can be assumed that wear and tear show a different pattern than the main product are not covered by the Eminent warranty Products are not covered by the Eminent warranty when subjected to incorrect improper use external influences and or when opened by parties other than Eminent 15 0 Declaration of Conformity T...

Page 33: ...EM4172 myiSharing NAS ...

Page 34: ...ppareil Android 10 8 2 Installer l application sur un appareil Apple 10 8 3 Configurer l appli pour se connecter à votre NAS 10 9 0 Connexion locale ou à distance via un navigateur Web 12 10 0 Changer le nom de votre NAS 13 11 0 Foires aux questions et réponses et autres informations 14 12 0 Service et assistance 14 13 0 Avertissements et mises en garde 15 14 0 Conditions de garantie 16 15 0 Décla...

Page 35: ...rouge cela signifie que le NAS subit une erreur Si cette LED est orange cela signifie que le port USB frontal a détecté une clé USB Copy Bouton Copier Appuyez sur ce bouton pour lancer la copie des données depuis le périphérique USB qui est connecté au port USB à l avant vers le NAS Port hôte USB 2 0 Arrière Port hôte USB 2 0 Connexion LAN Gigabit 12V CC Prise du cordon d alimentation Reset Bouton...

Page 36: ...nce à clignoter Le système arrête alors tous les services et environ 20 secondes plus tard il se met hors tension Si pour une raison quelconque le système ne répond pas appuyez et maintenez le bouton d alimentation pendant 6 secondes pour forcer l arrêt du système et couper l alimentation 3 0 Préparation de l EM4172 3 1 Montage du des disque s dur s Le NAS est capable d utiliser un ou deux disques...

Page 37: ... dur dans sa position Si vous souhaitez monter un disque dur supplémentaire répétez la procédure ci dessus Référez vous également à l image ci dessous 5 Une fois que vous avez terminé le montage du des disque s dur s vous devez refermer le boîtier Remettez en place le panneau avant sur le boîtier et resserrez la vis en partie inférieure de la face avant Serrez aussi les vis de disque dur fournies ...

Page 38: ...onnexion au NAS Il y a deux façons de se connecter au NAS Les deux méthodes sont expliquées 5 1 Connexion à l aide de l utilitaire de configuration Visitez www eminent online com remplissez EM4172 dans la barre de recherche et cliquez sur la flèche bleue pour rechercher votre produit Référez vous également à l image ci dessous Lorsque votre produit a été trouvé cliquez sur Assistance Dans Pilotes ...

Page 39: ...est correcte une adresse IP s affiche 4 Ouvrez le navigateur Internet de votre ordinateur 5 Saisissez l adresse IP du NAS dans la barre d adresse du navigateur et appuyez sur la touche Entrée de votre clavier 6 Vous êtes alors invité à saisir un nom d utilisateur et un mot de passe Remplissez comme Nom d utilisateur admin Remplissez comme Mot de passe admin 7 Appuyez sur la touche Entrée de votre ...

Page 40: ... l option Auto et appuyez sur OK 6 Sur l écran suivant cliquez sur Auto 7 Confirmez que les disques durs vont être effacés en cliquant 2 fois sur OK 6 2 Formatage du des disque s dur s 1 Cliquez sur Gestionnaire de disques en bas de la page Référez vous également à l image ci dessous ...

Page 41: ...ivez les étapes indiquées à l écran pour lancer le formatage des disques durs 5 Une fois que le formatage des disques durs est terminé une notification s affiche Référez vous également à l image ci dessous 6 Cliquez sur OK 7 Le formatage des disques durs est maintenant terminé 7 0 Configuration de l EM4172 l aide du manuel avancé en ligne 1 Utilisez le manuel avancé en ligne qui vous indique comme...

Page 42: ...er l application sur un appareil Android Ouvrez le Play Store sur votre appareil Android et recherchez myisharing Sélectionnez l appli Myisharing iSharing et appuyez sur Installer Une fois l installation terminée vous pouvez utiliser l application 8 2 Installer l application sur un appareil Apple Ouvrez l App Store sur votre appareil Apple et recherchez myisharing Sélectionnez l appli Myisharing i...

Page 43: ...S 2 Entrez l adresse MAC de votre NAS ou le nom de votre NAS dans le champ Serveur 3 Entrez votre nom d utilisateur et votre mot de passe nom d utilisateur et mot de passe par défaut admin 4 Cliquez sur CONNEXION ...

Page 44: ...ce via un navigateur Web Le NAS est accessible via un navigateur Web à partir de votre réseau local ou à distance par Internet 1 Ouvrez votre navigateur Web par exemple Internet Explorer Firefox Safari 2 Allez sur http isharing eminent online com ...

Page 45: ...ur Entrer 6 Un écran de connexion va suivre 7 Connectez vous à votre NAS Le nom d utilisateur et mot de passe par défaut pour l administrateur sont admin Pour des raisons de sécurité nous vous recommandons fortement de changer le mot de passe après la première connexion 10 0 Changer le nom de votre NAS Pour se rappeler du nom de votre NAS vous pouvez remplacer le nom de l adresse MAC par défaut en...

Page 46: ...ilisation du produit veuillez remplir le formulaire de support sur le site Web Ce manuel d utilisation a été conçu avec soin par les techniciens de Eminent Si vous rencontrez des problèmes lors de l installation ou de l utilisation du produit veuillez remplir le formulaire d assistance disponible sur le site Web www eminent online com support Vous pouvez aussi nous contacter par téléphone Vous tro...

Page 47: ... Dans la plupart des cas ceci concerne des produits électriques Une mauvaise ou incorrecte utilisation peut conduire à de sévères blessures La réparation du produit doit être effectuée par un agent qualifié de Eminent La garantie prend fin dès le moment oú les produits ont étés réparés par le client et ou mals utilisés Pour de plus amples informations sur les conditions de garantie merci de visite...

Page 48: ... sont soumis à une usure différente ne sont pas couverts par la garantie d Eminent Les produits ne sont pas couverts par la garantie d Eminent lorsqu ils ont fait l objet d une mauvaise utilisation ou d une utilisation inadéquate lorsqu ils ont été soumis à des influences extérieures et ou lorsqu ils ont été démontés par du personnel autre que celui agréé par Eminent 15 0 Déclaration de conformité...

Page 49: ...EM4172 myiSharing NAS ...

Page 50: ...0 8 2 Instalar la aplicación en un dispositivo Apple 10 8 3 Configurar la aplicación para conectarse su dispositivo NAS 10 9 0 Inicio de sesión local o remoto a través del explorador Web 12 10 0 Cambiar el nombre de su dispositivo NAS 13 11 0 Preguntas más frecuentes y otra información relacionada 13 12 0 Servicio de atención al cliente y soporte técnico 13 13 0 Advertencias y puntos de atención 1...

Page 51: ... LED se ilumina en color rojo significa que el dispositivo NAS tiene un error Si este LED se ilumina en color naranja significa que el puerto USB delantero ha detectado una llave de memoria USB Copy Botón Copiar Presione este botón para iniciar la copia de datos desde el dispositivo USB conectado en el puerto USB delantero al dispositivo NAS Puerto de host USB 2 0 Parte posterior Puerto de host US...

Page 52: ...r azul comience a parpadear A continuación el sistema cerrará todos los servicios y aproximadamente 20 segundos más tarde se apagará Si por alguna razón el sistema deja de responder presione sin soltar el interruptor de alimentación durante 6 segundos para obligar al sistema a que se apague y corte la corriente 3 0 Preparar el dispositivo EM4172 3 1 Montar los discos duros El dispositivo NAS puede...

Page 53: ...ándolo en su posición Si desea montar un disco duro adicional repita el procedimiento anterior Consulte también la imagen siguiente 5 Una vez montados los discos duros es necesario cerrar la carcasa de nuevo Vuelva a colocar el panel delantero en la carcasa y apriete de nuevo el tornillo situado en la parte inferior de dicho panel Asimismo apriete los tornillos de la unidad de disco duro suministr...

Page 54: ... el botón de alimentación del dispositivo NAS para iniciar este 5 0 Iniciar sesión con el dispositivo NAS Existen dos formas de iniciar sesión en el dispositivo NAS A continuación se explican varias formas 5 1 Iniciar sesión mediante la utilidad de configuración Visite www eminent online com escriba EM4172 en la barra de búsqueda y haga clic en la flecha de color azul para buscar el producto Consu...

Page 55: ...apítulo anterior 2 Haga doble clic en el icono que se colocará en el escritorio 3 Si todo va bien se mostrará una dirección IP 4 Abra el explorador Web de su PC 5 Escriba la dirección IP del dispositivo NAS en la barra de direcciones del explorador Web y presione la tecla Entrar del teclado 6 A continuación se le pedirá que escriba un nombre de usuario y una contraseña Como nombre de usuario escri...

Page 56: ...ático y presione Aceptar 6 En la pantalla siguiente haga clic en Automático 7 Confirme la eliminación de las unidades de disco haciendo clic dos veces en Aceptar 6 2 Dar formato a los discos duros 1 Haga clic en Administrador de discos en la parte inferior de la página Consulte también la imagen siguiente ...

Page 57: ...a utilizar la primera opción Automático Haga clic en Aceptar 4 Siga los pasos que se muestran en la pantalla para iniciar el formato de los discos duros 5 Cuando el formato de los discos se haya completado se mostrará una notificación Consulte también la imagen siguiente 6 Haga clic en Aceptar 7 Con esto se habrá completado la operación de formato de los discos duros ...

Page 58: ...72 8 0 Cómo acceder al dispositivo NAS en su dispositivo Android o Apple 8 1 Instalar la aplicación en un dispositivo Android Abra Play Store en su dispositivo Android y busque myisharing Seleccione la aplicación Myisharing iSharing y presione Instalar Cuando la instalación haya finalizado podrá utilizar la aplicación 8 2 Instalar la aplicación en un dispositivo Apple Abra App Store en su disposit...

Page 59: ...SPAÑOL 2 Escriba la dirección MAC o el nombre del dispositivo NAS en el campo del servidor 3 Escriba su nombre de usuario y contraseña el valor predeterminado de ambos es admin 4 Haga clic en INICIAR SESIÓN ...

Page 60: ...rvidor doméstico predeterminado es la dirección MAC de la unidad NAS Puede encontrar este número en una pegatina situada en el paquete del embalaje o en el propio dispositivo 4 Si lo prefiere seleccione la opción Recordármelo 5 Haga clic en Entrar 6 Aparecerá una pantalla de inicio de sesión 7 Inicie sesión en su dispositivo NAS El nombre de usuario y la contraseña predeterminados para el administ...

Page 61: ...nadas con el producto Eminent actualizará esta página frecuentemente para garantizar que dispone de la información más reciente Visite la página Web www eminent online com para obtener información acerca de su producto 12 0 Servicio de atención al cliente y soporte técnico Este manual de usuario ha sido redactado por técnicos expertos de Eminent con sumo cuidado Si experimenta algún problema para ...

Page 62: ...s internacionales mencionadas en esta tabla no incluyen los costes de llamadas por teléfono móvil 13 0 Advertencias y puntos de atención Debido a las leyes directivas y reglamentos establecidos por el Parlamento Europeo algunos dispositivos inalámbricos pueden estar sujetos a limitaciones relativas a su uso en determinados miembros de estados europeos En ciertos miembros de estados de Europa el us...

Page 63: ...a las partes inextricablemente conectadas al producto principal y o montadas en éste Los adaptadores de fuente de alimentación las baterías las antenas y el resto de productos no integrados en el producto principal o no conectados directamente a éste y o los productos de los que sin duda razonable se pueda asumir que el desgaste y rotura presentan un patrón diferente al del producto principal no s...

Page 64: ...16 ESPAÑOL EM4172 01 2013 ...

Page 65: ...EM4172 myiSharing NAS ...

Page 66: ...8 2 Installazione dell applicazione su un dispositivo Android 10 8 3 Impostazione dell applicazione per il collegamento al NAS 10 9 0 Login locale o remoto tramite browser web 12 10 0 Modifica del nome del NAS 13 11 0 Domande frequenti e altre informazioni correlate 13 12 0 Assistenza e supporto 13 13 0 Avvertenze e punti di atenzione 14 14 0 Condizioni di garanzia 15 15 0 Dichiarazione di conform...

Page 67: ...eriti i dati Se il LED è rosso il NAS presenta un Se il LED è arancione la porta USB anteriore ha rilevato una chiavetta USB Copy Tasto di copia Premere il tasto per iniziare a copiare i dati dal dispositivo USB collegato alla porta USB anteriore al NAS Porta host USB 2 0 Indietro Porta host USB 2 0 Connessione Gigabit LAN CC 12 V Connettore per il collegamento Reset Tasto di reset Utilizzato per ...

Page 68: ...ggiare Il sistema chiude tutti i servizi quindi dopo circa 20 secondi si spegne Se per qualche motirvo il sistema non risponde tenere premuto l interruttore di alimentazione per 6 secondi per forzare lo spegnimento del sistema ed non fornire alimentazione 3 0 Preparazione di EM4172 3 1 Montaggio degli hard disk Il NAS è in grado di utilizzare uno o due hard disk contemporaneamente Attenersi alle s...

Page 69: ...osizione Per montare un altro hard disk ripetere la procedura di cui sopra Fare inoltre riferimento alla seguente immagine 5 Al termine del montaggio degli hard disk chiudere di nuovo il case Riposizionare il pannello anteriore e serrare nuovamente la vite nella parte inferiore del pannello anteriore Serrare inoltre le viti dell HDD in dotazione per fissare gli hard disk montati Fare inoltre rifer...

Page 70: ...gin al NAS Vi sono due metodi per effettuare il login al NAS Verranno descritti entrambi i metodi 5 1 Login mediante utility di installazione Visitare il sito www eminent online com inserire EM4172 nella barra di ricerca e fare clic sulla freccia blu per cercare il prodotto Fare inoltre riferimento alla seguente immagine Una volta trovato il prodotto fare clic su Assistenza In Driver software soft...

Page 71: ...ova sul desktop 3 Se corretto verrà mostrato l indirizzo IP 4 Aprire il browser web del computer 5 Inserire l indirizzo IP del NAS nella barra degli indirizzi del browser web e premere il tasto Invio della tastiera 6 Sarà chiesto di immettere nome utente e password Immettere admin su Nome utente Immettere admin su Password 7 Premere il tasto Invio della tastiera per visualizzare la pagina principa...

Page 72: ...ne Automatico e premere OK 6 Nella schermata successiva fare clic su Automatico 7 Confermare la cancellazione degli hard disk facendo clic su 2x OK 6 2 Formattazione degli hard disk 1 Fare clic su Gestione disco nella parte inferiore della pagina Fare inoltre riferimento alla seguente immagine ...

Page 73: ...ttenersi alle procedure visualizzate sullo schermo per avviare la formattazione degli hard disk 5 Al termine della formattazione degli hard disk viene visualizzata una notifica Fare inoltre riferimento alla seguente immagine 6 Fare clic su OK 7 La formattazione degli è completata 7 0 Impostazione di EM4172 tramite il manuale avanzato online 1 Utilizzare il manuale avanzato online che descrive l im...

Page 74: ...one su un dispositivo Android Aprire Play Store sul dispositivo Android e cercare myisharing Selezionare l applicazione Myisharing iSharing e premere Installa Al termine dell installazione è possibile utilizzare l applicazione 8 2 Installazione dell applicazione su un dispositivo Android Aprire App Store sul dispositivo Apple e cercare myisharing Selezionare l applicazione Myisharing iSharing e pr...

Page 75: ...11 ITALIANO 2 Immettere l indirizzo MAC del NAS o il nome del NAS nel campo del server 3 Immettere nome utente e password nome utente e password predefiniti admin 4 Fare clic su LOGIN ...

Page 76: ...erver principale predefinito corrisponde all indirizzo MAC del NAS Questo numero si trova nell etichetta inferiore sulla confezione o sul dispositivo stesso 4 Se lo si preferisce selezionare l opzione Memorizza profilo utente 5 Fare clic su Invio 6 Viene visualizzata una schermata di login 7 Effettuare il login al NAS Il nome utente e la password predefiniti per l amministratore sono admin Per mot...

Page 77: ...curare che siano sempre disponibili le informazioni più recenti Visitare www eminent online com per altre informazioni sul prodotto 12 0 Assistenza e supporto Questo manuale destinato agli utenti è stato scritto con attenzione dal personale tecnico di Eminent Se si hanno problemi d installazione o d uso del prodotto completare il modulo d assistenza sul sito Questo manuale d uso è stato redatto in...

Page 78: ...o Si prega di contattare il governo locale per ricevere piú informazioni per quanto riguarda queste limitazioni Seguire sempre le istruzioni del manuale specialmente quando si riferisce a prodotti che bisognano essere assemblati Avviso Nella maggior parte dei casi si riferisce a un dispositivo elettronico L abuso o l uso improprio puó portare a lesioni forte Le riparazioni del prodotto devono esse...

Page 79: ...ti non integrati o direttamente collegati al prodotto principale e o i prodotti la cui usura mostra senza ombra di dubbio uno sviluppo diverso rispetto al prodotto principale non sono coperti da garanzia Eminent I prodotti non sono coperti dalla garanzia Eminent quando sono soggetti ad uso scorretto inappropriato ad influenze esterne e o quando sono aperti da persone non autorizzate da Eminent 15 ...

Page 80: ...EM4172 myiSharing NAS ...

Page 81: ...rät installieren 10 8 3 App zur Verbindung mit Ihrem NAS einrichten 10 9 0 Lokale oder externe Anmeldung per Webbrowser 12 10 0 Ihren NAS Namen ändern 13 11 0 Häufig gestellte Fragen und weitere wichtige Informationen 13 12 0 Kundendienst und Unterstützung 13 13 0 Warnhinweise und zu beachtende Punkte 14 14 0 Garantiebedingungen 15 15 0 Konformitätserklärung 15 1 0 Einleitung Wir gratulieren Ihnen...

Page 82: ... diese LED rot leuchtet ist ein Fehler am NAS aufgetreten Wenn diese LED orange leuchtet wurde am vorderen USB Port ein USB Speicherstick erkannt Copy Kopieren Taste Mit dieser Taste starten Sie den Kopiervorgang der Daten von dem am vorderen USB Port des NAS angeschlossenen USB Gerät USB 2 0 Host Port Zurück USB 2 0 Host Port Gigabit LAN Anschluss DC 12V Hier schließen Sie das Netzteil an Reset R...

Page 83: ...runter und schaltet sich etwa 20 Sekunden später ab Falls das System aus irgendeinem Grund nicht reagiert halten Sie die Ein Austaste zum Erzwingen einer Systemabschaltung und zur Unterbrechung der Stromversorgung 6 Sekunden gedrückt 3 0 EM4172 vorbereiten 3 1 Festplatte n einbinden Der NAS kann ein oder zwei Festplatten gleichzeitig nutzen Binden sie die Festplatte n anhand der nachstehenden Schr...

Page 84: ...e eine weitere Festplatte einbinden möchten wiederholen Sie das obige Verfahren Beachten Sie auch die nachstehende Abbildung 5 Sobald Sie mit dem Einbinden der Festplatte n fertig sind schließen Sie das Gehäuse wieder Bringen Sie die Frontblende wieder am Gehäuse an ziehen Sie die Schraube an der Unterseite der Frontblende fest Ziehen Sie zum Fixieren der eingebundenen Festplatte n auch die mitgel...

Page 85: ...s NAS die Ein Austaste am NAS 5 0 Am NAS anmelden Es gibt zwei Möglichkeiten zur Anmeldung am NAS Beide Methoden werden erklärt 5 1 Per Einrichtungsdienstprogramm anmelden Besuchen Sie www eminent online com geben Sie EM4172 in das Suchfeld ein klicken Sie zur Suche nach Ihrem Produkt auf den blauen Pfeil Beachten Sie auch die nachstehende Abbildung Sobald Ihr Produkt gefunden wurde klicken Sie au...

Page 86: ...e auf das Symbol am Desktop 3 Bei richtiger Vorgehensweise wird eine IP Adresse angezeigt 4 Öffnen Sie den Webbrowser Ihres Computers 5 Geben Sie die IP Adresse des NAS in die Adressleiste des Internetbrowsers ein und drücken Sie die Enter Taste der Tastatur 6 Sie werden aufgefordert Benutzernamen und Kennwort einzugeben Eingabe bei Benutzername admin Eingabe bei Kennwort admin 7 Drücken Sie die E...

Page 87: ...e die Option Auto klicken Sie auf OK 6 Klicken Sie am nächsten Bildschirm auf Auto 7 Bestätigen Sie die Löschung der Festplatte n indem Sie zweimal OK anklicken 6 2 Festplatte n formatieren 1 Klicken Sie unten auf der Seite auf Festplattenmanager Beachten Sie auch die nachstehende Abbildung ...

Page 88: ...e zum Formatieren der Festplatte n die Bildschirmanweisungen 5 Sobald die Formatierung der Festplatte n abgeschlossen ist erscheint eine Benachrichtigung Beachten Sie auch die nachstehende Abbildung 6 Klicken Sie auf OK 7 Nun ist die Formatierung der Festplatte n abgeschlossen 7 0 EM4172 über die erweiterte Anleitung online einrichten 1 Verwenden Sie die erweiterte Online Anleitung die Ihnen die E...

Page 89: ...zu 8 1 App am einem Android Gerät installieren Öffnen Sie den Play Store an Ihrem Android Gerät und suchen Sie nach myisharing Wählen Sie die App Myisharing iSharing und anschließend Installieren Sobald die Installation abgeschlossen ist können Sie die App nutzen 8 2 App an einem Apple Gerät installieren Öffnen Sie den App Store an Ihrem Apple Gerät und suchen Sie nach myisharing Wählen Sie die Ap...

Page 90: ...11 DEUTSCH 2 Geben Sie MAC Adresse oder Namen des NAS in das Serverfeld ein 3 Geben Sie Ihren Benutzernamen und das Kennwort ein Standardbenutzername kennwort admin 4 Klicken Sie auf Anmelden ...

Page 91: ...e com 3 Ihr Standardheimservername ist die MAC Adresse Ihres NAS Laufwerks Sie finden diese Nummer auf dem Etikett an der Unterseite bzw an der Verpackung oder am Gerät selbst 4 Wählen Sie auf Wunsch Angemeldet bleiben 5 Klicken Sie auf Enter 6 Ein Anmeldebildschirm erscheint 7 Melden Sie sich an Ihrem NAS an Standardbenutzername und kennwort des Administrators lauten admin Aus Sicherheitsgründen ...

Page 92: ...ifen können Besuchen Sie für weitere Informationen über Ihr Produkt www eminent online com 12 0 Kundendienst und Unterstützung Diese Bedienungsanleitung wurde sorgfältig von Eminent Experten geschrieben Falls es dennoch zu Problemen bei der Installation oder Nutzung Ihres Gerätes kommen sollte füllen Sie bitte das Kundendienstformular auf unserer Website aus Diese Bedienungsanleitung wurde sorgfäl...

Page 93: ...unterliegen Die Verwendung solcher Produkte könnte in einigen europäischen Mitgliedsstaaten verboten werden Wenden Sie sich an die lokale Regierung für weitere Informationen zu diesen Einschränkungen Befolgen Sie unbedingt die Anweisungen im Handbuch insbesondere wenn es sich um Geräte handelt die montiert werden müssen Warnung In den meisten Fällen handelt es sich um ein elektronisches Gerät Fals...

Page 94: ... sind Netzteile Batterien Akkus Antennen und sämtliche sonstigen Produkte die nicht in das Hauptprodukt integriert oder direkt damit verbunden sind sowie Produkte deren Verschleiß zweifellos vom Verschleiß des Hauptproduktes abweicht werden nicht durch die Eminent Garantie abgedeckt Die Eminent Garantie gilt nicht wenn Produkte falschem unsachgemäßem Gebrauch oder externen Einflüssen ausgesetzt od...

Page 95: ...EM4172 myiSharing NAS ...

Page 96: ... alkalmazást az Android eszközön 10 8 2 Telepítse az alkalmazást az Apple eszközön 10 8 3 Az alkalmazás beállítása a NAS hoz történő csatlakoztatáshoz 10 9 0 Helyi vagy távoli belépés WEB böngészővel 11 10 0 Változtassa meg a NAS nevét 12 11 0 Gyakran ismételt kérdések és egyéb információk 13 12 0 Szerviz és támogatás 13 13 0 Figyelmeztetések és felhívások 14 14 0 Jótállási feltételek 15 15 0 Megf...

Page 97: ... egy USB memória stick van Copy Másolás gomb Nyomja meg a gombot ha az előlapi USB portban lévő USB eszközről adatokat szeretne másolni a NAS ra USB 2 0 host port Hátoldal USB 2 0 host port Gigabit LAN csatlakozó DC 12V Tápcsatlakozó Reset Reset gomb Visszaállítja a NAS gyári állapotát Rendszer biztonsági zár 2 2 Ki Be kapcsolás folyamata Csatlakoztassa a tápot az eszközhöz majd ezután a fali konn...

Page 98: ...erleállást és a tápellátás megszüntetését 3 0 Az EM4172 előkészítése 3 1 A merevelemezek elhelyezése A NAS egy vagy két merevelemezzel is tud működni A következő lépések szükségesek a merevlemezek elhelyezéséhez 1 Állítsa a NAS t a feje tetejére 2 Keresee meg az előlapi panel alján a csavart és csavarozza ki ahogy a képen látható 3 Emelje fel az előlapi panelt ahogy a képen látható 4 Fogja meg a m...

Page 99: ...ze az előlapi panelt vissza a dobozra majd csavarozza vissza az előlapi panel alján Rögzítse a merevlemezeket is a mellékelt csavarokkal ahogy a képen látható 4 0 A NAS csatlakoztatása 1 Csatlakoztassa az UTP kábelt a NAS Gigabit csatlakozójához 2 Csatlakoztassa a kábel másik végét a routerhez vagy switch hez ne csatlakoztassa közvetlenül a számítógéphez 3 Csatlakoztassa a DC 12V tápot a NAS hoz 4...

Page 100: ...résznélmegtalálja az iSharing Finder t melyet az EM4172 telepítésénél használhat 1 Töltse le csomagolja ki és telepítse az iSharing Finder szoftver csomagot 2 Kattintson az ikonra az asztalon 3 Ha mindent jól tett eddig akkor egy IP címet foglátni 4 Válassza ki az IP címet kattintson a Connect re 5 Most ki kell töltenia a felhasznlónevet és a jelszót Írja be a Username hez admin Írja be a Password...

Page 101: ...ót Írja a Username hez admin Írja a Password höz admin 7 Nyomja meg az Enter t és ezután feltűnika NAS főoldala 6 0 Merevlemez telepítése Hogy minden jellemzőt és funkciót tökéletesen tudjon használni létre kell hozni egy HOME partíciót 6 1 Merevlemezek telepítése 1 Jelentkezzen be az eszközzel 2 A következő képernyő fog feltűnni 3 Válassza ki a kívánt merevlemezt 4 Kattintson a management re 5 Vá...

Page 102: ...olja vissza hogy merevelmezek törlésre kerülnek az OK gombra történő dupla kattintással 6 2 A merevlemezek formázása 1 Kattintsona Disk Manager re a lap alján ahogy a képen látható 2 Egy új képernyő fog feltűnni mely megkérdi hogy legyenek a merevlemezek formázva ...

Page 103: ... 6 Kattintson az OK ra 7 A merevlemez formázása elkészült 7 0 Az EM4172 beállítása az online bővített használati utasítással 1 Használja az online bővített használati utasítást mely megmutatja hogy kell beállítani az EM4172 t 2 Látogassa meg a www eminent online com honlapot és írja be az EM4172 t a keresőbe majd nyomja meg a kék nyilat ahogy a képen látható 3 Amkor a terméket megtalálta kattintso...

Page 104: ...közén és keresse meg a Myisharing iSharing alkalmazást majd telepítse Amikor kész máris használhatja 8 2 Telepítse az alkalmazást az Apple eszközön Nyissa meg a App Store t Apple eszközén és keresse meg a Myisharing iSharing alkalmazást majd telepítse Amikor kész máris használhatja 8 3 Az alkalmazás beállítása a NAS hoz történő csatlakoztatáshoz 1 Az alkalmazás megnyitása után a következő képernyő...

Page 105: ...ileg a felhasználónév és aassword is admin volt 4 Kattintson a LOGIN ra 9 0 Helyi vagy távoli belépés WEB böngészővel A NAS elérhető egy böngészőn keresztül a helyi hálózatban vagy távolról az Interneten 1 Nyissa meg a Web böngészőjét e g IE Firefox Safari ...

Page 106: ...5 Kattintson az Enter re 6 A bejelentkező oldal fog feltűnni 7 Belépés a NAS ra Az eredeti felhasználónév és jelszó az admin Javasoljuk hogy az első belépés után változtassa meg a jelszót 10 0 Változtassa meg a NAS nevét Hogy megjegyezze a NAS nevét megváltoztathatja a MAC címet egy könnyen megjegyezhető névre 1 Lépjen be a NAS rendszerbe és menjen a Preferences re 2 válassza ki a Portal Server t ...

Page 107: ...asználati utasítást az Eminent szakemberei írták Ha problémát tapasztal a termék telepítése vagy használata során töltse ki a támogatási űrlapot a weboldalon www eminent online com support Telefonon is elérhetők vagyunk Az alábbiakban megtalálhatja az egyes támogatott országok elérhetőségeit Ország Telefonszám Percdíj Belgium holland 070 277 286 0 30 Belgium francia 070 277 286 0 30 Dánia 45 69918...

Page 108: ...a legtöbb esetben elektronikus eszközökre is vonatkozik A hibás helytelen használat súlyos személyi sérüléshez vezethet A javítást csak az Eminent képzett szakemberei végezhetik A garancia azonnal érvényét veszíti ha a terméket saját maga próbálja megjavítani vagy azt rendeltetésellenes használják A bővebb garanciafeltételeket megtekintheti weboldalunkon www eminent online com warranty Megjegyzés ...

Page 109: ...inden kétséget kizáróan feltételezhető hogy a főtermék normál elhasználódásától eltérő mértékű elhasználódást mutatnak Az Eminent garanciája nem vonatkozik azon termékekre amelyeket rendeltetés ellenesen használnak vagy külső befolyásnak tettek ki és vagy az Eminent cégtől eltérő más személy nyitott ki 15 0 Megfelelőségi nyilatkozat Az Ön biztonsága illetve a terméknek az Európai Bizottság által m...

Page 110: ......

Page 111: ......

Page 112: ......

Reviews: