


Operations Manual
January 2017
FGD-MAN-0047
24
3.
The message Coil Status displays. The display then shows Energized
YES? and then De-Energized YES?.
4.
Press the Calibration button or use the reed switch to select. The
flashing YES confirms the selection. If no selection is made, Coil
Status option is repeated.
5.
The message Latch Status displays. The display then shows
Latching YES? and then Non-Latching YES?.
6.
Press the Calibration button or use the reed switch to select. The
flashing YES confirms the selection. If no selection is made, Latch
Status option is repeated.
7.
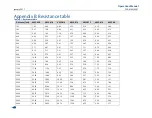
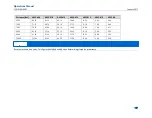
The message Set High displays.
The High Alarm level cannot be set to a value lower than the Low
Alarm level (as set in Step 2), nor higher than the maximum of 55%
LEL. The High Alarm level is displayed in increments of 5 greater
than the Low Alarm level (as set in Step 2).
8.
Repeat Steps 3 through Step 6 to complete the High Alarm level,
coil, and latch status settings.
If no selection is made, a five-minute timer expires, in which case the
unit returns to normal operation.
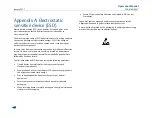
8.3
Enter Restricted menu
The Restricted menu allows you to select:
Sensor Separation Distance (Extend sensor separation)
Low Power Options (optional)
1.
Press and hold the Calibration button or hold the magnet to the
reed switch to enter the Main menu; wait for the countdown, from
10 to 0, to end.
2.
When Enter restricted menu YES? Displays, press the Calibration
button or use the reed switch to select.
The flashing YES confirms the selection.
3.
When Are you sure? YES? displays, press the Calibration button or
use the reed switch to select.
The flashing YES confirms the selection.
8.3.1
Extend sensor separation
1.
Enter the Restricted menu. Refer to
2.
When Extend Sensor Separation YES? displays, press the
Calibration button or use the reed switch to select.
The flashing YES confirms the selection.
3.
Sensor Separation = 75 to 150 feet YES? displays first, then Sensor
Separation = 0 to 75 feet YES?. Press the Calibration button or use
the reed switch to select.
The flashing YES confirms the selection.
The sensor separation distance, as set for this option, must be the same
as the physical length of sensor wiring; (within the range: 0 to 75 ft. or
75 to 150 ft).
To avoid damaging the sensor, the factory default of 0 to 75 ft must be
used for non-separation. If the sensor and controller are separated by a
distance greater than 75 ft., 75 to 150 ft. must be entering in the menu
under
8.3.2
Set low power options - optional
Some Millennium versions have two optional low power features to
reduce overall power consumption. Use this option to:
Dim the LED display (display will still be visible in most lighting
conditions - default setting)
Disable the 4–20 mA analog output (for applications requiring
only relay output - default setting)
Enter the Restricted menu. Refer to
1.
When Set Low Power Options YES? displays, press the Calibration
button or use the reed switch to select.
The flashing YES confirms the selection.
2.
When Lower Display Brightness YES? displays, press the Calibration
button or use the Reed Switch to select or wait until Display Full
Summary of Contents for Net Safety MLP-A-SC1100
Page 2: ......
Page 10: ......
Page 12: ...Operations Manual January 2017 FGD MAN 0047 2 ...
Page 22: ...Operations Manual January 2017 FGD MAN 0047 12 ...
Page 26: ...Operations Manual January 2017 FGD MAN 0047 16 ...
Page 28: ...Operations Manual January 2017 FGD MAN 0047 18 ...
Page 32: ...Operations Manual January 2017 FGD MAN 0047 22 ...
Page 38: ...Operations Manual January 2017 FGD MAN 0047 28 ...
Page 45: ...Operations Manual FGD MAN 0047 January 2017 35 ...
Page 47: ...Operations Manual FGD MAN 0047 January 2017 37 ...
Page 51: ...Operations Manual FGD MAN 0047 January 2017 41 ...
Page 53: ...Notes ...
Page 54: ...Notes ...
Page 55: ......