24
1
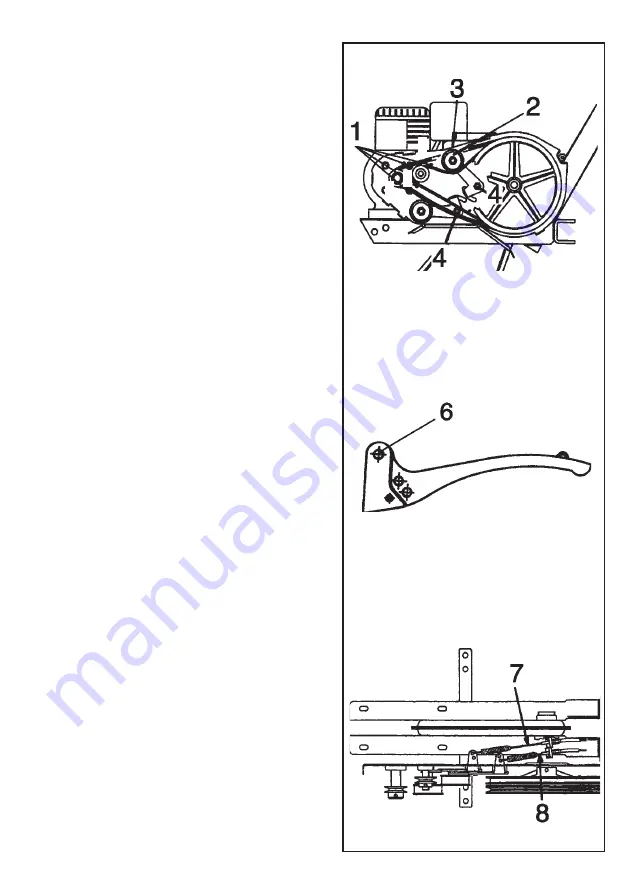
Fig. 9
Fig. 10
Fig. 11
MAINTENANCE
1) Periodically oil joints, control wires
and the belt-tightener support pin.
2) Keep the machine and knifes clean.
3) Periodically, at least once a season,
check the tightness of nuts and bolts,
mainly those concerning the rotary hoe.
To change the oil and service the engi-
ne (spark plugs, air filter, adjustments)
refer to the provided engine handbook.
IMPORTANT WARNINGS
1. After having assembled the belts, che-
ck that these are inside stakes 1 (Fig. 9).
2. In order to avoid great damage to the
rear gear belt, adjust the control wires
in such a way that the external diameter
of the belt-tightener skims the external
profile of bulkhead 2 (Fig. 9).
3. When assembling the belt cover hood,
pull the control levers in order to avoid
the belt from coming out of the pulley
races.
4. Avoid an excessive tightening of nuts
4 as this would cause an incomplete re-
turn of the belt-tightener and consequen-
tly would wear and break the belt.; there-
fore, check that the belt-tightener moves
freely along the whole stroke (Fig. 9).
5. Avoid an excessive tightening of screws
6 as this would prevent the lever return,
loosen if necessary (Fig. 10).
6. Check that the adjusters and the sprin-
gs (for the forward and reverse control) are
assembled according to Fig. 11:
- Forward gear drive control: lever n
°
2
on handlebar (7).
- Reverse gear drive control: lever n
°
7
on handlebar (if applicable) (8).


