background image

16

17

EQ Setting Combine

In the line "f0" tap on the band you want to 

adjust.  A pop-up window appears to enter 

the value of the center frequency you want. 

Confirm with "OK" 

In the line "Q" tap on the band you want to 

adjust. A pop-up window appears to enter 

the value of the quality factor you want. 

Confirm with "OK" 

.  Instead you can 

also touch “-“ or “+” to adjust the Q factor in 

0.1 steps. 

The quality factor (Q factor) determines the 

effect of the EQ filter (bandwidth) on the 

frequency band around the chosen center 

frequency f0.

Example1:

 f0 = 1000 Hz

desired bandwidth of EQ filter = 1000 Hz 

(i.e. 500 Hz – 1500 Hz)  Q = 1

Example2:

 f0 = 1000 Hz

desired bandwidth of EQ filter = 200 Hz 

(i.e. 900 Hz – 1100 Hz)  Q = 5

Q factors from 0.3 to 9.9 are possible.

If required, you can combine 

 each 

pair of channels. Simply use the “Combine” 

button in the upper right and chose the 

respective channels. 


If you just want to try out the presets and 

then go back to your personal preferences, 

exit without saving the app, and then 

restart. The app will then load your saved 

preferences from the amplifier.

Dynamic Bass

Located in the EQ menu, the “Bass” slider 

is a very effective way to increase bass per-

formance without overloading the speakers.

Level at “0” = no Dynamic Bass function 

active.

Level at “1” to “20” = the higher the 

value the higher the bass increasing. 

Simultaneously a strong subsonic filter 

is enabled to protect the speakers from 

deepest bass frequencies to avoid damage 

to them.

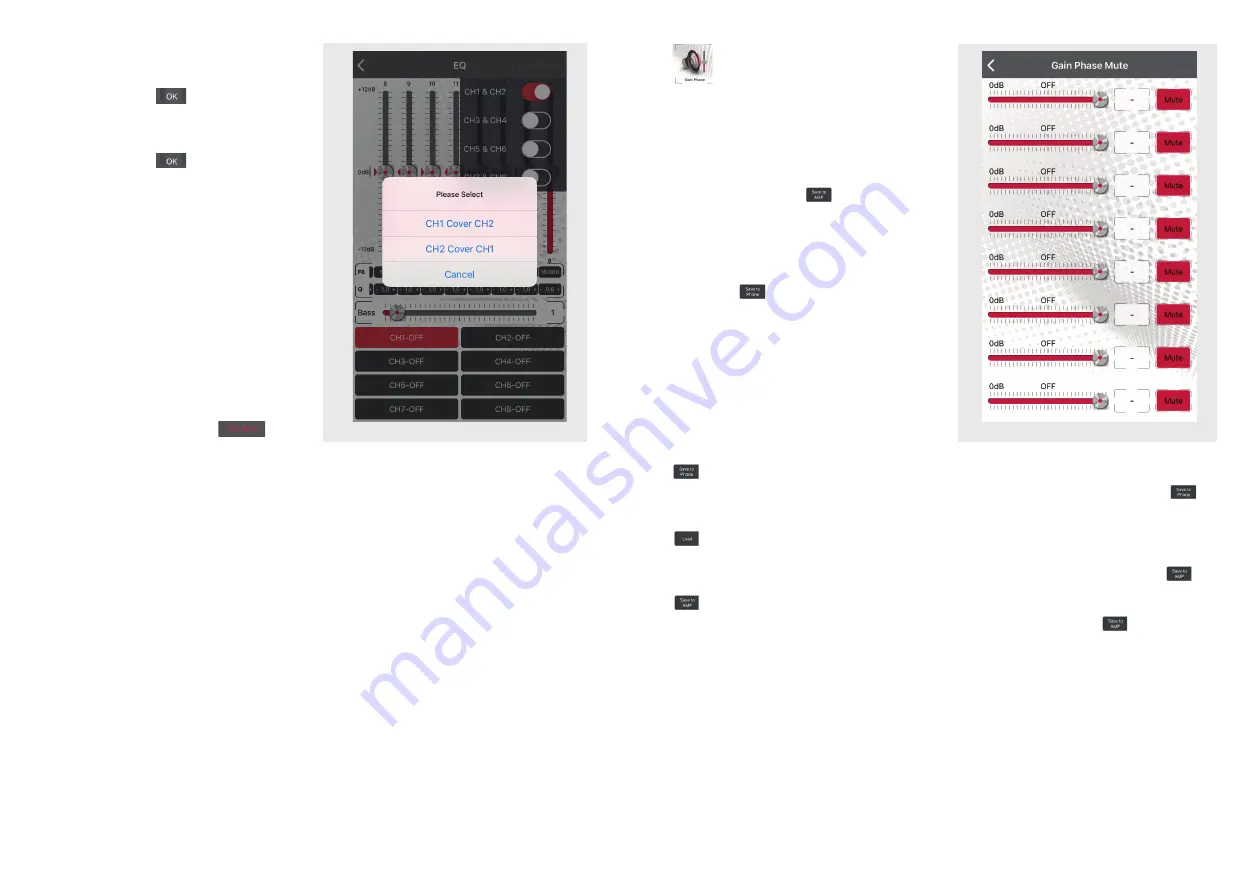
Gain


Gain 


In this menu you can make the following 

settings for each individual channel (from 

left to right): sound level, phase and mute. 


When you have done the preferences, 

go back to the main menu, and touch the 

"Save to Amp" button 

 to transfer the 

preferences to the amplifier. During the sav-

ing process do not switch off the amplifier 

as this may lead to malfunction and/or dam-

age. You can also save the preferences on 

your smartphone. To do this, press "Save 

on Phone" 

, and enter the desired 

filename.


Save to Phone

You can save the settings on your smartphone. To do this, press "Save on Phone" 

,  

enter the desired filename, and confirm with "OK".


Load

Shows a list of files saved on the smartphone. Touch the desired setup to load. If you now 

want to save the loaded setup permanently on the amp, press "Save to Amplifier" 

.


Save to Amp

When you have done the settings, touch the "Save to Amplifier" button 

 and chose the 

favorite to transfer the settings to the amplifier. During the saving process do not switch off 

the amplifier as this may lead to malfunction and/or damage. If you want to use this setup 

for future, just load the setup from the favorite list into the amp.

Summary of Contents for EA-D800

Page 1: ...INSTALLATION OPERATING MANUAL EINBAU BEDIENUNGSANLEITUNG 8 CH SMART DIGITAL AMPLIFIER EA D800 ...

Page 2: ...able if it does not correspond with the use There is a risk of fire injury and or damage to the product n Do not use nuts or fasteners part of the steering or braking systems for ground connection The fasteners and nuts used for the brake and steering systems or any other security system as well as various tanks must never be used for grounding Use of these parts as ground may deactivate the vehic...

Page 3: ...emote input of a separate amplifier WIRING DIAGRAM EA D800 Speaker Side panels 1 ACC in 11 GND 2 Rem out 12 B 3 RR in 13 FL out 4 RR in 14 FL out 5 RL in 15 FR out 6 RL in 16 FR out 7 FL in 17 RL out 8 FL in 18 RL out 9 FR in 19 RR out 10 FR in 20 RR out bn LINE IN CH1 CH2 CH3 CH4 CH6 CH5 CH1 CH2 CH3 CH4 CH6 CH5 CH7 CH8 POWER PROTECT SIGNAL TURN ON REMOTE TURN ON FUSE 30A BATT GND ANT CH4 IN CH4 I...

Page 4: ... of the car bat tery to the amplifier For protection of your car audio system against electrical fire hazards resulting from a short circuit of the main power cable to chassis ground a main fuse holder must be inserted within the first 30 cm of the positive main power cable The applicable fuse value must be matched to the limitations of your main power cable AND the current draw of the amplifier t...

Page 5: ... steps SELECTING THE OPERATION MODE FOR CH5 6 AND CH7 8 You must select and set the appropriate operation mode before you turn on the amplifier This operation mode depends on the speaker system connected to the respective ampli fier channels Select 4 ohm if the speaker system has a single 4 ohm voice coil If the speaker provides 2 x 2 ohm voice coil you need to connect both voice coils in series t...

Page 6: ...tore Scan to download and install the app from the EMPHASER homepage APP INSTALLATION EA D800 Favorites Press the star button at the top right and select one of the favorites 1 5 FUNCTIONS Connection to the smart mobile Start the app and touch the Connect button After the connection procedure is done successfully the app downloads the current settings from the amplifier UI Connecting Start the app...

Page 7: ...ver Crossover In this menu you can assign a frequency band to the connected speakers that cor responds to their recommended operat ing range You can chose to adjust each channel separately or combine each pair of channels Button Combine in the upper right corner In the left half of the diagram you can set the break frequency of the high pass filter as well as its slope In the right half are the br...

Page 8: ... 30 cm from the listening position SubW subwoofer is 2 00 cm from the listening position Value for FL SubW FL FL 2 00 0 80 cm Value for FR SubW FR FL 2 00 1 40 cm Value for RL SubW RL RL 2 00 0 50 cm Value for RR SubW RR RR 2 00 1 30 cm SubW remains at the value 0 Time Aligment Noise Gate Noise Gate function Noise Gate The Noise Gate function is dedicated to reduce the back ground noise of the hea...

Page 9: ...vel at 0 no Dynamic Bass function active Level at 1 to 20 the higher the value the higher the bass increasing Simultaneously a strong subsonic filter is enabled to protect the speakers from deepest bass frequencies to avoid damage to them Gain Gain In this menu you can make the following settings for each individual channel from left to right sound level phase and mute When you have done the prefe...

Page 10: ...em Level wo Sie noch Geräusche von aussen wahrnehmen können Es besteht sonst ein hohes Risiko eines Unfalls n Öffnen und oder modifizieren Sie das Produkt nicht Es besteht sonst ein hohes Risiko eines Unfalls Feuers oder elektrischen Schlags n Der Verstärker ist ausschliesslich für Anwendungen in PKW mit einem 12 Volt Bordnetz mit Masse vorgesehen Es besteht bei anderweitiger Verwendung ein hohes ...

Page 11: ...chtet rote LED ANSCHLUSS SCHEMA EA D800 Speaker 2 REM Out Schliessen Sie dieses Kabel an den Re mote Eingang eines separaten Verstärkers an Side panels 1 ACC in 11 GND 2 Rem out 12 B 3 RR in 13 FL out 4 RR in 14 FL out 5 RL in 15 FR out 6 RL in 16 FR out 7 FL in 17 RL out 8 FL in 18 RL out 9 FR in 19 RR out 10 FR in 20 RR out bn LINE IN CH1 CH2 CH3 CH4 CH6 CH5 CH1 CH2 CH3 CH4 CH6 CH5 CH7 CH8 POWER...

Page 12: ...lklemmenabgriff muss eine Hauptsicherung angebracht werden Absicherung des Pluskabels gegen Kurzschluss auf Fahrzeug Masse und dadurch resul tierendem Kabelbrand Verwenden Sie einen dem Stromkabelquerschnitt entsprechen den Sicherungswert Schliessen Sie das Masse Powerkabel am Verstärker und an einem geeigneten Masse punkt im Fahrzeug an Versuchen Sie das Massekabel so kurz wie möglich zu halten E...

Page 13: ...ichen Wählen Sie 2 Ohm wenn der angeschlossene Lautsprecher eine 2 Ohm Schwingspule hat Sollte der Lautsprecher eine 2 x 4 Ohm Doppelschwingspule besitzen so schalten Sie diese in parallel um eine Impedanz von 2 Ohm zu erreichen Wählen Sie BTL wenn der angeschlossene Lautsprecher im Brückenbetrieb verwendet wird ausschließlich 4 Ohm Wenn Sie den BTL Modus nutzen schließen Sie den Lautsprecher an C...

Page 14: ...n zum Download und zur Installation der APP aus Apple AppStore Scannen zum Download und zur Installation der APP von der EMPHASER Homepage Favoriten Drücken Sie den Stern Button oben rechts und wählen Sie einen der Favoriten 1 5 FUNKTIONEN Verbinden mit dem Smartphone Starten Sie die App und drücken Sie den Connect Button Nach dem Verbindungsaufbau lädt die App auto matisch die aktuellen Einstellu...

Page 15: ... deren empfohle nen Einsatzbereich entspricht Sie können die Einstellungen für jeden Kanal einzeln vornehmen oder die Einstellungen der jeweiligen Kanalpaare kombinieren Menü Combine in der oberen linken Ecke In der linken Hälfte des Diagramms wählen Sie die Flankensteilheit und die Einsatz frequenz des Hochpassfilters HPF in der rechten Hälfte die gleichen Parameter für den Tiefpassfilter LPF Die...

Page 16: ...örposition entfernt RR Hinten Rechts ist 1 30 m von der Hörposition entfernt SubW Subwoofer ist 2 00 m von der Hörposition entfernt Wert für FL SubW FL FL 2 00 0 80 m Wert für FR SubW FR FR 2 00 1 40 m Wert für RL SubW RL RL 2 00 0 50 m Wert für RR SubW RR RR 2 00 1 30 m SubW bleibt bei Wert 0 Time Aligment Noise Gate Noise Gate Funktion Noise Gate Noise Gate ist dazu gedacht mögliches Grundrausch...

Page 17: ...ung Gleichzeitig wird ein Subsonicfilter aktiviert der die Lautsprecher vor sehr tiefen Frequenzen schützt Gain Gain In diesem Menü können für jeden einzelnen Kanal folgende Einstellungen vorgenom men werden von links nach rechts Pegel Phase und Stummschaltung Wenn Sie die Einstellungen abgeschlos sen haben kehren Sie in das Hauptmenü zurück und berühren Sie den Save to Amp Button um die Einstellu...

Page 18: ...ten Sie für Ihren Verstärker Garantie Leistungen beanspruchen wenden Sie sich bitte direkt an den Händler bei dem Sie das Gerät gekauft haben Bitte senden Sie keine Geräte an EMPHASER Inc U S A Bei Schwierigkeiten ein geeignetes EMPHASER Service Center zu finden erhalten Sie bei Ihrem jeweiligen Landes Vertrieb weitere Informationen Der Hersteller gewährleistet auf diesen EMPHASER Verstärker für d...

Page 19: ...Rev B ...

Reviews: