background image

1

2

3

4

ATV PART 

Advanced Features

ATV PART 

Advanced Features

40

41

1.DOWN 
2.LEFT/ CH-
3.
4.SETUP

LEFT/ CH+

 www.elonex.com

 www.elonex.com

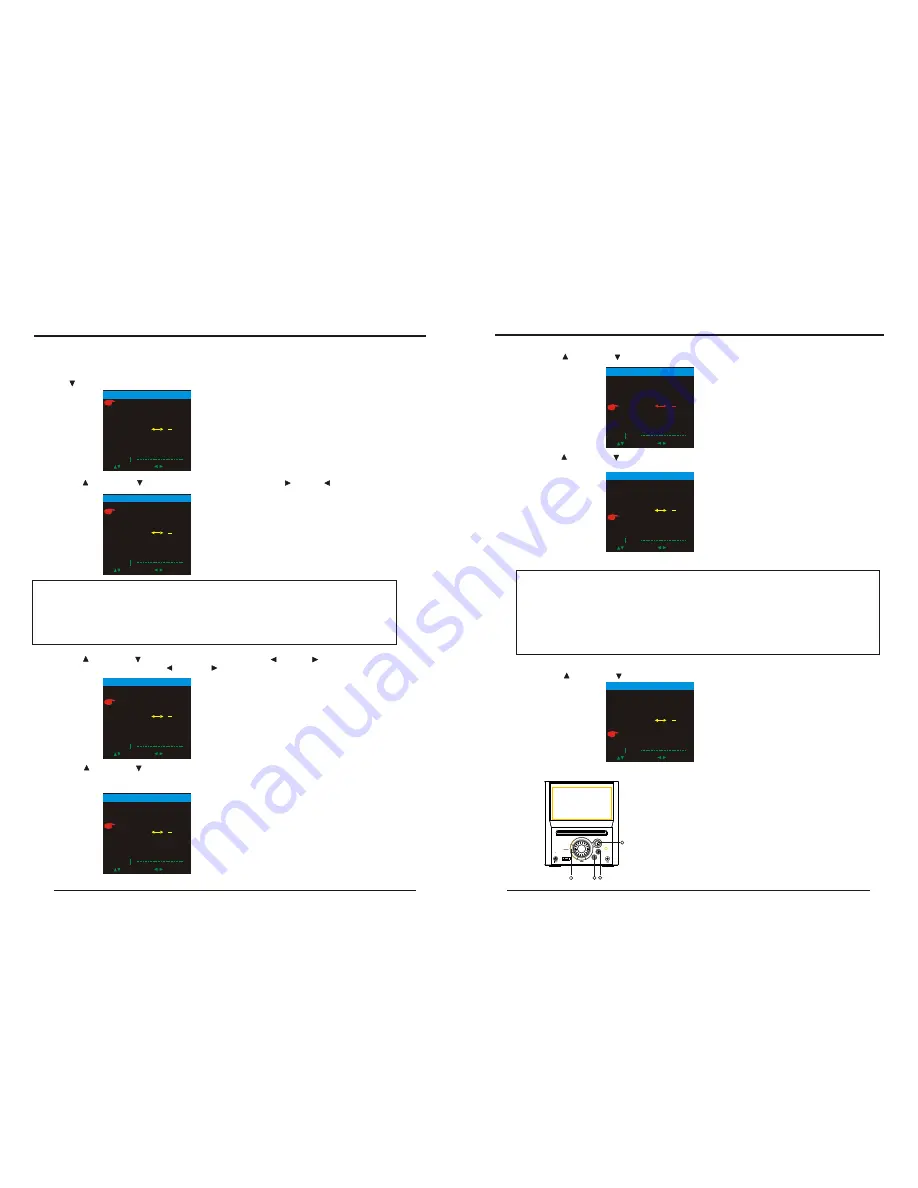
1.Press source button to select ATV MODE
2.Press SETUP to display options as follows.

A. Press     DOWN button to select  Auto search, Press       Right button to start Search.

B. Press UP     and  DOWN      button to select  Manul Search, Press      Right or      Left button to start 
Manual Search.

C. Press UP     and DOWN      button to select  Fine Tune, Press       Left and      Right button to Fine 
Tune  the Frequency .NOTE: Press       Left and       Right once then the Frequency desending 50K 
or increase 50K.

D. Press UP      and DOWN      button to select  

Channel

 to display the current Channel number and

Channel Frequency. Press Left or Right button to decrease or increase 1 channel and display this 
channel  s number and Frequency.

NOTE:
1.Auto Search  Start from Program NO.0
2.When receive signal under Manual Search, the indication frequency stop means the 
optimum position for signal storage. If channel under weak signal is received. The channel 
storage will automatically identify it as no signal.
3.when Auto Search or Manual Search, you can press SETUP  button to stop 
Auto search or Manual Search.

,

E. Press UP      and DOWN      button to select Video Standard to display the TV system PAL.

F. Press UP      and DOWN      button to select  Audio Standard to display the Audio system 
I, DK, BG.
 

G. Press UP      and DOWN      button to section SKIP to skip the channel.

NOTE:
1.Notes on Sound system:6.0M stands for I, 6.5M stands for DK and 5.5M is BG,
please set the Sound system at local one.
2.Color system(all color system are auto setup)
A.While sound system is I, color system is PAL-I.
B.While sound system is DK, color system is PAL-DK.
C.While sound system is BG, color system si PAL-BG.
3.In case with picture while sound or with noise, please check the sound
system for correct setup first.

3. Panel keys Functions the panel keys have the Functions as below at the ATV state.

AUTO  SEARCH

MANUAL  SEARCH
FINE 
POSITION                       

4

S-SYS                                 L
SKIP                              OFF

UHF                  585.25MHz

SELECT                 ADJUST

SWAP       0

TV  MENU

AUTO  SEARCH

MANUAL  SEARCH

FINE 
POSITION                       

4

S-SYS                                 L
SKIP                              OFF

UHF                  585.25MHz

SELECT                 ADJUST

SWAP       0

TV  MENU

AUTO  SEARCH
MANUAL  SEARCH

FINE 

POSITION                       

4

S-SYS                                 L
SKIP                              OFF

UHF                  585.25MHz

SELECT                 ADJUST

SWAP       0

TV  MENU

AUTO  SEARCH
MANUAL  SEARCH
FINE 

POSITION                       

4

S-SYS                                 L
SKIP                              OFF

UHF                  585.25MHz

SELECT                 ADJUST

SWAP       0

TV  MENU

AUTO  SEARCH
MANUAL  SEARCH
FINE 
POSITION                       

4

S-SYS                                 L
SKIP                              OFF

UHF                  585.25MHz

SELECT                 ADJUST

SWAP       0

TV  MENU

AUTO  SEARCH
MANUAL  SEARCH
FINE 
POSITION                       

4

S-SYS                                 L

SKIP                              OFF

UHF                  585.25MHz

SELECT                 ADJUST

SWAP       0

TV  MENU

AUTO  SEARCH
MANUAL  SEARCH
FINE 
POSITION                       

4

S-SYS                                 L

SKIP                              OFF

UHF                  585.25MHz

SELECT                 ADJUST

SWAP       0

TV  MENU

Summary of Contents for LNX Cube3

Page 1: ......

Page 2: ...Never push objects of any kind into this product through openings as they may touch dangerous voltage points or short out parts that could result in a fire or electric shock Never spill liquid of any...

Page 3: ...Handling Do not touch the playback side of the disc Do not attach paper or tape to discs Do not stick or write anything on the surface Protect against fingerprints Always hold a disc by the center an...

Page 4: ...been carefully plug power cord into outlet Press the POWER button on the front panel When the unit is initially powered a brief surge electronic equipment on the same circuit If this occurs connect th...

Page 5: ...oller Make sure there is no barrier between the remote control and remote sensor as it could prevent the unit from receiving the signal Do not spill water or put wet items on the remote control Never...

Page 6: ...equipment Do not tie the AV cord with any other cords such as the power cord or speaker wires as it may result in poor picture and or sound quality CONNECTING DEVICES 8 9 Y Pb Cb Pr Cr ANTENNA FM SPEA...

Page 7: ...gnals may be difficult to receive in some buildings and under certain conditions The provided antenna will help in their reception They are intended for indoor use only FM Indoor Antenna The FM antenn...

Page 8: ...tlet Press the POWER button on the front panel to power the unit The display panel will light When the unit is initially powered a brief surge of electricity may cause interference with other electron...

Page 9: ...y unless it and the selected signal button coincide with the active program source signal input Volume Control The volume may be adjusted by either turning the large volume knob on the front panel or...

Page 10: ...ave band have been saved When a station is stored the memory storage number as well as the station s frequency will flash for four seconds in the display 3 When the total number of stations reaches 30...

Page 11: ...SETUP BRIGHTNESS CONTRAST HUE SATURATION EXIT SETUP VIDEO SETUP VIDEO SETUP BRIGHTNESS CONTRAST HUE SATURATION EXIT SETUP SYSTEM SETUP SYSTEM SETUP TV SYSTEM VIDEO TV TYPE PASSWORD RATING DEFAULT EXIT...

Page 12: ...YPE PASSWORD RATING DEFAULT EXIT SETUP OFF ON SCREEN SAVER P SCAN YPBPR P SCAN YPBPR INTERLACE YUV INTERLACE YUV TV RGB TV RGB S VIDEO S VIDEO SYSTEM SETUP SYSTEM SETUP TV SYSTEM VIDEO TV TYPE PASSWOR...

Page 13: ...UP 1 1 KID KID SAFE SAFE 2 2 G G 3 3 PG PG 4 4 PG13 PG13 5 5 PG R PG R 6 6 R R 7 7 NC 17 NC 17 8 8 ADULT ADULT SYSTEM SETUP SYSTEM SETUP TV SYSTEM VIDEO TV TYPE PASSWORD RATING DEFAULT EXIT SETUP REST...

Page 14: ...LANG EXIT SETUP ENGLISH ENGLISH FRENCH FRENCH SPANISH SPANISH GERMAN GERMAN PORTUGUESE PORTUGUESE ITALIAN ITALIAN ROMANIAN ROMANIAN CZECH CZECH LANGUAGE SETUP LANGUAGE SETUP OSD LANGUAGE AUDIO LANG S...

Page 15: ...92K 48K 96K 192K AUDIO SETUP AUDIO SETUP AUDIO OUT DOWN SAMPLE EXIT SETUP DOWN SAMPLE To avoid disturbing neighbours at night use this function to lower the volume without changing the original tone 2...

Page 16: ...SATURATION EXIT SETUP VIDEO SETUP VIDEO SETUP BRIGHTNESS CONTRAST HUE SATURATION EXIT SETUP 28 VIDEO SETUP VIDEO SETUP VIDEO SETUP BRIGHTNESS CONTRAST HUE SATURATION EXIT SETUP SPEAKER SETUP SPEAKER S...

Page 17: ...t selections Select Next and press ENTER to proceed to the next screen which is shown in Figure 3 The setup menu system DVB PART Figure 1 Figure 2 First time installation First time installation Do yo...

Page 18: ...VB PART Advanced Features 3 Channel Guide 3 1 TV Channels The TV Channels Menu is shown in Figure 9 The channels are listed on the left side of the menu and a preview window is on the right side From...

Page 19: ...ype 4 3 Pan and Scan 4 3 Letterbox 16 9 See Figure 17 Figure 14 TV Setting Menu Figure 15 TV System TV Setting TV System TV Setting TV System TV System Video TV Type PAL TV RGB 4 3PS TV Setting TV Sys...

Page 20: ...ntrol Channel Lock Change pin Press ENTER Channel Lock Press ENTER Password Password Parent Control Channel Lock Parent Control Channel Lock 0001 No 0002 0003 0004 TV XXXX XXXXXXX XXX XXXXX Lock The s...

Page 21: ...change the settings Once done go to Start Scan and press ENTER The setup menu system DVB PART Advanced Features Figure 31 Manual Scan Menu Manual Scan Country Country English Scan Type Single Channel...

Page 22: ...ndard to display the TV systemPAL F Press UP andDOWN button to select Audio Standard to display the Audio system I DK BG G Press UP and DOWN button to section SKIPto skip the channel NOTE 1 Notes on S...

Page 23: ...Language Press to button UP and DOWNselect language Press LEFT and RIGHT can select different language BRIGHT 50 CONTRAST 50 COLOR 50 HUE 50 S COLOR AUTO LANG ENGLISH DEFAULT SELECT ADJUST ZOOM 16 9...

Page 24: ...file is not encoded with a variable bit rate such as provided by Real Networks 44 FrequencyR esponse 200Hz 20kHz 3 dB S N Ratio 76dB Input Sensitivity 350mv 47k Channel Resolution 30dB Normal Remote...

Reviews: