


How to replace the transducer tank
© Elma GmbH & Co KG
SM/Transsonic_LC/1104/D
53
There are two ways to replace the transducer tank:
Replacement by a complete transducer tank with mounted
transducer system (and heating, if required). We recommend to
use a complete tank if the transducer system is damaged and if
you do not have the necessary knowhow for a replacement of
the PXE transducer disks.
Replacement by a preassembled tank with coupling piece(s) for
the mounting of the transducer system and the support for the
heating element(s), but without transducer system. We
recommend to use the preassembled tank if the transducer
system on the old tank is without fault and can be mounted on
the new tank. For this you need a torque wrench. We
recommend to carry out this repair only if you have the required
knowhow for replacing the PXE disks.
For instructions on the replacement of the transducer system
and / or the PXE transducer disks please
see also section 10
.
See spare parts list in Annex B; selection according to type of
unit and voltage.
To replace the transducer tank proceed as follows:
Tank complete with
transducer system
Tank without
transducer system
Elma Order No.
How to proceed
1. Place the unit upside down on a solid workplace.
2. Open the unit as described in
section 7
.
3. Interrupt the electric supply to the transducer tank::
Mark all electric supply cables to the tank and loosen them.
The marking of the cables is important for the correct
reassembly in order to avoid damage due to wrong
connections.
4.
On units with drain duct: Loosen the screw connections of
the drain duct. Note: The screw connections are secured
with Loctite 586. The screw connections can be loosened
more easily after heating the duct in the threaded area with
a hot air fan. Ensure that no other component in the unit is
damaged (s
ee also section 12.
)
.
5. Remove the transducer tank from the housing:
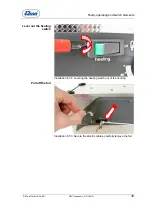
Carefully heat the tank edge around the silicone sealing with
a hot air fan to make the silicone flexible (
see Illustration
11.1.1
).
6. Cut the silicone sealing between the tank edge and the
housing with a narrow and flexible knife (
see Illustration
11.1.1
).
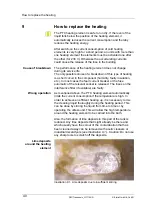
7. Carefully lever the tank out of the housing (
see Illustration
11.1.2
).
8. Remove the silicone remains on the tank and the edge of
the housing with a knife.
Summary of Contents for LC130H
Page 2: ......