background image


Appendix 1: Activated carbon unit 


© Elma Schmidbauer GmbH 

BA_Elmasolvex_VA_EN_Vers.05.2018 

109 


14.3 

Maintenance 

Fire and explosion hazard! 

Solvents are separated at the activated carbon unit. 


The instructions from 

Chapter 8

 of this operating manual are 

applicable. 
Observe the applicable safety regulations for handling 

solvents. 

14.3.1  


Emptying condensate separator 

After view, at the latest if the filling level of the separated 

solvent has risen to approx. 20 mm below the filter in the 

condensate separator (

Fig. 14.1.1.N

). 

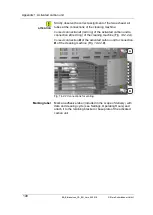
Remove the retaining plate (C) with the condensate separator 

(D) and the activated carbon cartridges (E / F / G). In the case 

of wall mounting, the condensate separator can be unscrewed 

while the retaining bracket is attached. 
Unscrew the condensate separator out of the holder. Ensure 

that you do not spill any solvent in doing so. 
After emptying, screw the condensate separator back into the 

holder. 

14.3.2  


Replacing activated carbon granulate 

The activated carbon granulate must be emptied depending on 

the operating conditions. It is recommended to change the 

activated carbons depending on the odour development. 

However, the activated carbons should be changed at the latest 

after 3 months or 150 cleaning cycles (information applies for 

unfavourable operating conditions: e.g. high ambient and media 

temperature, high proportion of drying cycles). 
Technical requirements for activated carbons: 

  Activated carbons for organic solvents 

  Butane activity: 32 % (the replacement interval must be 

adjusted depending on the butane activity;  

32 % - 150 cycles, 20 % - 100 cycles, …) 

  Grain size: >= 2 mm 

  Free of dust 

Activated carbon granulate recommended by the manufacturer: 
Type: EcoSorb BX-Plus 2 mm 
Manufacturer: Jacobi 
Germany Sales: Overlack GmbH 


DANGER


Interval 

Procedure 

Interval 

Activated carbon 

granulate 

specification  

Summary of Contents for Elmasolvex VA

Page 1: ...BA_Elmasolvex_VA_EN_Rev 05 2018 doc order no 105 1412 Elma Schmidbauer GmbH Germany Operating manual Elmasolvex VA Watches small parts cleaning machine English ...

Page 2: ...ntrol panel 17 3 11 Description of the menu icons 18 3 12 Cleaning chamber description 19 3 13 Media tanks description 20 3 13 1 Suction filter functionality 20 4 Before the initial commissioning 21 4 1 Unpacking and installing the cleaning machine 21 4 2 Attaching protective grilles 22 4 3 Connecting activated carbon unit or exhaust air tubes 23 4 4 Filling media tank 25 4 4 1 Checking shut off v...

Page 3: ...le solvent based media 67 8 3 2 Non flammable solvent based media 67 8 3 3 Environmental hazard from solvent based media 68 9 Care and maintenance tasks 69 9 1 Daily maintenance actions 69 9 1 1 Filling level check of the media tanks 69 9 1 2 Cleaning the cleaning chamber 70 9 1 3 Cleaning of the drain sieve 71 9 1 4 Cleaning the filling level sensors 71 9 1 5 Leak checks 71 9 2 Continuous mainten...

Page 4: ...5 14 2 Filling Installation Commissioning 107 14 3 Maintenance 109 14 3 1 Emptying condensate separator 109 14 3 2 Replacing activated carbon granulate 109 14 3 3 Changing PE filter 110 15 Appendix 2 Pager 112 16 Appendix 3 Procedure and parameter recommendations using Expert Mode 114 16 1 Cleaning parameters recommendations in Expert Mode 118 16 2 Rinsing parameters recommendations in Expert Mode...

Page 5: ...urer shall not accept any liability in the event of injuries to persons damage to the cleaning machine or product to be cleaned which has been caused by improper use contrary to the instructions in this operating manual and non observance of the maintenance intervals The owner shall be responsible for the instruction of the operating personnel 2 1 Notes for using this manual 2 1 1 Information sign...

Page 6: ... must not be smaller than 0 355 mm For information Smaller particles can be rinsed into the machine through the meshes of the cleaning basket and sieve insert on the bottom of the cleaning chamber and can cause damage e g to the valves Flammable liquids can be used as cleaning and rinsing media when used as intended However it is not permitted to operate the cleaning machine in an environment with...

Page 7: ...ust air connection and during replacement of the cleaning and rinsing media Smoking and open ignition sources in the cleaning machine surroundings particularly in the immediate vicinity of the zone marked with the appropriate danger symbol are therefore prohibited Strictly observe the safety instructions specified in this manual to prevent such hazards In the event of liquid discharge from the cle...

Page 8: ...Pay attention when inserting the basket holder that it is attached correctly ball pressure protection engaged Reduce the spinning speed in the case of critical loading The cleaning chamber must not be opened during operation Solvents can spray out Fast rotating cleaning basket Risk of explosion during transport Strictly empty the media container before shipment and also ensure that the cleaning ch...

Page 9: ...vents see Declaration of conformity Chapter 3 5 3 1 How it Works The cleaning and rinsing media are drawn into the cleaning chamber one after the other using a vacuum from the media tanks in the bottom part of the cleaning machine The cleaning is then performed under vacuum conditions with multiple frequency ultrasound technology using rotation or using oscillation without ultrasound technology Th...

Page 10: ...ble areas of geometrically complicated parts Cleaning and rinsing 3 times all supported as required with multiple frequency ultrasound of the switchable frequencies 40 an 80 kHz in Normal Sweep or Pulse operation Microprocessor controlled and permanently monitored cleaning processes Gentle vacuum drying with radiant heat below 100 mbar absolute supported if necessary by spinning up to 1400 rpm Pre...

Page 11: ...g rail see Chapter 4 2 Allen key 5 mm for mounting the connecting kit Connecting kit for exhaust air tubes Operating manual 3 4 Optional accessories movement holders for not dismantled watch movements for accommodation of up to 12 movements Art No 104 6733 Holders for bridges and plates Art No 104 6153 Basket inserts with different division and height electro polished or plastic coated design Mini...

Page 12: ...x_VA_EN_Vers 05 2018 Elma Schmidbauer GmbH 3 5 CE conformity This small parts cleaning machine fulfils the CE marking criteria with regard to the Machinery Directive 2006 42 EC the EMC Directive 2004 108 EC and the ATEX Directive 94 9 EC ...

Page 13: ...rasound frequencies kHz 40 80 Maximum total power consumption W 220 Effective ultrasound power W can be regulated 30 100 50 Power consumption in standby W 20 Spinning mode speed range freely adjustable up to max rpm 1400 Cleaning rinsing mode rotation speed range rpm 1 20 Oscillation vibration frequency rate 1 s 1 14 Oscillation vibration mode deflection 1 60 Operation sound pressure level 1 LpAU ...

Page 14: ...a tanks with cleaning and rinsing liquid can be moved up for removal of the media tanks Guide rail for media tanks protective grille The protective grille is inserted here by the user before the first start up Screw as stop for the top end position when moving the protective grille upwards The screw must be unscrewed by approx 2 turns after attaching the protective grilles Plastic cap must be plug...

Page 15: ...ting the cleaning chamber Instructions for use of the Elma exhaust air tube included in the scope of delivery or with the Elma activated carbon unit optional accessory Chapter 4 3 Connecting activated carbon unit or exhaust air tubes Connection for venting the media tanks Connection instructions for use of the Elma exhaust air tube or connection with Elma activated carbon unit Chapter 4 3 Connecti...

Page 16: ... control panel Operating buttons for selecting functions and settings and navigation in the software menu On Standby button for switching on the control panel Start Pause button for starting or interrupting the cleaning process Display shows the setting options and the current status of the cleaning process A B C D A A B C D ...

Page 17: ... operating buttons The control panel is not a touch sensitive user interface touch screen Controls and settings on the cleaning machine are made using the respective operating button assigned to the navigation symbol The operating buttons only have to be pressed for a short time 0 5 sec for the actuation Explanation of the handling instructions for operating steps in this manual The instruction to...

Page 18: ...the previous display Invokes a confirmation screen where the changes can be saved or discarded Cancel can be selected as option Navigates up by one menu item in the menu selection Navigates down by one menu item in the menu selection Navigates one step to the left in the screen display Navigates one step to the left in the screen display Navigates one step to the right in the screen display Naviga...

Page 19: ... and coarse particles when draining the cleaning rinsing liquid from the cleaning chamber The sieve can be removed for cleaning When reinstalling the sieve it must be screwed in carefully as far as the stop Check freedom of movement of the cleaning basket afterwards collision hazard if the sieve insert has not been screwed in correctly Never operate cleaning machine without sieve insert Danger of ...

Page 20: ... 3 13 1 3 13 1 Suction filter functionality During suction of the medium the medium must flow through the suction filter Fig 3 13 1 G in this way only filtered medium reaches the cleaning chamber When draining the medium the suction filter automatically sinks to the bottom of the tank so that unfiltered medium flows into the media tank The cleaned soiling thus gets into the canister unhindered and...

Page 21: ... cleaning liquid A smooth installation surface is required to be able to rotate the cleaning machine when changing the cleaning liquid Danger of electric shock due to ingress of liquid Protect the cleaning machine against the ingress of liquid The interior of the cleaning machine is protected against dripping moisture from outside IP class 20 However keep the installation surface and the case dry ...

Page 22: ...sed is permitted to be stored in the surroundings of the cleaning machine at a minimum distance of 3 m from the cleaning machine 4 2 Attaching protective grilles The protective grilles in front of the media tanks are not attached when the cleaning machine is delivered Procedure for attaching protective grilles 1 Insert the two protective grilles with the carriage Fig 4 2 1 B in each case from abov...

Page 23: ... in the area of the ventilation openings of the cleaning machine Observe the applicable safety regulations for handling flammable media Keep all kinds of ignition sources away from the danger area Prevent ignition sparks from electrostatic discharge Use the activated carbon unit or exhaust air tubes protection measures described in this chapter Strictly observe the protection measures shown here 1...

Page 24: ...letely ruled out Only use the activated carbon unit from the Elma accessories 1 Connect the 2 exhaust air tubes included in the scope of delivery to the respective connections Fig 4 3 1 A and Fig 4 3 1 B In doing so the connection coupling must audibly engage in each case In order to prevent mix ups for the connections this coupling has a red marking ring and also the associated connection at the ...

Page 25: ...cognition of the filled media Fig 4 4 3 E For recognition of the respective position there are markings on the case and the support surface under the media tanks 1 2 3 4 Media tank in position 1 Cleaning medium Media tank in position 2 Rinsing medium Media tank in position 3 Rinsing medium Media tank in position 4 Rinsing medium Fig 4 4 1 Illustration of the positions of the media tanks All 4 medi...

Page 26: ...hing any grounded equipment before handling flammable materials e g water tap metal surface of the case of the cleaning machine or use ESD protective equipment ESD arm band If liquid escapes while replacing the media tank this must only be removed using a dry cloth to prevent electrostatic charging Start with the media tank 1 Fig 4 4 1 1 1 Push up the covers for the media tanks Fig 4 4 2 A A 2 Unl...

Page 27: ...above the Max marking is also used as reserve for possible liquid entrainments 5 Check the shut off valves of the quick couplings on the media tank and the media tubes for correct function Chapter 4 4 1 6 Replace the tank in the cleaning machine 7 Reconnect the tube couplings to the media tanks The tube couplings must audibly engage in the shut off valves Also visually inspect the secure seating o...

Page 28: ...ed to each other Check the correct function of the shut off valves at every media change Press the nipple of the shut off valve a few millimetres into the coupling to check the shut off function After releasing the shut off valve must spring back outside to the closed position arrow direction The shut off valve Fig 4 4 1 1 F is moveable and in the not connected state must be flush with the guide b...

Page 29: ... 4 4 1 2 J in the not connected state must protrude over the edge of the quick coupling Fig 4 4 1 2 Media tube quick coupling closed Check the seal is seated correctly Fig 4 4 1 3 H correct seating Fig 4 4 1 4 H incorrect seating Fig 4 4 1 3 Seal OK Fig 4 4 1 4 Seal not OK Media tube quick coupling Checking seal in the quick coupling of the media tube J H H ...

Page 30: ...Switch on the cleaning machine at the main switch Fig 3 7 1 B The internal fans are started fan noise audible 5 3 Selecting language in the display A language must initially be selected when first switching on for handling see Chapter 3 10 The display does not change to the next step until then The language in the display set at the factory is German Confirm or change the language by pressing the ...

Page 31: ...tanks The retrieval of the filling levels of the media tanks is shown on the display Fig 6 1 1 Check the filling levels and fill or empty the media tanks if required to the correct filling level Chapter 4 4 Confirm the correct filling levels with Fig 6 1 1 Display Check filling level of the media tanks The display automatically switches to the Start menu with display of the cleaning programs Fig 6...

Page 32: ...diameter is smaller than 0 355 mm Open the cover of the cleaning chamber by slightly lifting the snap connector at the front end of the cover handle Fig 3 7 1 A1 The basket holder mounting shaft is only placed in the coupling of the basket holder locking by engaging in a ball gripper Remove the basket holder by pulling upwards Press the basket holder locking down Fig 6 2 1 A1 and simultaneously tu...

Page 33: ...suitable basket compartments Fig 6 2 2 Basket holder structure Stack the loaded baskets back into the basket holder Attention All baskets must strictly be replaced in the basket holder to be able to securely close the basket holder again In doing so it is not important whether all baskets are loaded Place the basket lid Fig 6 2 2 D in the top position Lock the basket holder with the basket locking...

Page 34: ...ket holder When slightly pulled the basket holder must remain connected to the shaft of the rotation seal Check the seating of the basket holder If the basket holder can be removed very easily it was not fixed correctly Position it again If the basket holder is no longer correctly mounted after longer use of the cleaning machine check the wear on the toothing of the collar bushing see Basket holde...

Page 35: ... Four special programs for particular applications are also stored description Chap 6 3 1 These are displayed in the Visible Cleaning Programs display setting and can be displayed in the program selection if required see Chap 7 1 5 Select the required cleaning program by navigating with Confirm the selection with Fig 6 3 1 Display Program Select List home screen The instruction to insert the baske...

Page 36: ...after disconnection of the cleaning machine from the mains power supply e g switching off using main switch The safety test takes approx 1 2 minutes The progress is shown on the display Fig 6 3 3 The safety test can be aborted with the button The Cancel safety test dialogue box is displayed The Program Select List display is shown when the button is pressed The specified cleaning program is not st...

Page 37: ...lay Status of the program progress After completion of the initialisation phase the corresponding notification in the display is cleared and the cleaning program is started The remaining time until the end of the cleaning program is displayed If you have a pager you can initialise this now for description see Chapter 15 Appendix 2 Pager The detailed progress of the cleaning program can be shown on...

Page 38: ... confirm this notification and switch off the signal tone Fig 6 3 6 The display for selection of the cleaning program Fig 6 3 1 is shown on the display again Fig 6 3 6 Display Program finished Now you can open the cover of the cleaning chamber and remove the basket holder Depending on the program duration the cleaning chamber interior wall is still hot 60 C and the basket holder is still warm 45 C...

Page 39: ... described in Chap 7 1 5 Program for drying complete drying step in the event of cancellation of the cleaning program cleaning basket wet Special cleaning program when using the W2V movement holder without spinning Special program for epilamisation according to the method of the company Surfactis on request Program for additional drying if the standard drying was not sufficient cleaning basket moi...

Page 40: ... interrupted for any reason The display with the pause information Fig 6 4 1 is shown on the display Press the Start Pause operating button Fig 3 9 1 C if you would like to continue with the cleaning program Fig 6 4 1 Display Pause If you would like to definitively abort the cleaning program there is a selection option whether a rinsing process should still be performed or not Press Abort process ...

Page 41: ...and switch off the signal tone The display for selection of the cleaning program Fig 6 3 1 is shown on the display again Fig 6 4 3 Display Program finished Now you can open the cover of the cleaning chamber and remove the basket holder Depending on the program duration the cleaning chamber interior wall is still hot 60 C and the basket holder is still warm 45 C immediately after the program end If...

Page 42: ...le without input of the valid Administrator PIN 7 1 Cleaning machine Settings It is possible to make various cleaning machine and program settings These options are described in the following chapters The procedure for the operating steps starts in each case from the display Program Select List Fig 7 1 1 and then Unit Settings Fig 7 1 2 Fig 7 1 1 Display Program Select List Press in the Program Se...

Page 43: ...g the commissioning Starting from the display Program Select List Fig 7 1 1 1 Press The display Unit Settings Fig 7 1 2 is shown 2 Using select Date and time in the selection list and confirm with The Date and time Fig 7 1 1 1 display is shown 3 Check whether the settings match the local time and date If no changes are required exit from the Date and time display using or 4 For changes navigate us...

Page 44: ...ay Program Select List 1 Press The display Unit Settings Fig 7 1 2 is shown 2 Using select Admin PIN in the selection list and confirm the selection with The Admin PIN Fig 7 1 2 1 display is shown 3 In the display Fig 7 1 2 1 select On by touching and confirm by pressing Fig 7 1 2 1 Selection field for activating deactivating the Admin PIN The Admin PIN Fig 7 1 2 2 display is shown The Administrat...

Page 45: ... been set A dialogue box requesting the Admin PIN will be displayed the next time Program Settings or Unit Settings is called If you have forgotten the PIN press Fig 7 1 2 3 and follow the instructions Fig 7 1 2 3 Display Enter PIN Proceed as for the Admin PIN activation procedure After input of the previously set Admin PIN select the setting Off in the display Fig 7 1 2 1 using and confirm the se...

Page 46: ...clearance see Chapter 11 3 Fault clearance by user The entries also provide fault descriptions for technical support or the on site service technician In the event of a fault invoke the Event List to obtain further information for the fault and fault clearance Proceed as follows Starting from the display Program Select List 1 Press The display Unit Settings Fig 7 1 2 is shown 2 Using select Event ...

Page 47: ... additional information for more precise assessment of the fault 1 Navigate using in the Event List and press to retrieve further information about the respective entries The following display Fig 7 1 3 2 is shown 2 Press to exit from the detail view Fig 7 1 3 2 Display detailed information view Procedure for displaying details ...

Page 48: ...r time Starting from the display Program Select List 1 Press The display Unit Settings Fig 7 1 2 is shown 2 Using select Set language in the selection list and confirm with The Set language Fig 7 1 4 1 display is shown 3 Select the required language using 4 Press to apply the changes Press or to exit from this display without changes Fig 7 1 4 1 Display Set language Procedure ...

Page 49: ...Unit Settings Fig 7 1 2 is shown 2 Using select Visible Cleaning Programs in the selection list and confirm with The display Visible Cleaning Programs Fig 7 1 5 1 is shown 3 Using select the program which should be displayed or hidden 4 Press to activate or deactivate the selection field Activated programs are marked with a checkmark 5 Proceed in the same way if other programs should be hidden or ...

Page 50: ...g select Reminders in the selection list and confirm with The display Reminders Fig 7 1 6 1 is shown Fig 7 1 6 1 Display Reminders for exchange of media The menu item Reminders for exchange of media enables the activation of reminders for an exchange of media and setting of the reminder intervals 3 Using select Reminders for exchange of media in the selection list and confirm with If you would lik...

Page 51: ...ays since setting this value for the respective media tank 1 Using in the selection list Fig 7 1 6 1 select Set reminders and confirm with The Set reminders for exchange of media Fig 7 1 6 4 display is shown 2 Using select between the input value and the cleaning machine Cycles Days see Fig 7 1 6 5 3 Press to set the input value or to change the cleaning machine Cycles Days 4 Press to save the set...

Page 52: ...days individually or completely to 0 The counting starts again from 0 Fig 7 1 6 6 Display Reset reminders for exchange of media If the set input value is reached the Change Medium Fig 7 1 6 7 display is shown after program execution The relevant media tank is marked with a warning symbol Now perform the media change After changing the media press All counted cycles or days are reset to 0 If you wo...

Page 53: ...ttings Fig 7 1 2 is shown 2 Using select Reminders in the selection list and confirm with The display Reminders Fig 7 1 6 8 is shown Fig 7 1 6 8 Display Reminders General reminder deactivated Starting from the display Reminders 3 Using select General reminder in the selection list and confirm with The following screen is displayed Assign a description to the general reminder max 30 characters Fig ...

Page 54: ...y for setting the reminder interval Fig 7 1 6 10 Display for setting reminder interval 7 Using select between the input value and the cleaning machine Cycles Days see Fig 7 1 6 10 8 Press to adjust the input value or to change the cleaning machine Cycles Days 9 Press to save the settings 10 Press or to exit from the settings without saving After the specified interval Cycles Days has elapsed the R...

Page 55: ...nd individual components The usage time is shown in cycles or hours and minutes Every component required for the cleaning process is shown separately with the respective usage time Only completely executed cycles are added Starting from the display Program Select List 1 Press The display Unit Settings Fig 7 1 2 is shown 2 Using select Operating Hours in the selection list and confirm with The Oper...

Page 56: ...Settings 56 BA_Elmasolvex_VA_EN_Vers 05 2018 Elma Schmidbauer GmbH Fig 7 1 7 1 Display Operating Hours ...

Page 57: ...y Program Select List 1 Press The display Unit Settings Fig 7 1 2 is shown 2 Using select Signal tone setting in the selection list and confirm with The Signal tone setting Fig 7 1 8 1 display is shown 3 Select using whether a signal tone On or no signal tone Off should sound at the end of the cleaning program 4 Press to confirm the input Press to exit from this display without changes Fig 7 1 8 1...

Page 58: ... program should be copied and also made available with a few parameter changes Change existing cleaning program Chapter 7 2 3 Recommended procedure if various parameters of an existing program should be modified The predefined cleaning programs stored in the cleaning machine at the factory cannot be modified or deleted Programs you create yourself can be copied modified or deleted at any time Fact...

Page 59: ...he selection list and confirm with Fig 7 2 1 1 The Enter a program name Fig 7 2 1 2 display is shown Navigate within any line of the character selection using Using you can navigate between the 3 lines Using the button you can delete already entered characters Press to apply the selected character To save the entered program name and continue with setting the program parameters press Fig 7 2 1 2 E...

Page 60: ...p them Fig 7 2 1 3 Display Process step Clean Navigate between the input fields using Press to change the preset values To save the settings and continue to the next process step 1st rinse step press Rinse 1 The Rinse 1 Fig 7 2 1 4 display is shown For setting the Rinse 1 process parameters proceed in the same way as previously described for setting the Cleaning process parameters Fig 7 2 1 4 Disp...

Page 61: ...ing step Fig 7 2 1 4 A Process step display Dry After you have changed the values of the program parameters press to return to the Program Select List display A query for saving the settings made is displayed first see Fig 7 2 1 5 Fig 7 2 1 5 Display Save changes Using select the required action from the selection list and confirm with Using the Reject changes selection you return to the Program S...

Page 62: ...should be copied and modified e g Standard Confirm the selection with Fig 7 2 2 1 Display new program from copy After selection of the cleaning program to be copied the Program name display Fig 7 2 2 2 is shown In the field for the program name the original program name with a number e g _0 is initially specified The name can be changed individually as described in Chapter 7 2 1 To save the progra...

Page 63: ...ng program apart from the standard programs available the message that no modifiable program has been found is shown on the display when selecting Modify existing program On the display Modify Create Programs Fig 7 2 1 1 select Modify existing program using and confirm with The display Modify program with the already existing cleaning programs Fig 7 2 3 1 is shown Using select the cleaning program...

Page 64: ...y time On the display Modify Create Programs Fig 7 2 1 1 select Delete existing program using and confirm with Using select the cleaning program which should be deleted in the example Standard_0 Fig 7 2 4 1 Confirm the selection with Fig 7 2 4 1 Display Delete program A display with the query whether the selected program should really be deleted is shown Press to confirm the delete program command...

Page 65: ...or liquid form are Polytetrafluorethylene PTFE Polyetheretherketone PEEK Polysulphone PSU Polyphenylene sulphide PPS Polyoxymethylene POM Polypropylene PP Polyamide 12 PA 12 for the media tanks until 07 2017 PVDF for the media tanks from 08 2017 Polyethylene PE Peroxide or oxygen cross linked EPDM and NBR for static seals so that their swelling in aliphatic hydrocarbons is safe FPM FFPM Also the a...

Page 66: ...ying only use volatile rinsing media Instructions for the above mentioned recommended media 1 The upper limit of the boiling range of rinsing media should not exceed 170 C at normal pressure for successful drying use sufficient volatile rinsing media at least in the last rinsing step 2 If the boiling range of any cleaning or rinsing medium undercuts the lower limit of 100 C at normal pressure the ...

Page 67: ... on request Therefore note the flashpoint specification in the safety data sheet of your intended cleaning and rinsing media 8 3 2 Non flammable solvent based media In the case of intended permanent use with fluorinated non flammable solvents e g epilamisation seals made of the fluoroplastic elastomers FPM FFPM may have to be replaced previously see materials mentioned above In the case of using t...

Page 68: ...the safety data sheet of your intended cleaning and rinsing media This is applicable to a smaller extent for media based on alkoxy compounds The marking must be observed both for handling the solvent based media as well as for their disposal elma wf pro is classified as environmentally hazardous according to R51 and R53 and therefore has an environmental hazard pictogram while elma suprol pro and ...

Page 69: ...ponents and consumable materials from your dealer in good time 9 1 Daily maintenance actions 9 1 1 Filling level check of the media tanks At least once a day according to needs Visually inspect whether the filling level of the different media tanks is in the range between the Min and Max markings Fig 9 1 1 1 D Adjust the filling level accordingly if required Fig 9 1 1 1 Media tanks filling level m...

Page 70: ...Filling level sensor Work level Filling level sensor Overfilling level Guard bar 2 per sensor Sieve insert mesh size 0 36 mm for collecting lost precision parts and coarse particles when draining the cleaning rinsing liquid from the cleaning chamber The sieve can be unscrewed for cleaning When reinstalling the sieve it must be screwed in carefully as far as the stop Check freedom of movement of th...

Page 71: ...ds Visually inspect the surfaces of the filling level sensors and the guard bar for soiling or damage Fig 9 1 2 1 A B C F In the case of visible soiling clean the components carefully with a moist cloth and a suitable cleaning agent e g with your rinsing medium In the case of recognisable damage to the sensors the cleaning machine must no longer be operated Contact the manufacturer 9 1 5 Leak chec...

Page 72: ...hazard Observe the applicable safety regulations for handling solvents Keep all kinds of ignition sources away Prevent ignition sparks from electrostatic discharge Discharge possible electrostatic charges body charge by touching any grounded equipment before handling flammable media e g water tap metal surface of the case of the cleaning machine or use ESD protective equipment ESD arm band Remove ...

Page 73: ...ng Fig 9 2 2 1 C anticlockwise out of the media tank The suction filter Fig 9 2 2 1 G is now loose in the media tank 2 Remove the suction filter e g using suitable tweezers from the media tank Fig 9 2 2 1 Quick coupling and suction filter 3 Clean the filter fabric carefully using a suitable cleaning agent e g IPA Subsequent treatment with a brush or carefully with compressed air 4 Replace the seal...

Page 74: ...esignation Art No Change interval Illustration Complete media tank 103 8653 Visual inspection Media tank 108 7925 Visual inspection Cover for media tank 104 4088 Visual inspection Coupling tube 105 2475 Visual inspection Seal for coupling 105 2475 105 3131 Visual inspection Suction filter 105 2718 Visual inspection Coupling with PTFE sealing tape 105 2485 Visual inspection ...

Page 75: ...t the baskets are no longer correctly fixed in the basket holder The consequence of this is that cleaning parts can be flung out of the baskets Fig 9 2 3 1 Intact support surfaces Fig 9 2 3 2 Worn support surfaces Check the toothing of the collar bushing Fig 9 2 3 3 C for wear The collar bushing must be replaces as soon as any wear on the toothing is recognisable Fig 9 2 3 5 E Worn toothing of the...

Page 76: ... 1 Spare parts basket holder Use the following article numbers for spare part orders Designation Art No Change interval Illustration Basket holder complete 105 3905 Visual inspection Basket holder locking 105 6436 Visual inspection Basket holder 104 5991 Visual inspection Collar bushing for basket holder complete 106 6950 Visual inspection D E ...

Page 77: ...ese are performed automatically according to predefined requirements after confirming the cleaning cycle using the Start button Simple safety test is performed after the cleaning machine has been disconnected from and reconnected to the mains power supply Extended safety test is performed after 500 cleaning cycles at the latest every 3 months See Chapter 10 3 10 1 5 years service interval by Servi...

Page 78: ...er cover Basket rotation unit Basket drive exchange part Solenoid valve V with couplings Vacuum pump PTFE sinter filter Cleaning chamber Battery CR 2032 Control PCB 4x sealings Media tank couplings 4x sealings Media tank couplings Flange sleeve collar bush Basket support According to assessment criteria it can be required to replace other components This is at the discretion of the service point E...

Page 79: ...he display Attention A change of the rotation seal becomes due Estimated number of standard programs remaining 1000 Fig 10 2 1 1 A new and in each case one time notification is shown when reaching remaining running time of 900 800 700 100 standard cleaning cycles A continuous notification is shown when reaching remaining running time of 100 99 98 1 standard cleaning cycles The display notification...
Page 80: ...hamber Therefore the seal replacement does not necessarily have to be performed by a service point this can be done by the user Elma order number 108 3896 A service manual for the procedure is enclosed with the service kit The instructions in this service manual must be strictly followed If the service manual is not available please request this from the manufacturer If you have any questions abou...

Page 81: ...the remaining months are displayed see fig 10 2 2 1 Fig 10 2 2 1 Display Maintenance required in 6 months After the above mentioned messages have elapsed the message indicating that maintenance is due immediately appears with an additional disclaimer of liability see fig 10 2 2 2 Fig 10 2 2 2 Display Maintenance now due Safe operation of the cleaning machine is no longer guaranteed In order to con...

Page 82: ...n until after the extended safety test has been performed Fig 10 3 1 Display Start safety test For this extended safety test the function of the overfilling level filling level sensor is tested by suctioning medium In the case of possible malfunction of the overfilling level sensor medium can escape This should be collected by the collecting container It is required here that the exhaust air tube ...

Page 83: ...EN_Vers 05 2018 83 Fig 10 3 2 Display Check filling level pos 4 Confirm the correct filling level with Fig 10 3 2 The safety test is now started automatically and ends after approx 5 minutes The progress is shown on the display Fig 10 3 3 Fig 10 3 3 Display Safety Test progress ...

Page 84: ...ecified in the troubleshooting contact the dealer or manufacturer immediately For safety reasons repairs must only be performed by trained staff which has been authorised by the manufacturer The manufacturer shall accept no liability for damage caused by unauthorised and incorrect interventions on the cleaning machine 11 1 Fault messages on the display Possible malfunctions of the cleaning machine...

Page 85: ...in moved correctly Can the valves of the quick couplings on the media tanks Fig 4 4 1 1 F be pressed in moved correctly Is the cover of the cleaning chamber closed correctly Cover seal of the cleaning chamber chapter 10 1 1 B damaged slipped Emergency ventilation in the cover of the cleaning chamber chapter 11 3 2 A leaking Switch off cleaning machine and restart Contact Service if the fault persi...

Page 86: ... fans for foreign bodies and remove if necessary Switch off cleaning machine and restart Contact Service if the fault persists 147 178 Warning Working level filling level not correct Fill level in cleaning chamber not optimal or fluctuates from time to time Check the following possibilities Cleaning basket inserted correctly Sieve insert Fig 9 1 4 1 D in the cleaning chamber inserted correctly Fil...

Page 87: ...slots blocked Ambient temperature must be 30 C Media temperature and media heating see warnings 179 and 211 Let cleaning machine cool down and restart Contact Service if the fault persists 181 Warning Small temperature change during the heating process Temperature measurement defective the measured temperature does not change as intended during the heating up e g temperature sensor has detached it...

Page 88: ...witch off cleaning machine and restart Contact Service if the fault persists 204 Abortion Critical fault Overfilling level filling level sensor defective Program has not been ended Plausibility error working level fill level sensor overfill level fill level sensor Check the following possibilities Working level fill level sensor Fig 9 1 4 1 B soiled Clean with suitable cloth if necessary Work leve...

Page 89: ...h off cleaning machine and restart Contact Service if the fault persists 212 Abortion Evacuation gradient too low Explosion safety not guaranteed Program has not been ended Timeout vacuum is not achieved Possible cause Cleaning rinsing Temperature of the medium see Error 211 Drying Scooping parts with larger quantity of last rinsing medium not draining see cause for 211 Check the following possibi...

Page 90: ...ig 4 4 1 1 F be pressed in moved correctly Are the quick couplings on the media tanks Fig 3 13 1 B C correctly engaged Suction filter in the media tank Fig 3 13 1 G clogged blocked Fill level sensor Empty level Fig 9 1 4 1 F soiled Clean with suitable cloth if necessary Fill level sensor Empty level Fig 9 1 4 1 F damaged scratches cracks Switch off cleaning machine and restart Contact Service if t...

Page 91: ...not possible Program has not been ended Vacuum in the cleaning chamber is not released Check the following possibilities Air intake and exhaust openings in the cleaning chamber Fig 3 12 1 A clogged Exhaust air tube chapter 4 3 kinked Switch off cleaning machine and restart Contact Service if the fault persists 216 Cleaning chamber drains slowly Timeout 1 of the Empty level fill level sensor during...

Page 92: ...d correctly Are the quick couplings on the media tanks Fig 3 13 1 B C correctly engaged Suction filter in the media tank Fig 3 13 1 G clogged blocked Filling level sensor Empty level installed under the sieve insert Fig 9 1 4 1 F soiled Clean with suitable cloth if necessary Fill level sensor Empty level Fig 9 1 4 1 F damaged scratches cracks Retrofit ant reflection sleeve for Empty level fill lev...

Page 93: ... See chapter 11 2 for the further procedure Liquid discharge from the bottom case opening Clean deflagration protection chapter 11 3 1 Correct media tanks fill levels Disconnect cleaning machine from mains power supply and restart Contact Service if the fault persists 253 Critical error Vacuum safety switch faulty Safety test not finished See operating instructions Vacuum safety switch does not tr...

Page 94: ...ective Malfunction of the overfill level fill level sensor during the safety test Check the following possibilities Overfill level fill level sensor Fig 9 1 4 1 A B soiled Clean with suitable cloth if necessary Overfill fill level sensor Fig 9 1 4 1 A B damaged scratches cracks Switch off cleaning machine and restart Contact Service if the fault persists 266 Abortion Critical fault Level empty fil...

Page 95: ... Condensate separator activated carbon filter if connected clogged Exhaust air tube chapter 4 3 kinked Can the valves of the quick couplings Fig 4 4 1 2 J be pressed in moved correctly Can the valves of the quick couplings on the media tanks Fig 4 4 1 1 F be pressed in moved correctly Are the quick couplings on the media tanks Fig 3 13 1 B C correctly engaged Switch off cleaning machine and restar...

Page 96: ... if the fault persists 274 Abortion Critical fault Both fans defective Both fans are blocked or defective during the safety test Check the following possibilities Check fans for foreign bodies and remove if necessary Switch off cleaning machine and restart Contact Service if the fault persists 278 Abortion Critical fault Memory chip defective Software electronics error Check the following possibil...

Page 97: ...ensor Empty level Fig 9 1 4 1 F damaged scratches cracks Retrofit anti reflection sleeve for Empty level fill level sensor Switch off cleaning machine and restart Contact Service if the fault persists 299 Warning Contact the service Change of the rotation seal is necessary See operating instructions Check the following possibilities Take machine out of operation immediately Contact Service Safe op...

Page 98: ...uer GmbH This screen Fig 11 1 2 is always displayed if the cleaning program has not been ended properly e g after any fault in the cleaning machine or a power failure during cleaning Fig 11 1 2 Fault information for cleaning machine checking Fault information Checking ...

Page 99: ...ities Check media tank filling level Cleaning deflagration protection see Chapter 11 3 1 Contact Service if the fault persists 11 3 Fault clearance by user Risk of electric shock from live parts in the interior of the cleaning machine Always unplug the mains plug before opening the cleaning machine The manufacturer shall accept no liability for damage caused by unauthorised interventions on the cl...

Page 100: ...e of the cleaning machine and remove the cover Fig 11 3 1 2 C of the service opening 3 Detach the two tube connections Fig 11 3 1 2 E by pulling on the respective tube and simultaneously pressing on the grey ring Fig 11 3 1 3 F 4 Remove the deflagration protection Fig 11 3 1 3 D and drain the residual liquid present 5 Let the deflagration protection dry leave for approx 30 minutes in the removed c...

Page 101: ...101 Fig 11 3 1 2 Service opening with deflagration protection Fig 11 3 1 3 Tube connection with locking ring In the event of further discharge of liquid droplets the cleaning machine must not be further operated Contact your dealer or the manufacturer ATTENTION B C D E E F ...

Page 102: ...the display Cleaning chamber does not drain The cleaning chamber can be vented manually using the bleed screw in the cover of the cleaning chamber Open the bleed screw using a 5 mm Allen key There is a feedthrough for the Allen key in the handle of the cover of the cleaning chamber By removal of the vacuum in the cleaning chamber the medium should flow back into the relevant media tank If this is ...

Page 103: ...faces The vacuum pump solenoid valves drives and heater can still be very hot immediately after operation of the cleaning machine Contact the supplier or manufacturer in the case of cleaning machine faults which cannot be rectified using the instructions for fault clearance in this operating manual If any return to a service centre is required use the original packaging to prevent transport damage...

Page 104: ...lso accepts old components for disposal Dispose of used cleaning and rinsing media in accordance with the applicable national regulations 13 Manufacturer address contact address Elma Schmidbauer GmbH Gottlieb Daimler Str 17 D 78224 Singen Phone head office 49 0 7731 882 0 Fax head office 49 0 7731 882 266 info elma ultrasonic com www elma ultrasonic com We reserve the right to make technical and v...

Page 105: ...arbon unit Fire and explosion hazard Solvents are separated at the activated carbon unit The instructions from Chapter 8 of this operating manual are applicable Observe the applicable safety regulations for handling solvents Keep all kinds of ignition sources away Prevent ignition sparks from electrostatic discharge Discharge possible electrostatic charges body charge by touching any grounded equi...

Page 106: ...late attached in the base frame J detachable for emptying the condensate separator activated carbon cartridges Condensate separator can be unscrewed with filter insert Activated carbon cartridge 1st stage Activated carbon cartridge 2st stage Activated carbon cartridge 1nd stage Screw plug can be unscrewed for filling emptying the activated carbons Base plate enables floor standing operation on the...

Page 107: ... wall mounted Benefit for wall mounting the condensate separator can be unscrewed for emptying without having to detach the retaining plate Fig 14 2 1 C from the base plate For wall mounting first fasten the base plate floor bracket feet upwards using the supplied mounting material Attach the retaining plate to the base plate see Fig 14 2 1 Fig 14 2 1 Activated carbon filter in wall mounting posit...

Page 108: ...tivated carbon unit to connection A red ring of the cleaning machine Fig 14 2 2 A Connect connection B of the activated carbon unit to connection B of the cleaning machine Fig 14 2 2 B Fig 14 2 2 Connections for venting Mark an adhesive label included in the scope of delivery with date and cleaning cycle see Settings Operating Hours and attach it to the retaining bracket or base plate of the activ...

Page 109: ...ou do not spill any solvent in doing so After emptying screw the condensate separator back into the holder 14 3 2 Replacing activated carbon granulate The activated carbon granulate must be emptied depending on the operating conditions It is recommended to change the activated carbons depending on the odour development However the activated carbons should be changed at the latest after 3 months or...

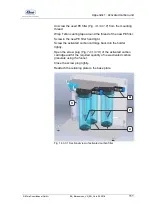
Page 110: ...ns If the required cleaning time gradually becomes longer and or if an appropriate warning message is shown on the display Unscrew the outer PE filter Fig 14 3 3 1 M from the activated carbon cartridge Wrap Teflon sealing tape around the thread of the new PE filter Screw in the new PE filter hand tight Unscrew the condensate separator see also Chapter 14 3 1 Emptying condensate separator from the ...

Page 111: ...e new PE filter Screw in the new PE filter hand tight Screw the activated carbon cartridge back into the holder tightly Open the screw plug Fig 14 3 3 1 H of the activated carbon cartridge and fill the required quantity of new activated carbon granulate using the funnel Close the screw plug tightly Reattach the retaining plate to the base plate Fig 14 3 3 1 Sectional view of activated carbon filte...

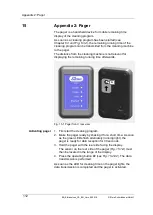
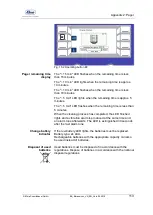
Page 112: ...the remaining running time afterwards Fig 15 1 Pager front rear view 1 First start the cleaning program 2 Make the pager ready by shaking it for a short time As soon as the green LEDs flash alternately running light the pager is ready for data reception for 30 seconds 3 Hold the pager with the rear side facing the display The sensor on the rear side of the pager Fig 15 1 A must then be located in ...

Page 113: ...is less than 5 minutes When the cleaning process has completed the LED finished lights and a vibration alarm is produced at the same time and an alarm tone afterwards The LED is extinguished 30 seconds after the last alarm tone If the low battery LED lights the batteries must be replaced Battery type 2x AAA Rechargeable batteries with the appropriate capacity can also be used instead of batteries ...

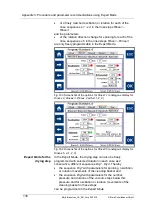
Page 114: ...Mode until the Standard Mode is restored in the Create change programs screen by clicking on the folder icon again Programs created and saved in the Expert Mode are also retained after return to the Standard Mode and can be selected from the list of created to be changed programs It is recommended to accompany the following explanations and make the changes on the device using the practice program...

Page 115: ...e1 Rinse3 can also be programmed in 5 consecutive sequences in the process with selected duration in each case For example Rinse1 can be subdivided into the sequences Rinse1 1 Rinse1 2 Rinse1 5 accordingly also Rinse2 and Rinse3 Among these the sequences Rinsex 1 Rinsex 4 with different parameters in each case for the ultrasound the oscillation or rotation movements of the cleaning basket and the ...

Page 116: ...1 analogous display for Rinsex 2 Rinsex 3 Rinsex 4 with x 1 2 3 Fig 16 4 Screenshot of the options for Rinse3 5 analogous display for Rinsex 5 x 1 2 3 In the Expert Mode the drying step can also be freely programmed with selected duration in each case as 2 consecutive different sequences Dry1 Dry2 Thereby the sequence Dry1 with parameters for spinning oscillation or rotation movements of the clean...

Page 117: ...4 for any of the steps Clean Rinse1 Rinse2 or Rinse3 are all specified with the duration 0 min 0 sec the Sequence 5 of this step is also not executed and the complete step is skipped In this case the intended medium for this step is also not suctioned and therefore also not discharged In the event of process problems with the stored standard cleaning programs in the Clean Rinse1 Rinse3 or Dry step...

Page 118: ...onds range and ensures sustained exceedance of the cavitation threshold The average sound pressure amplitude and thus the heating rate of the medium treated with ultrasound in the work chamber therefore do not increase in the pulse mode The parts have both residues adhering very firmly to the parts surfaces such as oxide layers caused by corrosion or resinified oil or grease residues as well as re...

Page 119: ...nd sequences and additional cleaning time is only programmed for the additional fast oscillation 16 2 Rinsing parameters recommendations in Expert Mode One example problem solution using modifications of the standard cleaning program shows which possibilities of the Expert Mode are enabled for the probably most frequent rinsing problem The parts still have residues of the cleaning medium in fine h...

Page 120: ... only spend additional rinse time for the additional fast oscillation in between 16 3 Drying parameters recommendations in Expert Mode 16 3 1 Spinning If permitted by the parts and the parts carrier used rotating basket the drying can be made much easier by spinning of the remaining rinsing medium in the last rinse step Rinsex usually Rinse5 The then still to be evaporated using vacuum and cleanin...

Page 121: ... the parts basket with parts after the spinning 16 3 2 Vacuum drying Both parts and basket surfaces as well as the interior surfaces of the cleaning chamber are evenly dried in the Elmasolvex VA by evaporation of the last rinsing medium from the mentioned surfaces with running removal of the evaporated rinsing medium via the vacuum outlet of the cleaning chamber and subsequent delivery by heat rad...

Page 122: ...process of parts cleaning with vacuum drying 2 the basket in Dry2 must be programmed as slowly rotating 5 rpm to expose all rotating basket areas particularly in the area of the 2 heater elements to the outgoing radiation heat from the inner wall 3 in addition to the resistance to chemicals rotating baskets should have a material surface resembling an ideal black body a material with good thermal ...

Page 123: ...ree program independent 600 mbar short cycles are performed after each programmed cycle Compact metal parts however partially with cavities in hollow spaces also pipes with wall thickness in the internal diameter area are still wet after the standard drying with 12 cycles of 8 seconds each at 120 mbar The heat capacity here is usually sufficient to pass to a lower number of yet longer duration cyc...

Page 124: ...iling point of the last rinsing medium are essential for the drying duration they determine its dependency of the vapour pressure on the temperature pV T Media are required for the ultrasonic cleaning and the ultrasound supported rinsing steps that still do not boil during the necessary vacuum 125 bar and maximum permissible media heating to 45 C for explosion safety warning is output if 40 C is e...

Page 125: ..._VA_EN_Vers 05 2018 125 Fig 16 7 Comparison of the vapour pressure dependencies on the temperature for IPA isopropanol 2 propanol and the elma suprol pro hydrocarbon mixture The latter should be considered between the vapour pressure curves of its two components with the lowest and highest vapour pressure ...

Page 126: ...f approx 10 mbar and at 40 C when reaching approx 15 mbar Fig 16 7 The elma suprol pro rinsing medium like other transportable rinsing media by road rail and air as flammable liquids at still reasonable costs must not undercut a flashpoint of 23 C Unfortunately this does not allow any higher content of low boiling point and lower content of high boiling point components in the mixture This results...

Page 127: ...urth sub step the liquid is drained The fifth sub step is always executed without liquid Here you can also set parameters for spinning The drying process can be divided into two sub steps The actual drying function is achieved through the radiant heat of the heating and several vacuum aeration cycles in the chamber These parameters can be selected in the second sub step of the drying process The f...

Page 128: ...ilable in additional to the original program with just a few parameter changes Modify an existing cleaning program Recommended procedure if you would like to modify the parameters of an existing program The factory set predefined cleaning programs cannot be modified or deleted Programs which you create yourself may be copied modified or deleted at any time You can also delete your own existing cle...

Page 129: ...ode Fig 7 2 1 1b Create Change Programs expert mode display Use in the selection list to select Create New Program and confirm with Fig 7 2 1 1b The Enter Program Name Fig 7 2 1 2 display appears Navigate within any line of the character selection using Use to navigate between the 3 lines Use the button to delete any character that you entered Press to apply the selected character To save the ente...

Page 130: ...steps Fig 7 2 1 3 Fig 7 2 1 3 Display screen tabs with individual process steps Use to navigate between the tabs Press on the Cleaning tab to display sub steps for cleaning Fig 7 2 1 4 Navigate through the sub steps of the Cleaning process parameters in the same way as you navigate through the tabs of the entire cleaning program Specifying changing program parameters Specifying changing the Cleani...

Page 131: ...turn to the display screen with the process step tabs Fig 7 2 1 3 You can also press to return to the Program Selection display If you did not save your changes by pressing you will be prompted to save any changes when you press Fig 7 2 1 5 Fig 7 2 1 5 Save Settings display Use in the selection list to select the required action and confirm with Use Save Changes to save any amended settings and re...

Page 132: ...rom Copy display After you have selected the cleaning program to be copied the Program Name display appears Fig 7 2 2 2 The field for the program name initially contains the field for the program name with a number such as _0 You can change the name as desired To save the program name and continue to specify program parameters press Fig 7 2 2 2 Program Name display After you enter the program name...

Page 133: ... Programs display Fig 7 2 1 1 use to select Change Existing Program and confirm with The Change Program display appears and shows the existing cleaning programs Fig 7 2 3 1 Use to select the cleaning program for modification Standard_0 in the example below Fig 7 2 3 1 Confirm your selection with Fig 7 2 3 1 Change Program display After you select the cleaning program to be modified the Program Nam...

Page 134: ...g Program and confirm with Use to select the cleaning program for deletion Standard_0 in the example below Fig 7 2 4 1 Confirm your selection with Fig 7 2 4 1 Delete Program display You are then asked if you really want to delete the selected program Press to confirm the Delete Program command If you want to discard the command press Both actions will return you to the Delete Program display You c...

Page 135: ...Appendix 4 Expert Mode Elma Schmidbauer GmbH BA_Elmasolvex_VA_EN_Vers 05 2018 135 ...

Reviews: