


page 2
1. Unpacking Your Fan.
Carefully open the packaging. Remove items
from Styrofoam inserts. Remove motor housing
and place on carpet or Styrofoam to avoid
damage to finish. Do not discard fan carton or
Styrofoam inserts should this fan need to be
returned for repairs.
Check against parts inventory that all parts have
been included.
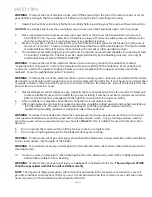
2. Parts Inventory.
a
. canopy. 1 piece
b
. hanging bracket.1 piece
c
. 4in. downrod and hanging ball. 1 piece
d
. motor housing. 1 piece
e
. blade arm. 5 pieces
f
. blade. 5 pieces
g
. hardware packs
a
d
e
f
g
b
c
IMPORTANT REMINDER
: You must
use the parts provided with this fan for
proper installation and safety.