27
FINISHING OFF
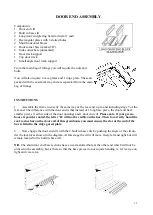
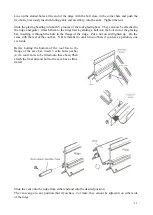
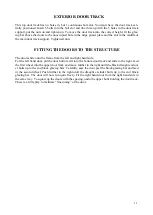
To prevent the door from sliding past its opening, you must fix 2 angle brackets to the door end as-
sembly. Insert a cropped head bolt into the bolt channel at the top of the left hand glazing bar
(viewed from the inside) and fix and angle bracket as shown in the picture below.
The bracket must be fitted at the same height as the door panel so that, as
the door moves left or right, the bracket prevents the door from moving too
far along the top door track.
Repeat at the bottom of the door
Repeat for the 2nd door
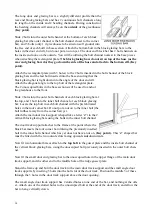
To facilitate smooth running of the door , fit 1 flat bar at each end of the top
door track.
The flat bar has 2 holes of different size.
Loosely fix the larger hole to the bolt channel at the back of the top door
track using a short bolt and allow the flat bar to hand vertically down.
Move the flat bar along the top door track until the small hole in the flat bar
meets the self tapping screw groove in the roof corner bar.
Fix the small hole in the flat bar to the corner bar using a self tapping screw.
FITTING THE CANOPY PLATE
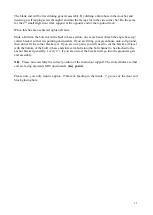
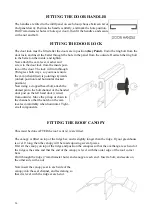
The canopy plate has 3 holes. Slide a LONG bolt (provided) into the external bolt slot of the glazing
bar above the door . Fit the canopy plate to this bolt, and put a nut on. Do not tighten yet. Now the
top 2 holes in the plate are fitted to the self tapping screw grooves in the ends of the roof canopy
using 1/2” colour coded screws provided. The canopy at the rear end is
secured only using the 2 self tapping screw fixings
Tighten all screws and nuts.
FITTING THE RAMP
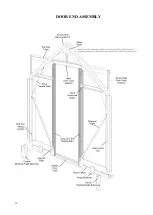
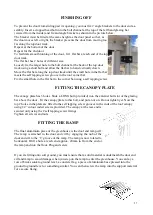
The final aluminium piece of the greenhouse is the door end ramp cill.
The ramp is attached to the door end cill by engaging the nub of the
door end cill to the ‘C’ groove of the ramp. The ramp is now rotated to
horizontal. Drill a hole at each end approx. 20mm in from the end of
the ramp and into the floor. Plug and screw.
If you are fitting onto soft ground, you must ensure that a solid material is underneath the door end
cill and ramp to avoid damage when you step on the ramp to enter the greenhouse. You can lay a
row of bricks sunk to ground level, a concrete flag, a piece of aluminium base pressed into the
ground to ground level or something similar. You can then screw the ramp into the support material
for a secure fixing.
Summary of Contents for 6'5" WIDE TITAN
Page 1: ......
Page 2: ...2 ...
Page 3: ...3 ...
Page 9: ...9 SIDE FRAME ASSEMBLY ...
Page 12: ...12 REAR END ASSEMBLY ...
Page 16: ...16 DOOR END ASSEMBLY ...
Page 19: ...19 ...
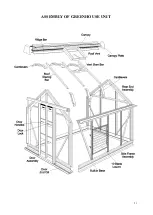
Page 21: ...21 ASSEMBLY OF GREENHOUSE UNIT ...
Page 32: ...32 ELITE 1803 ...

